


In the development of injection-molded cosmetic parts, surface texture and gloss are the most critical aesthetic control metrics, yet they are also the areas where it’s easiest to fall into pitfalls based on experience alone:
even with the same mold steel, visual color differences can be enormous depending on the treatment;
Soft materials like TPE and TPU suffer from severe mold sticking as soon as they’re molded on a mirror-finish mold;
The gloss of glass-fiber-reinforced products becomes brighter the more they’re polished during mass production;
And low-matte textures always leave weld lines and shrinkage marks completely exposed…
Many engineers adjust gloss levels solely by repeatedly testing sandblasting techniques and changing polishing grades, yet they never fully grasp the underlying, consistent logic.
This article systematically breaks down all the core principles of mold texture and gloss from four dimensions—optical principles, microstructure, process control, and material matching—to help you establish a comprehensive understanding spanning from design to mass production.
First, Let’s Debunk Three Common Misconceptions
Before delving into the principles, let’s first dispel three of the most common misconceptions in the industry—which are also the root causes of the vast majority of gloss and demolding issues:
Misconception 1: The Color of the Mold Steel Itself Determines the Gloss of the Molded Part
The natural color of the steel substrate has no bearing on the final gloss of the molded part.
Visual differences in brightness stem entirely from how the surface microstructure reflects light.
Misconception 2: The Shiner the Mold Is Polished, the Smoother the Demolding of the Plastic Part
A high-gloss mirror finish enhances the vacuum suction effect between the plastic part and the mold, which actually exacerbates sticking.
Under certain conditions, coarse-grit, grain-following polishing yields far superior demolding performance compared to a mirror finish.
Misconception 3: Surface Texture Depth is the Sole Factor Determining Gloss
Gloss is determined by two structural factors: the macroscopic geometric morphology of the texture and the microscopic surface finish of the texture.
The latter is the key to fine-tuning gloss on-site, yet it is most easily overlooked.
Underlying Principle: The essence of gloss is light reflection; textures have a dual-layer structure.
Optical Essence: The Interplay Between Specular Reflection and Diffuse Reflection
The level of gloss on a molded part is essentially a direct replication of the light reflection patterns from the mold surface:
1. Specular Reflection
When a surface is extremely smooth, light is reflected in a specific direction at a fixed angle.
The light reaching the human eye is concentrated, resulting in a high-gloss, high-brightness appearance.
2. Diffuse Reflection
When the surface has irregularities, light scatters in all directions, reducing the amount of directional reflection; visually, this appears as a matte finish with low gloss.
Consider a lake as an analogy: a calm, still water surface produces a dazzling reflection, corresponding to a specular high-gloss finish;
Gentle ripples caused by a light breeze correspond to a medium matte finish;
And rough waves caused by strong winds correspond to an extremely low-gloss finish.
The water itself does not change color; what changes is simply how the surface irregularities interact with the light.
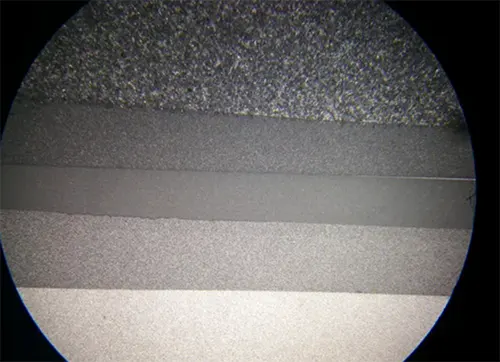
The image below visually demonstrates this principle:
Using the same mold steel—with identical base material composition and natural color—simply applying different surface treatments results in a striking visual difference ranging from deep dark to bright white.
Core Insight: The Two-Layer Texture Structure That Determines Gloss
This is a key point that the vast majority of professionals tend to overlook:
Mold surface texture is not a single structure, but rather consists of two layers that together determine the final gloss.
1. First Layer: Macro Texture Geometry
Large-scale irregularities formed by processes such as acid etching and electrical discharge machining, including texture depth, pattern spacing, contour clarity, and peak-valley morphology.
This layer determines the base level of gloss and is the primary focus of control during the appearance design phase.
2. Second Layer: Surface Finish
On the peaks and valleys of the macro-texture, there is an additional layer of finer micro-texture formed by post-processing techniques such as sandblasting and polishing.
This layer is central to the fine-tuning of gloss and serves as the primary means for on-site mold modifications and matching customer sample approvals.
Understanding this two-layer structure explains why, even with the same grain number, the gloss can vary significantly after different sandblasting treatments—the first layer remains unchanged, while the microscopic morphology of the second layer is altered.
Process Control: Sandblasting and Micro-Etching for Precise Gloss Control
After creating the base grain pattern through acid etching, sandblasting is the industry-standard process for calibrating gloss;
For applications requiring extremely low gloss, it is combined with a micro-etching process.
The core principle behind both methods is to control gloss by altering the microscopic surface finish of the second layer.
Mechanisms of Action for Two Core Sandblasting Media
The two most commonly used sandblasting media in the industry are aluminum oxide and glass beads.
While their particle shapes differ, their mechanisms of action are completely opposite, resulting in significant differences in the final finish:
| Media Type | Particle Shape | Working Mechanism | Microscopic Surface Effect | Plastic Gloss Appearance |
|---|---|---|---|---|
| Alumina abrasive | Irregular abrasive particles with sharp edges and corners | Cutting impact creates dense pits on the surface | Sharp peaks and deep concave pits | Matte finish; lowest gloss |
| Glass beads | Round, smooth spherical particles | Impact grinding; mainly smooths protruding edges | Smooth surface with shallow concave pits | Higher gloss; smoother surface |
Blending Ratios and Standard Formulations
Since aluminum oxide has a much stronger cutting effect than glass beads and exerts a greater influence on surface roughness, the standard ratio for a medium-gloss finish is not 1:1, but rather 1 part aluminum oxide to 2 parts glass beads.
Three industry-standard mass production options cover the vast majority of aesthetic requirements:
Low-gloss finish: Pure aluminum oxide blasting, suitable for anti-slip parts, matte structural components, and internal cover parts.
Medium-gloss grade: Aluminum oxide : glass beads = 1:2; the preferred choice for general-purpose appearance parts, balancing texture and yield.
High-gloss grade: Pure glass bead blasting, suitable for exterior housings requiring a soft, glossy finish.
If the three standard solutions do not meet sample approval requirements, custom ratios within the range of 1:1 to 12:1 can be specified to achieve continuous, fine-tuned adjustments to gloss.
Microetching: Achieving Uniform, Low-Gloss Finishes Through Chemical Methods
For parts that require an extremely matte finish and have complex cavity structures (deep ribs and numerous dead corners), sandblasting often fails to ensure uniformity.
In such cases, the \\microetching\\ process is employed.
The principle involves using chemical etching to overlay a layer of finer, micro-scale topography onto the existing macroscopic surface texture.
This is analogous to adding a layer of “fine ripples” to a “wavy lake surface,” causing secondary scattering of light and thereby achieving a uniform, stable low-gloss finish.
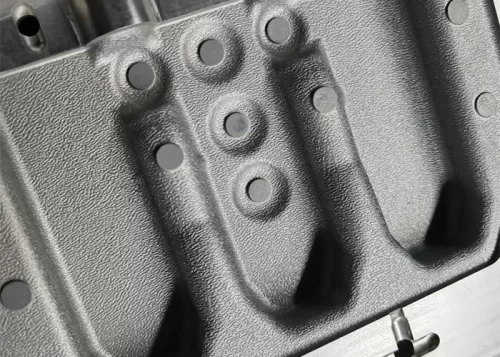
The image below shows the typical microscopic morphology of a microetched texture, clearly revealing a dual-layer topography: a layer of fine, dot-like pits overlying the larger-scale base texture.
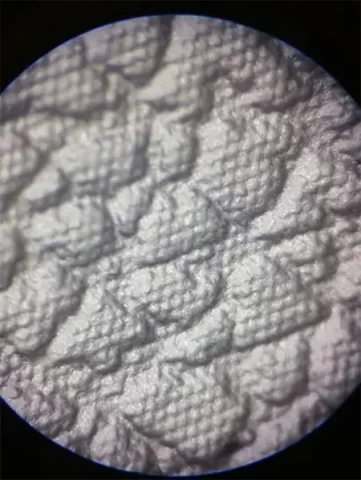
Compared to sandblasting, micro-etching offers the advantage of uniformity throughout the entire cavity, with no dead spots and no localized variations in brightness;
Its disadvantage is that the microstructure is more fragile, making it more susceptible to wear during mass production of fiberglass-reinforced materials.
Polishing Systems: Grading Standards and Logic for Optimizing Demolding
When a product requires a high-gloss or even mirror-like finish, a mold polishing process is necessary.
However, when it comes to polishing, “brighter is not necessarily better”;
The appropriate method must be selected based on a comprehensive evaluation of material properties and demolding requirements.
SPI Mold Polishing Grade Standards
The industry-standard SPI polishing grades are divided into four categories: A, B, C, and D, ranging from a mirror-like high gloss to a sandblasted matte finish.
Each grade corresponds to specific processing materials and surface finishes:
| Grade | Abrasive / Processing Medium | Surface Characteristics | Typical Applications |
|---|---|---|---|
| A1 | #3 Diamond paste | Optical-grade mirror surface; highest gloss | Lenses, transparent parts, exterior components with high-end mirror finishes |
| A2 | #6 Diamond paste | High-grade mirror surface with fine, uniform reflection | High-end consumer electronics housings, glossy decorative parts |
| A3 | #15 Diamond paste | Satin surface with fine semi-gloss finish | Medium-gloss exterior components |
| B1 | 600-grit sandpaper | Fine sandpaper semi-gloss finish | General appliances, automotive interior decorative parts |
| B2 | 400-grit sandpaper | Medium-grit sandpaper finish | Standard exterior components |
| B3 | 320-grit sandpaper | Coarse sandpaper semi-matte finish | Compromise applications requiring both gloss and ease of demolding |
| C1–C3 | Oil stone | Rough polishing and removal of tool marks | Pre-polishing process; not used as the final surface finish |
| D1–D3 | Sandblasting | Matte, textured surface | Matte finishing, anti-slip surfaces, improved demolding |
Draw Polishing: An Underestimated Technique for Optimizing Mold Release
Draw polishing refers to the final polishing step, in which the surface is polished strictly along the draft direction of the plastic part.
This is a process detail that is extremely low-cost yet offers significant benefits for mold release.
Principle: Polishing inevitably leaves microscopic scratches.
When these scratches run along the draft direction, they effectively form micro-venting channels that quickly break the vacuum adhesion between the molded part and the mold;
At the same time, scratches running in the same direction have no transverse undercuts and do not increase demolding resistance.
Key Conclusion: Coarse-grit draw polishing yields far superior demolding performance compared to high-precision, random-pattern mirror polishing.
Even with A1-grade diamond mirror polishing, microscopic polishing scratches still exist;
If the scratch orientation is random, it can actually create a micro-interlocking effect that exacerbates mold adhesion.
A Compromise Solution for Soft Materials Sticking to Molds
Thermoplastic elastomers such as TPU and TPE, as well as polypropylene (PP), are inherently highly adhesive materials.
They are extremely prone to vacuum adhesion on high-gloss mirror surfaces, leading to severe mold sticking, white marks, and warping.
If a matte finish is acceptable: Prioritize sandblasted surfaces, as the microscopic irregularities disrupt the vacuum—this is the most cost-effective solution;
If a glossy finish must be retained: We recommend polishing with 320-grit sandpaper in the direction of the grain.
This is an industry-proven, optimal compromise that preserves a certain level of gloss while ensuring adequate demolding performance.
Mass Production Stability: Material Matching and Appearance Control
The gloss scheme selected during the design phase must be validated in light of the characteristics of the materials used in mass production; otherwise, issues such as production drift and low appearance yield rates are likely to occur.
Glass Fiber-Reinforced Plastics: Root Causes and Solutions for Gloss Drift
During mass production of glass fiber-reinforced plastics (such as PA+GF and PP+GF), the phenomenon of “increasing gloss with repeated molding” is commonly observed.
The root cause lies in the following:
The hardness of glass fibers is significantly higher than that of mold steel.
During prolonged injection molding, high-speed flowing glass fibers continuously erode the microscopic peaks and valleys of the surface texture, gradually smoothing the surface, reducing diffuse reflection, and causing the gloss to increase over time.
Mass Production Solutions
1. Select hardened die steel as the mold base material to enhance basic wear resistance;
2. Apply a wear-resistant coating to the cavity surface (e.g., DLC, hard chrome plating, nitriding);
3. Allow for a gloss margin during the design phase, setting the initial gloss slightly below the target value so that it falls exactly within the acceptable range after wear;
4. Periodically reapply a coating to the mold cavities to restore their micro-roughness.
The Gloss Magnification Effect on Appearance Defects
Gloss levels are directly related to the visibility of appearance defects, which is a critical consideration during the design phase:
When the 60° gloss reading is below 3, the plastic part has a very matte finish; diffuse reflection makes shadows cast by minor surface irregularities, weld lines, shrink marks, and flow marks more pronounced, significantly magnifying these defects;
Medium- to high-gloss surfaces rely primarily on specular reflection, where minor defects are masked by strong light, resulting in a higher appearance yield.
Maintenance Guidelines for High-End Mirror-Finish Molds
Molds with diamond-grade mirror finishes incur exponentially higher processing costs, and repairs are extremely difficult once damage occurs;
Therefore, strict maintenance guidelines must be followed.
Minimize Contact; Do Not Wipe Dry
Minimize contact between the mold surface and any foreign objects as much as possible, including specialized lint-free wipes.
Tiny particles of debris on the wipe or the mold surface can leave irreversible scratches on the mirror finish.
Standard Cleaning Procedure
The standard cleaning procedure for optical lens molds is as follows:
First, spray a specialized mold cleaner onto the surface, then use clean compressed air to blow the cleaner away.
Direct wiping is strictly prohibited throughout the entire process.
Repairs by Qualified Personnel
Mirror surface repairs must be performed by professionally trained polishing technicians.
Diamond polishing requires the use of wooden polishing blocks or felt polishing pads.
Selecting the wrong type of polishing compound, polishing tool material, or employing incorrect techniques can cause permanent damage to the mold.
Key Findings from the Project
1. The gloss of plastic parts is unrelated to the natural color of the mold steel;
It is entirely determined by the light reflection patterns of the surface microstructure.
2. Gloss is controlled by a two-layer structure: macroscopic texture geometry sets the baseline level, while microscopic surface finish provides fine-tuning.
3. Aluminum oxide is primarily used for low gloss, while glass beads are primarily used for high gloss;
The standard ratio for medium gloss is aluminum oxide : glass beads = 1:2.
4. Polishing brightness is not directly proportional to demolding performance;
Coarse polishing along the grain yields better demolding results than random mirror-finish polishing.
5. For materials prone to sticking to the mold, such as TPU, TPE, and PP, use mirror-finish polishing with caution;
320-grit polishing along the grain is a universal compromise.
6. Molds for glass-fiber-reinforced materials must be reinforced for wear resistance; otherwise, the gloss level will continue to increase during mass production.
7. Low gloss magnifies surface defects; for parts with high aesthetic requirements, prioritize medium-to-high gloss with a textured finish.
8. Maintaining diamond-mirror molds is extremely challenging; both cleaning and repairs must be performed strictly according to standards.