China CNC Milling » Blog » Clamping Method for Through-Hole Chamfering of High-Precision Plastic Sheets
FAQ
What materials can you work with in CNC machining?
We work with a wide range of materials including aluminum, stainless steel, brass, copper, titanium, plastics (e.g., POM, ABS, PTFE), and specialty alloys. If you have specific material requirements, our team can advise the best option for your application.
What industries do you serve with your CNC machining services?
Our CNC machining services cater to a variety of industries including aerospace, automotive, medical, electronics, robotics, and industrial equipment manufacturing. We also support rapid prototyping and custom low-volume production.
What tolerances can you achieve with CNC machining?
We typically achieve tolerances of ±0.005 mm (±0.0002 inches) depending on the part geometry and material. For tighter tolerances, please provide detailed drawings or consult our engineering team.
What is your typical lead time for CNC machining projects?
Standard lead times range from 3 to 10 business days, depending on part complexity, quantity, and material availability. Expedited production is available upon request.
Can you provide custom CNC prototypes and low-volume production?
Can you provide custom CNC prototypes and low-volume production?
Hot Posts
The design requirements for thin-walled, thin-plate structural components are to reduce product weight while ensuring structural strength.
This paper investigates and analyzes the milling process of high-precision plastic thin plates.
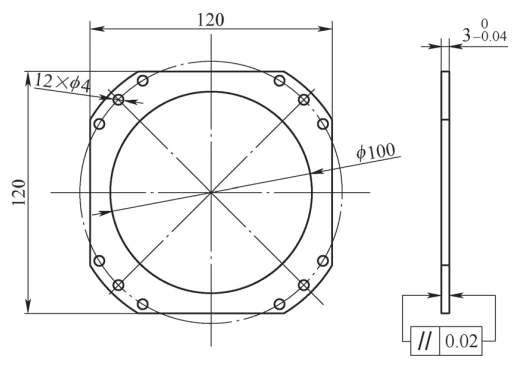
The focusing spacer ring shown in Figure 1 is made of 2A12-T4 aluminum alloy, with the following technical specifications:
- Part thickness: 3 mm
- Machining allowance: 0.5 mm
- Hole chamfer: 0.3 mm
- Surface roughness value Ra: 1.6 μm
Both the side walls and edge strips of the part feature arc-shaped structural connections.
Due to these structural characteristics, the part exhibits poor rigidity, challenging workpiece clamping, and difficult-to-control geometric tolerances, all of which impact product quality.
Analysis of Machining Challenges
The focusing spacer wall thickness of the objective lens barrel measures only 3-0.040 mm.
Due to the workpiece’s thin wall thickness, poor rigidity, low strength, and lack of clamping points, it is highly susceptible to deformation under machining stresses and clamping methods, making dimensional and geometric tolerances difficult to guarantee.
The key to successful machining lies in rationally designing the process plan and tooling, and correctly selecting the clamping method.
Grinding offers high precision, but analysis of the part’s machining challenges indicates that high-precision plastic thin-plate surfaces are unsuitable for grinding.
Non-ferrous metals exhibit good plasticity and toughness but lower hardness.
From a cutting perspective, while grinding wheels possess self-sharpening properties, chip and fragmented abrasive clogging diminishes their cutting performance.
From a clamping perspective, these non-magnetic materials pose safety risks when clamping thin plate surfaces directly, as they cannot withstand direct clamping forces.
Consequently, grinding cannot be used for machining the flat surfaces of non-ferrous metals and their alloys. Under current conditions, milling is the only viable method.
Issues in Milling Operations
Milling the focusing spacer ring of an objective lens also presents numerous challenges. Conventional clamping methods often fail to meet requirements.
The characteristics of universal fixtures and the stress conditions during part clamping frequently result in unreliable clamping and unstable quality during machining, adversely affecting part quality.
Vise clamping is also unreliable, as parts are prone to deformation under clamping force, making dimensional tolerances difficult to guarantee.
While clamping plates provide larger contact areas and balanced force distribution, they suffer from poor tool engagement control and severe workpiece deformation.
During flat milling, segmented tool engagement requires frequent plate repositioning, making it difficult to maintain geometric tolerances at the engagement points.
Clamping Method
Given the thin-walled structure and low rigidity of the focusing spacer ring, selecting an appropriate clamping method is essential to ensure machining accuracy and prevent deformation.
Traditional flat clamping, vise gripping, or standard fixture compression cannot provide both stability and protection for such a delicate part. Therefore, the clamping design must consider three critical factors:
Minimizing deformation caused by external force — Even small clamping forces can distort the thin 3 mm walls.
Ensuring repeatable positioning accuracy — Since the part includes arc-shaped sidewalls and curved edge strips, locating surfaces are limited.
Maintaining full accessibility for milling — The clamping approach must avoid blocking cutter paths, especially when milling inner and outer contours and ensuring smooth transitions between engagement points.
To meet these requirements, a customized clamping strategy is needed—one that utilizes available geometrical features, reduces stress concentration, and distributes pressure evenly.
Additionally, due to the part’s circular structure, relying on side-wall pressing would introduce torsion, further increasing deformation risk.
This leads to the adoption of a hole-based clamping method, enhanced with micro-chamfering to create a secure yet low-stress interface between the countersunk screw and the part.
1. Solution
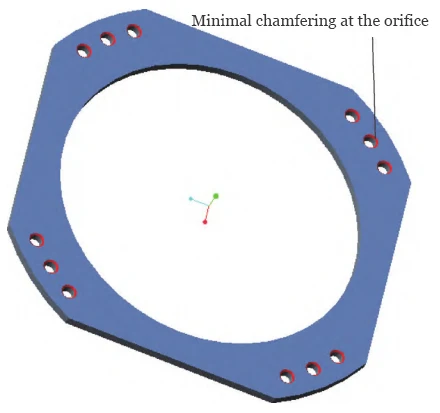
To control deformation, the part is positioned using the end face and holes, with clamping via four peripheral through-holes.
Considering the part’s unusual shape, these four through-holes cannot provide sufficient clamping force.
Therefore, a 0.3mm x 45° chamfer is applied to the hole edges, utilizing micro-chamfer clamping. The micro-chamfering of the hole edges is shown in Figure 2.
2. Technical Principle
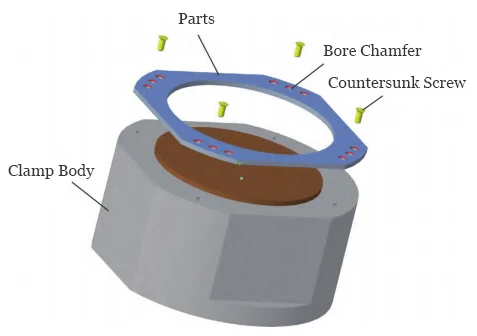
Part clamping is illustrated in Figure 3.
The part’s locating surface closely contacts the clamping fixture, ensuring positioning accuracy to guarantee dimensional and geometric precision.
The through-hole clamping method employs a slight chamfer at the hole opening.
Countersunk screws are partially countersunk into the part, utilizing the slight contact between the screw’s countersunk face and the hole opening chamfer to achieve clamping.
Since the size of the slight chamfer at the hole opening must be controlled to ensure adequate cutting depth, the dimension of the countersunk screw’s countersunk face embedded in the part should be smaller than the cutting depth.
3. Clamping and Machining Steps
The specific steps are as follows:
1) Mount the fixture on the machine tool and calibrate the fixture’s locating surfaces using a dial indicator.
2) Chamfer the part’s hole edges by 0.3mm x 45° plus machining allowance. Calculate each machining pass at 0.05~0.15mm per face.
For the four peripheral through-holes used for clamping, chamfer the hole edges by 0.35~0.40mm.
Note: Chamfers on clamping holes must be consistent.
Small chamfers directly reduce machining allowance, while large chamfers compromise part compliance with technical requirements.
For thin-plate parts, reduce cutting depth to prevent unnecessary deformation.
3) Clean positioning surfaces and part mounting surfaces.
When locating the workpiece, only verify that design reference points, lines, and surfaces occupy correct positions within the process system.
4) Mount the part in the core and align the clamping holes.
Install the part in the fixture, ensuring the locating reference coincides with the dimensional reference.
5) Insert screws into the clamping holes and tighten them sequentially.
6) Perform micro-milling on the machined surfaces.
7) Remove the workpiece.
During operation, steps 2–7 are repeatedly performed. Multiple passes with a 0.5mm machining allowance and incremental cutting consistently reduce errors.
After repeated milling, error accumulation diminishes progressively until eliminated.
This iterative micro-cutting process controls flatness while minimizing unnecessary deformation.
Processing Verification
The focusing spacer ring for the objective lens barrel was machined on an X52K milling machine using the plastic thin-plate flat-bore pressing method.
A φ160mm right-angle face milling cutter was employed as the milling tool, with micro-cutting parameters applied.
The cutting parameters for the objective lens barrel focusing spacer ring are detailed in Table 1.

After multiple iterations of micro-cutting, inspection confirmed that the finished high-precision plastic sheet met all design specifications.
The actual deviation for the 3mm dimension remained within 0.015mm, while the parallelism between both surfaces was controlled within 0.02mm.
Conclusion
Due to their inherent properties, plastic parts cannot be secured using electromagnets during grinding operations, while irregular geometries impose limitations on vacuum suction cup usage.
This paper addresses the challenges of clamping and face milling high-precision plastic thin plates by improving machining methods and clamping techniques.
It employs a positioning method based on the end face and inner hole, combined with a clamping approach utilizing four peripheral through-holes with micro chamfers.
This solution meets the design requirements for dimensional accuracy, geometric tolerances, and surface quality in the milled surfaces, providing a reference for machining similar components.
