China CNC Milling » Blog » Research on the Error Control Method for Five-Axis CNC Machine Tool Machining based on Digital Twin
FAQ
What materials can you work with in CNC machining?
We work with a wide range of materials including aluminum, stainless steel, brass, copper, titanium, plastics (e.g., POM, ABS, PTFE), and specialty alloys. If you have specific material requirements, our team can advise the best option for your application.
What industries do you serve with your CNC machining services?
Our CNC machining services cater to a variety of industries including aerospace, automotive, medical, electronics, robotics, and industrial equipment manufacturing. We also support rapid prototyping and custom low-volume production.
What tolerances can you achieve with CNC machining?
We typically achieve tolerances of ±0.005 mm (±0.0002 inches) depending on the part geometry and material. For tighter tolerances, please provide detailed drawings or consult our engineering team.
What is your typical lead time for CNC machining projects?
Standard lead times range from 3 to 10 business days, depending on part complexity, quantity, and material availability. Expedited production is available upon request.
Can you provide custom CNC prototypes and low-volume production?
Can you provide custom CNC prototypes and low-volume production?
Hot Posts
Five-axis CNC machines are widely used in high-precision complex surface machining.
They are characterized by multiple interconnected axes and frequent tool orientation changes.
These factors make machining accuracy susceptible to various disturbances.
Inaccurate angular positioning, unstable orientation switching, and tool tip displacement become primary sources of error, directly impacting part forming quality.
Traditional control methods predominantly rely on static corrections, struggling to adapt to the real-time dynamic requirements of five-axis machining.
Digital twin technology possesses the capability to dynamically represent machining process information, enabling the identification of critical error sources and aiding in machining state analysis and precision adjustment.
This paper focuses on typical error manifestations, integrating tool orientation, spatial trajectory, and rotational motion characteristics to propose a digital twin-based machining error control method.
Relevant experiments were conducted to validate its effectiveness in enhancing machining precision.
Sources of Machining Errors in Five-Axis CNC Machines
Rotary Axis Indexing Positioning Error
The rotary axis in five-axis CNC machines handles tool orientation adjustment and angular indexing, with its positioning accuracy directly impacting spatial orientation precision.
During indexing of the A and C axes, angular commands are transmitted from the servo drive unit to the reduction gear and rotary assembly.
These commands often exhibit deviations due to backlash, transmission lag, and load disturbances.
As a result, angular errors can reach up to ±0.02°.
Loose worm gear meshing, elastic backlash in harmonic reducers, and uneven force distribution in cycloidal gears can cause short-term angular overshoot and rollback.
This occurs when start-stop frequencies exceed 10 times per minute.
These effects lead to cumulative repeatability errors.
Encoder resolution below 0.001° induces quantization errors in feedback signals, compromising closed-loop control accuracy.
Bearing clearance expansion and sleeve thermal expansion exceeding 15μm reduce shaft system rigidity, further degrading indexing action stability and consistency.
Posture Switching Impact Error
During posture switching on five-axis CNC machines, the A and C axes typically execute rapid turns at angular velocities ranging from 30°/s to 90°/s.
Maintaining synchronized motion commands among axes during high-speed interpolation proves challenging, resulting in instantaneous response delays exceeding 10ms and causing abrupt tool axis direction jumps.
At attitude interpolation nodes, if angular acceleration changes abruptly by over 500°/s², servo drives exhibit tracking errors.
This causes abrupt tool orientation discontinuities, resulting in angular discontinuities on the machined surface.
In regions with abrupt angular changes, if the interpolation segment angle exceeds 3°, insufficient curvature transition during attitude conversion significantly increases impact errors.
This manifests as deformation of the machined edge profile and deviation in the tool’s spatial orientation.
This type of error primarily occurs in spatial free-form surface interpolation segments, with its impact range tending to expand as angular velocity increases and directional change frequency rises.
Attitude switching impact error represents a typical dynamic disturbance source during five-axis interpolation, significantly affecting tool axis directional stability and machining consistency.
Tool Tip Trajectory Drift Error
During high-speed simultaneous interpolation, the spatial position of the tool tip can deviate from its intended trajectory.
This deviation occurs due to multi-axis synchronization accuracy, inconsistent axial acceleration and deceleration, and feedback lag.
If any axis experiences command delay exceeding 5ms during coordinated motion of the X, Y, Z linear axes and AC rotary axes, the tool tip position will deviate from the theoretical trajectory by more than 0.02mm.
When angular position changes superimpose on linear displacement, minute angular errors are projected into three-dimensional space.
This causes deviation between the actual cutting point and the ideal position, manifesting as contour indentations or abnormal surface textures.
Latency in lead screw backlash compensation, thermal-induced shaft deflection, and servo system response jitter can all cause transient tool point shifts.
These errors accumulate more readily in regions of continuous curvature change, becoming direct sources of spatial interpolation error.
Tool tip trajectory deviation errors exhibit transient, non-periodic, and position-dependent characteristics.
They frequently occur concurrently with sudden feed rate changes or posture switching actions.
In severe cases, they can cause point-to-point jumping in free-form surface areas, compromising machining accuracy stability and local surface consistency.
Processing Error Control Method Based on Digital Twin
Construction of Rotary Shaft Error Model
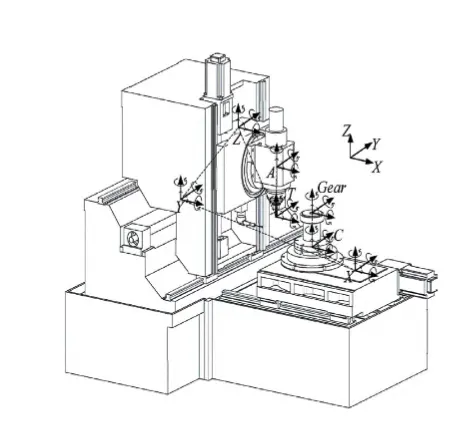
To control rotational errors, a synchronous mapping channel is established on the digital twin platform.
Real-time injection of rotational motion response parameters into the virtual end creates an error recording interface dynamically consistent with the physical end, as shown in Figure 1.
The sampling frequency is set to 500 Hz, covering the angular velocity range of 10–90°/s.
Time series data for command angle, feedback angle, and steady-state angle are recorded, and the distribution characteristics of lag angle, backlash, and overshoot in the angular position deviation curve are extracted.
Machine tool characteristics—including shaft system stiffness, backlash allowance, thermal expansion coefficient, and rotational inertia—were loaded into the digital twin.
This enabled the construction of a unified static-dynamic error mapping.
This separated repeatable errors from non-repeatable disturbance components.
For worm gear transmission, auxiliary shaft locking clearance, and harmonic gear ring deformation, simulate cumulative angular errors under high-frequency switching excitation.
Then, correct the resulting angular positioning drift trends.
Train interpolation relationships using axial feedback and measured error data to establish an angular deviation interpolation table.
Select three key input variables—angular velocity change rate, load disturbance amplitude, and start-up delay time—to form an error partitioning matrix.
The digital twin platform compares virtual-physical feedback discrepancies, records error evolution trajectories, and calibrates angular position error thresholds sequentially.
These thresholds enable real-time control invocation and rotational compensation adjustment.
This method achieves precise angular mapping between command inputs and posture outputs, meeting high-frequency positioning accuracy requirements for five-axis CNC machine tools.
Monitoring and Extraction of Tool Spindle Attitude Changes
Tool spindle attitude changes exhibit high-speed, multi-frequency, and small-amplitude angular fluctuations, which can easily induce sudden feed direction changes and cause tool tip deviation behavior.
Employing a digital twin real-time monitoring approach, virtual tool axis attitude data is frame-synchronized with actual angular measurements.
The rotational angles of the B-axis (used for attitude modeling) and the physical C-axis serve as primary measurement values.
High-precision angle encoders are deployed at 5° intervals.
They operate with a sampling frequency of 2000 Hz and an acquisition cycle not exceeding 2 ms.
This setup ensures comprehensive signal coverage throughout the entire attitude change process.
› Tool Axis Vector Modeling and Posture Deviation Extraction
Convert the acquired B-axis and C-axis angle values into tool axis direction vectors and embed them into the digital twin’s posture library.
Match the corresponding theoretical posture sequence, then combine tool length-to-diameter ratio and clamping point offset to calculate posture angle deviation.
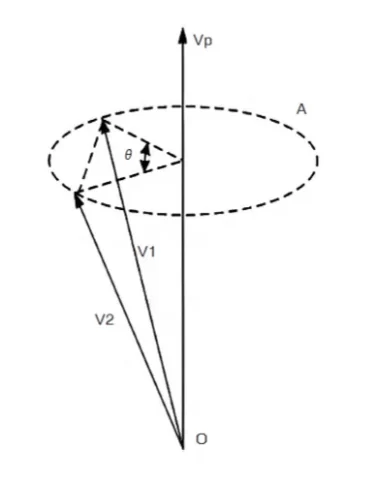
Output a set of posture difference vectors. As shown in Figure 2, the tool axis direction at each time point can be represented as a vector.
The directional angle between adjacent time points constitutes the core parameter for attitude fluctuation, serving as the key basis for identifying abrupt switching behavior and angular cumulative offset.
To enhance recognition accuracy, the system employs a synchronized approach combining time stamps and interpolation segment indices.
This confines tool axis deviation behavior to independent calculations within each G-code segment.
A threshold of ±0.05 rad/s for the angular deviation rate is set to identify abrupt posture transition points.
Each set of posture change data undergoes spatial posture projection processing in virtual space.
By leveraging the variation patterns of the tool tip direction vector and the angle between the clamping direction at the previous moment, a posture transition sequence is constructed.
Continuous extraction of angle fluctuation trends and angular distribution in the axis interference zone forms a visual posture change spectrum for error source traceability comparison.
Spatial Tool Tip Trajectory Deviation Identification
Five-axis CNC machines frequently experience tool tip positional shifts during complex surface machining.
This necessitates precise identification and deviation localization of the tool’s spatial trajectories.
Digital twin technology is used to achieve this.
Real-time acquisition of theoretical tool tip positions and actual trajectory coordinates measured by laser interferometers is performed at 100 ms intervals.
These data are used to update spatial point comparisons. This process constructs a point cloud sequence of tool tip trajectories.
Trajectory comparison uses the theoretical feed vector of the interpolation segment as the reference.
The angle between the actual displacement direction of the tool tip and the commanded direction is calculated.
The deviation threshold is defined as an angle exceeding 0.15 rad or a point displacement exceeding 0.03 mm.
All identified deviation points are mapped into the digital twin 3D space by interpolation segment number.
Combined with B-axis and C-axis indexing records, this captures correlation features between deviation clusters and posture transition segments.
Cubic spline interpolation reconstructs continuous trajectory curves.
It calculates the maximum normal error between theoretical and measured trajectories.
It also locates interpolation time windows corresponding to error extrema points.
Based on this dataset, a trajectory deviation hotspot map is established and integrated into the digital twin virtual machining space.
This enables visual representation of error trends while dynamically annotating high-frequency disturbance segments in conjunction with tool axis posture history sequences.
This aids in identifying deviation sources and provides reference for compensation adjustments.
Control Parameter Compensation Output
Compensation output uses the digital twin virtual machining space as its carrier.
It generates real-time control parameter correction values for five-axis CNC machines.
These values are based on rotary axis error models and tool axis posture recording data.
› Rotary Axis Angular Compensation Calculation and Output
Addressing the indexing lag characteristics of the C-axis and B-axis, theoretical and measured rotational angles are extracted at the endpoint of each interpolation segment.
After calculating angular deviation and response delay time, the axial command adjustment value is back-calculated.
To ensure the feasibility and precision support of the angular deviation correction calculation at the end of the interpolation segment, the angular compensation value Δθ is solved according to the relationship in Equation (1):
-1.jpg)
Among these, θt represents the theoretical rotation angle, θm denotes the measured angle, ωm indicates the measured angular velocity, t∆ signifies the response delay time, and kp and kd respectively denote the proportional gain and derivative gain coefficients of the control system.
This formula comprehensively accounts for the effects of command response lag and inertial dynamic offset on the rotation axis.
The output ∆θ serves as the axial command correction input for the B/C axes, enhancing the accuracy of virtual-to-real mapping and control stability.
› Tool Tip Trajectory Compensation and G-Code Injection Strategy
Tool tip trajectory compensation compares measured point clouds with the theoretical trajectory to identify the time interval with the maximum normal error.
The compensation direction and amplitude are then determined based on the combined posture and feed vector.
Compensation values are injected into simulation channels in virtual space, validated through closed-loop testing at 100ms cycles, and feedback-adjusted within correction intervals.
The CNC system indexes by NC line number. It splits angular and positional compensation into G-code templates.
These templates are batch-injected in 5-line interpolation segments.
This process generates compensation files for command updates prior to physical machining.
To prevent abrupt attitude changes, compensation magnitude constraints are set: maximum adjustment for B/C axes ≤ 0.2°, spatial compensation at tool points ≤ ±0.05mm.
Smooth transition zones are established between segments to maintain continuity in the five-axis interpolation trajectory.
Experimental Validation
Experimental Design
The experiment was conducted on a five-axis CNC machine equipped with a HEIDENHAIN linear encoder and a cantilever-type laser interferometer.
The spindle rotation range was -120° to +120°, with a worktable rotation range of 360°.
The machining material selected was 45# steel, with dimensions of 100mm × 50mm × 20mm.
The machining task involved complex cavity features with multi-axis contouring.
The experiment comprised two groups. The control group employed traditional error parameter settings without compensation operations.
The experimental group implemented a digital twin-based control parameter compensation strategy.
Compensation values were applied to modify machining commands based on the rotary axis error model, monitoring of tool axis posture changes, and spatial tool point trajectory deviation identification results.
Each group completed 10 identical toolpath machining processes.
During machining, a laser probe and a coordinate measuring machine (CMM) were used to extract real-time key tool point positions, orientations, and trajectory deviation values.
The maximum error, average error, and standard deviation of each measurement point were recorded.
Error data was collected at a resolution of 0.001mm with a sampling frequency of 20Hz.
The original trajectory data was registered and compared with the actual post-machining trajectory.
This comparison validated the control effectiveness of compensation across three metrics: rotational angle error, tool axis attitude angle error, and spatial offset error of the cutting point.
Analysis of Experimental Results
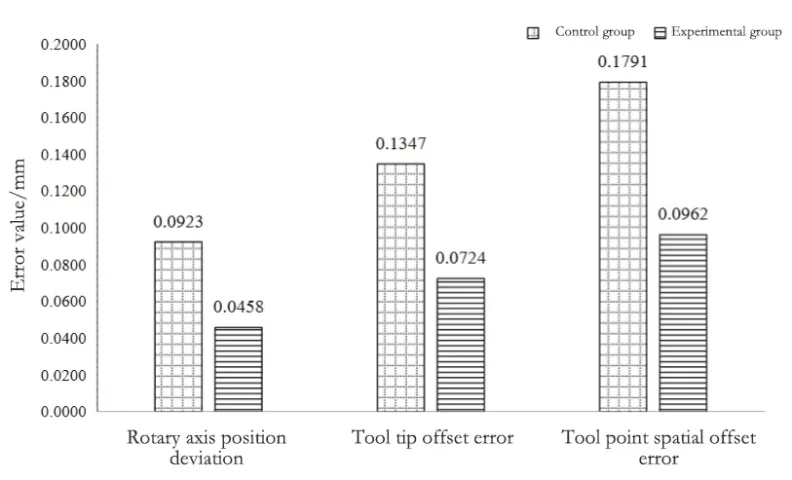
The difference in error results between the control group and the experimental group is shown in Figure 3.
The rotational axis position deviation decreased from 0.0923 mm to 0.0458 mm.
This indicates that the error model effectively describes the impact of rotational axis positional shift on the actual tool tip position.
As a result, axial fitting accuracy is improved.
The tool tip offset error decreased from 0.1347 mm to 0.0724 mm.
This verifies the sensitivity of the attitude angle monitoring extraction method to minute changes in tool axis posture.
It also enhances the mapping capability between attitude variation and positional deviation.
The spatial offset error of the tool tip decreased from 0.1791 mm to 0.0962 mm.
This reflects that the coordinated strategy of tool tip trajectory deviation identification and compensation output has a significant corrective effect.
It reduces the impact of composite error superposition on forming accuracy.
The downward trends in all three metrics indicate robust model chain integrity and stable feedback mechanisms, with balanced error suppression capabilities.
This demonstrates the practical ability of digital twin control methods to maintain spatial tool tip trajectory consistency under multi-source disturbance scenarios.
Conclusion
In summary, five-axis CNC machines encounter critical challenges in high-precision machining, including rotary axis indexing errors, posture switching impacts, and tool tip trajectory drift.
The error control method based on digital twins effectively enhances machining accuracy.
It does so by constructing rotary axis error models and extracting tool axis posture changes.
It also identifies spatial tool point trajectory deviations and outputs control compensation values.
Experimental results demonstrate significant reductions across all critical error metrics, validating the method’s adaptability and practicality under complex operating conditions.
Future research should focus on expanding real-time coupling mechanisms between digital twin models and actual machining environments.
This will enhance feedback responsiveness and system adaptability.
Ultimately, it will advance the integration of intelligent five-axis machining with precision manufacturing.
