China CNC Milling » Blog » Research on Machining Processes for Complex Spatial Components
FAQ
What materials can you work with in CNC machining?
We work with a wide range of materials including aluminum, stainless steel, brass, copper, titanium, plastics (e.g., POM, ABS, PTFE), and specialty alloys. If you have specific material requirements, our team can advise the best option for your application.
What industries do you serve with your CNC machining services?
Our CNC machining services cater to a variety of industries including aerospace, automotive, medical, electronics, robotics, and industrial equipment manufacturing. We also support rapid prototyping and custom low-volume production.
What tolerances can you achieve with CNC machining?
We typically achieve tolerances of ±0.005 mm (±0.0002 inches) depending on the part geometry and material. For tighter tolerances, please provide detailed drawings or consult our engineering team.
What is your typical lead time for CNC machining projects?
Standard lead times range from 3 to 10 business days, depending on part complexity, quantity, and material availability. Expedited production is available upon request.
Can you provide custom CNC prototypes and low-volume production?
Can you provide custom CNC prototypes and low-volume production?
Hot Posts
In modern manufacturing, technology is advancing rapidly. At the same time, demands for product performance are continually increasing. As a result, the use of spatially complex parts has become increasingly widespread.
These components typically feature intricate geometries, high-precision dimensional requirements, and stringent geometric tolerance standards.
Their machining quality directly impacts the overall performance and reliability of the entire product.
Consequently, achieving efficient and precise machining of spatially complex parts has emerged as a significant challenge in the manufacturing sector.
Challenges and Innovations
Traditional machining methods often face many difficulties when handling such components.
These include low processing efficiency, challenges in maintaining machining accuracy, and frequent tool interference issues.
Multi-axis CNC machine tool technology continues to advance and improve.
As a result, manufacturers now apply four-axis and five-axis machining centers more widely in modern manufacturing processes.
Challenges in Traditional Machining and Advances in Multi-Axis CNC
Compared to traditional machining methods, multi-axis machining centers provide greater processing flexibility and precision.
This makes them especially suitable for machining parts with complex spatial surfaces and structures.
However, advanced equipment alone is not enough to achieve efficient and high-quality machining of spatially complex parts.
Rational process planning and optimization are equally important.
Research Advances and Methodologies for Complex Component Machining
Yuan Ming addressed the challenge of ensuring machining accuracy for thin-walled discs, which are prone to deformation because of low material rigidity.
He proposed a deformation control method for machining complex thin-walled disc parts made of high-temperature alloys.
Gao Hongliang focused on precision machining systems to carefully analyze part processing workflows.
He investigated the precision levels required for complex components and thoroughly discussed the practical development of machining systems.
His work laid theoretical foundations for enterprises to advance their machining processes.
Liu Yongqing et al. proposed CNC machining techniques for complex gearbox housing components through tool selection, path optimization, and surface roughness control.
Innovative Machining Strategies and Trajectory Planning
Ye Long used a complex turbine blade surface machining project as an example.
He calculated machining trajectories with projection methods to obtain tool contact point parameters and carried out a simulation analysis.
Wang Fuqiao planned ultra-precision multi-axis milling trajectories for complex curved parts.
During multi-axis contour milling, the operator adjusted the tool axis orientation and projection direction.
This generated smooth trajectories on complex curved surfaces and ensured milling quality.
Wang Jianping et al. discussed micro-cutting equipment and tool system configurations.
The researchers examined the characteristics and process requirements of micro-machining, as well as tool and parameter selection for complex surface micro-cutting.
They also addressed practical machining issues.
Addressing Specialized Challenges in Machining
Chen Baolai et al. addressed shortcomings in small-diameter thread hole machining.
These included inconsistent results, low efficiency, excessive reliance on specialized fixtures, and susceptibility to positive taper during thread milling.
They proposed and designed dedicated thread milling cutters for such applications.
Sun Jiadong et al. addressed the challenges in machining surfaces and inclined holes on long spar-type components.
They rationally designed machining plans and arranged process routes.
Engineers adopted high-speed milling, implemented layered milling programming strategies, and added process stiffeners.
These measures effectively reduced deformation during mechanical processing.
Wang Guodong optimized the machining process for complex curved surface impeller components by modifying machining steps, tool parameters, and toolpaths.
Case Study: Machining of the Guide Cone
This paper focuses on the guide cone, a monolithic spatially complex structural component.
Non-standard geometry, intricate surfaces, and stringent dimensional requirements characterize it.
By analyzing its structural features, machining characteristics, and factors affecting surface quality, the paper proposes design principles.
It also applies combined hot–cold processing methods.
This approach aims to achieve high-precision, high-efficiency, and high-quality machining objectives.
It provides a valuable reference for processing spatially complex parts in modern manufacturing.
Part Requirements
The two-dimensional drawing of the flow cone part is shown in Figure 1.
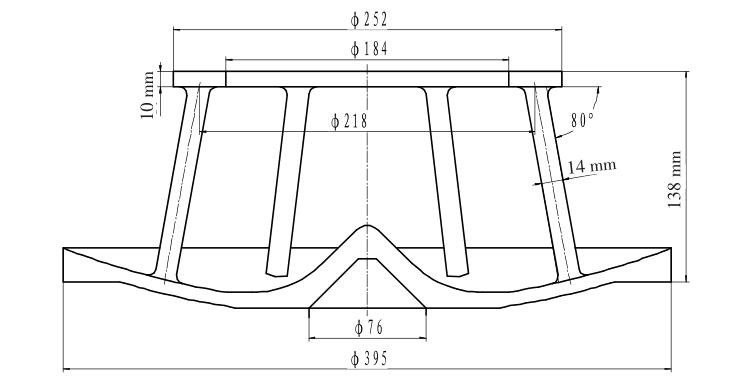
The technical requirements are as follows:
1.All surface roughness shall meet Ra3.2.
2. Dimensions without specified tolerances shall follow GB/T1804-m; form and position tolerances without specified dimensions shall follow GB/T1184-K.
3.The top surface requires a flatness of 0.2 mm, with the inner hole coaxiality meeting Φ0.6 mm and positional tolerance meeting Ф0.2 mm.
Manufacturers require the bottom surface to have a flatness of 0.2 mm, with the inner hole positional tolerance meeting 0.2 mm and surface roughness meeting Ra3.2.
The six legs of the part form an 80° angle with the horizontal plane.
Manufacturers form the center of the base plate as a conical surface using integral machining.
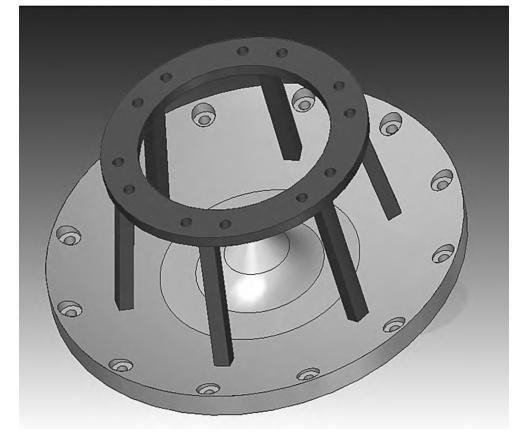
Through analysis of the 2D drawings, the team used Pro software to perform 3D modeling.
Figure 2 shows the results.
Technical Challenges
The flow cone is a monolithic spatially complex structural component.
It features non-standard geometry, intricate curved surfaces, and stringent dimensional tolerances.
Manufacturers fabricate it from 05Cr17Ni4Cu4Nb, a precipitation-hardening martensitic stainless steel composed of chromium and niobium.
This material exhibits a tensile strength of 1000–1310 MPa and a yield strength of 725–1180 MPa, demonstrating high strength and hardness.
Its structure comprises a support plate, a base plate, and six legs connecting them.
The designers uniformly distribute the legs at an 80° angle to the horizontal plane.
Manufacturers design the base plate center with a conical surface and include twelve through-holes on both the support plate and base plate.
Engineers form the part through integral machining.
The surface roughness must meet Ra 3.2, and the sealing groove at the bottom of the base plate must be smooth and flat.
Engineers require custom extended cutting tools for the 150 mm internal depth of the flow cone.
Additionally, the flow cone’s structural stiffness distribution is complex and uneven.
The long tool overhang during machining leads to weak stiffness and unstable high-dynamic cutting forces.
It can also cause occasional vibration, stress concentration, and cutting deformation issues.
The machining process imposes extremely high demands on the structural rigidity and stability of the entire process system.
This system includes the machine tool, fixture, workpiece, and cutting tool.
Consequently, machining the flow cone presents significant challenges.
Process Design
Through extensive research on machining methods for spatially complex components, the researchers identified factors affecting machining accuracy.
These factors also influence surface roughness and dimensional tolerances.
By combining theoretical analysis with practical testing, the researchers developed technical solutions and machining methods.
These methods aim to achieve the forming of the flow-guiding cone.
Principles for Establishing Technical Approaches
1.When precision-turning the internal cavity surface of the flow-guiding cone, operators face special challenges due to the 150 mm hole depth and its angled configuration.
To address this challenge, engineers can design and manufacture an extended tool holder for part machining.
By optimizing machining methods and cutting parameters, engineers reduce cutting chatter to improve part surface roughness.
2.For milling the internal cavity, operators use a vertical-horizontal conversion machining center.
By designing specialized fixtures and clamping methods, engineers can mill all six legs and 24 through-holes on a single machine.
This eliminates multiple handling and clamping operations between processes, shortens the machining chain, improves efficiency, and ensures product accuracy.
3.To eliminate dimensional and geometric variations during machining, reduce stress corrosion susceptibility, and optimize the process flow, engineers should adopt a staged approach.
This approach comprises roughing, semi-finishing, and finishing operations.
Incorporate a heat treatment stress-relief process to minimize machining deformation and stress concentration.
This will help ensure compliance with the flow cone’s dimensional and geometric tolerances.
Tool Design and Fabrication
The geometric parameters of cutting tools significantly influence the machining process.
A well-designed tool geometry can reduce cutting forces and temperatures, minimize tool wear, extend tool life, and decrease tool vibration.
When machining internal bores and tapered surfaces, the guide cone presents several challenges.
The bore depth exceeds 150 mm.
Engineers design the six legs of the part to form an 80° angle with the horizontal plane, with the chassis featuring multiple circular arc transitions.
Conventional turning tools cannot meet these requirements.
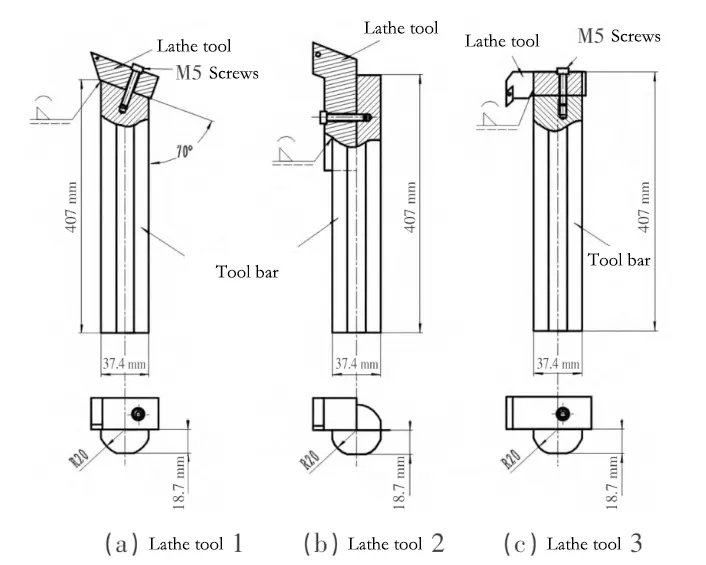
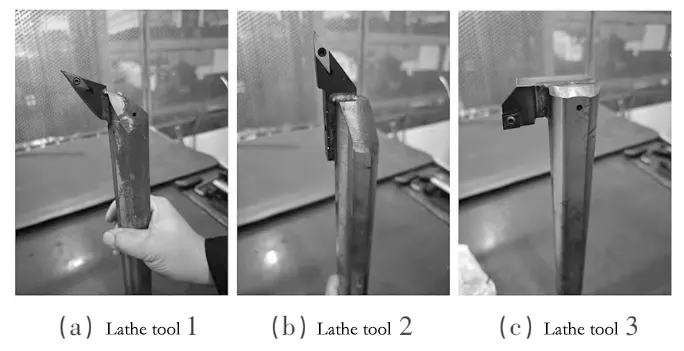
Therefore, an extended tool holder must be designed and manufactured, with the tool secured via screws for part machining.
The turning tool design drawings, physical diagrams, and actual application are shown in Figures 3 and 4.
Cutting Parameter Selection
Referring to the turning surface roughness formula 1, the surface roughness is mainly determined by the turning tool tip radius R (mm) and the feed per revolution f (mm/r).
The turning tool radius R = 0.4 mm, the roughness Ra 3.2 μm, from which the theoretical feed rate can be calculated to be f = 0.102 mm/r.
.jpg)
For a turning tool with a radius R = 0.4 mm and a roughness Ra of 3.2 μm, the theoretical feed rate can be calculated as f = 0.102 mm/r.
Referring to the tool linear speed (V) within the range of 60–1500 m/min, the inner bore surface of the flow guide cone requires high smoothness and must be free of tool marks.
Therefore, a lower linear speed is preferable.
Therefore, the tool linear speed is tentatively set at 60 m/min.
The minimum diameter D of the flow guide cone inner bore is 184 mm. According to formula 2, the theoretical speed N=104 r/min can be calculated.
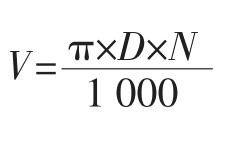
Under a finishing cut depth of 0.1 mm, different rotational speeds and feed rates were selected to machine the inner bore of the test specimen.
The surface roughness of the inner bore was compared; see Table 1 for details.
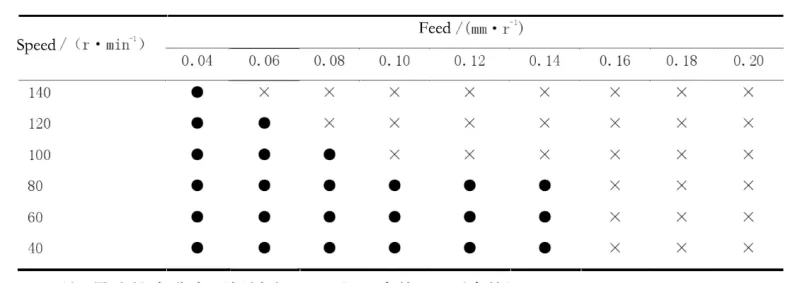
Table 1 indicates that lower spindle speeds and smaller feed rates yield better surface roughness.
However, considering machining efficiency and actual machine tool operation, we selected a spindle speed of 80 rpm.
We also chose a feed rate of 0.12 mm/min for machining the inner bore of the flow-guiding cone.
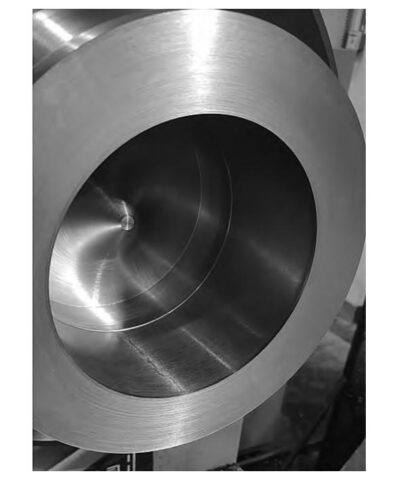
As shown in Figure 5, machining tests confirmed that the surface roughness of the flow cone meets drawing specifications.
The tests also showed that cutting chatter was effectively reduced and machining efficiency satisfied production requirements.
Process Sequence Arrangement
The machining process route for the diverter cone (Figure 6) may adopt the following approach.

1.Rough Machining
Clamp the workpiece.
Rough-turn the outer shape of the flow cone. Machine the outer diameter Ф395 to Ф410 and Ф252 to Ф262.
Rough-turn the internal cavity with a 5mm allowance on one side.
2.Heat Treatment
Perform stress relief aging treatment.
3.Semi-Finish Turning
Leave 2mm allowance on the upper end face of the support plate and 2mm overall allowance on the lower end face of the base plate.
Machine dimensions: Ф252 to Ф256, Ф184 to Ф180, Ф395 to Ф399.
Operators machine the upper end face of the support plate from 10 mm to 12 mm and machine the internal cavity dimensions according to the drawing.
4.Milling
On vertical/horizontal conversion machining center, mill 6 legs of the flow guide cone.
Dimensions per drawing.
5.Solution heat treatment
HRC 28~34. Eliminate residual stresses for enhanced dimensional stability.
6.Finish turning
Clamp the bottom end and face-off the end surface. Precision-turn the outer diameter ( \Phi 252 ) and inner bore ( \Phi 184 ) of the upper support plate, ensuring a thickness of 10 mm.
Reposition the clamping, align, and mount the center support.
Turn the chassis outer diameter ( \Phi 395 ) and chamfer C1.
Turn the bottom plate surface and tapered hole.
Finally, turn the tapered cavity, ensuring internal cavity dimensions and external shape, with consistent tapered cavity thickness.
7.Milling
Mill through holes and countersink holes.
8.Finishing
Deburr, fully polish surfaces, ensuring no dents or scratches.
Trial Machining
Machine Tool Selection: The CKH1463-Y high-speed precision CNC turning center is a turning-milling composite machine tool.
It is primarily designed for turning, with milling as a secondary function.
It features high precision, high rigidity, and high reliability.
DIANA35 Vertical/Horizontal Conversion Machining Center:** This machine is equipped with an advanced CNC system and an AC high-power servo motor drive.
It employs roller-type linear guideways to ensure machining precision and stability.
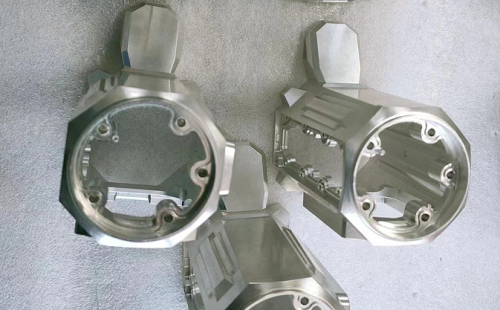
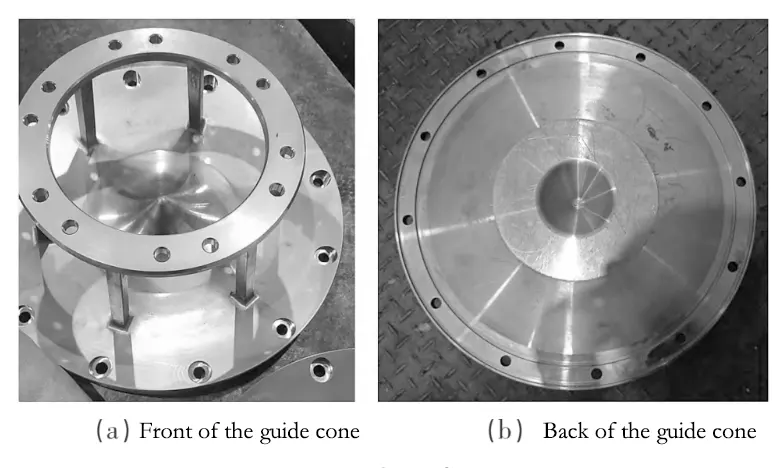
The finished product is shown in Figure 7.
Conclusion
In summary, this paper conducts an in-depth and systematic investigation into the machining processes for spatially complex components.
By analyzing the structural characteristics and machining challenges of these parts, a rational machining process flow was established.
Through practical machining trials, specialized cutting tools were designed and manufactured, and optimal cutting parameters were identified.
The research findings demonstrate that well-planned processes and cutting parameters can effectively enhance the machining accuracy and efficiency of spatially complex components.
They provide reliable technical support for the production of such parts in modern manufacturing.
However, it is also recognized that with the continuous development of manufacturing and ongoing technological innovation, machining processes for complex spatial parts still face numerous challenges.
At the same time, they present many new opportunities.
In the future, further exploration of more advanced machining technologies and process methods will be pursued.
These include intelligent machining and the combined application of additive and subtractive manufacturing.
The goal is to continuously enhance the machining quality and production efficiency of complex spatial parts.
