China CNC Milling » Blog » Research on Large ARC Machining Technology
FAQ
What materials can you work with in CNC machining?
We work with a wide range of materials including aluminum, stainless steel, brass, copper, titanium, plastics (e.g., POM, ABS, PTFE), and specialty alloys. If you have specific material requirements, our team can advise the best option for your application.
What industries do you serve with your CNC machining services?
Our CNC machining services cater to a variety of industries including aerospace, automotive, medical, electronics, robotics, and industrial equipment manufacturing. We also support rapid prototyping and custom low-volume production.
What tolerances can you achieve with CNC machining?
We typically achieve tolerances of ±0.005 mm (±0.0002 inches) depending on the part geometry and material. For tighter tolerances, please provide detailed drawings or consult our engineering team.
What is your typical lead time for CNC machining projects?
Standard lead times range from 3 to 10 business days, depending on part complexity, quantity, and material availability. Expedited production is available upon request.
Can you provide custom CNC prototypes and low-volume production?
Can you provide custom CNC prototypes and low-volume production?
Hot Posts
The test section of a certain project consists of four large guide rail seats, symmetrical in upper and lower halves on both sides.
Workers bolt and fix them to the frame of the support section.
Technicians mount the curved blade support plates using arc guide rail pairs at the center of the left and right sections of the upper and lower rail mounting bases.
The installed curved blade structure slides vertically within the guide rail seats, as shown in Figure 1.
Technicians must ensure dimensional consistency across all four bases when performing arc machining on large workpieces of the guide rail bases.
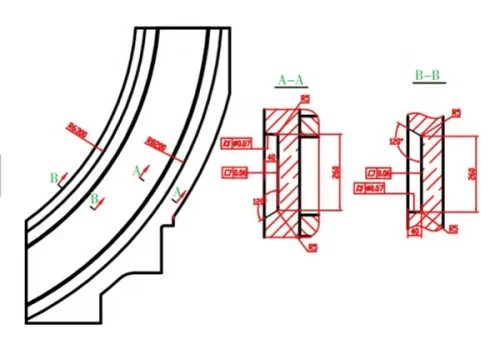
The cylindricity tolerance for the dual guide rail mounting slots is Φ0.07 mm, while the flatness tolerance for the guide rail mounting surfaces is 0.06 mm.
Figure 2 illustrates the arc slot of a single guide rail base.


Structure and Manufacturability of the Guide Rail Base
Structure of the Guide Rail Base
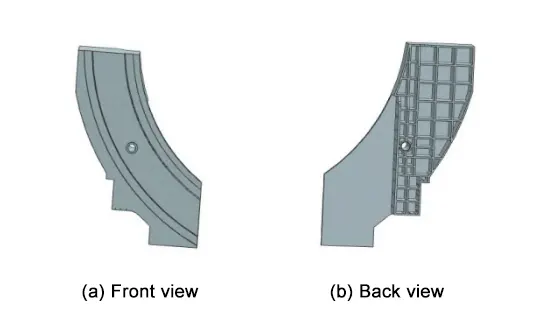
Each guide rail base is an assembled weldment, as shown in Figure 3, primarily fabricated by welding a large plate and backing stiffeners.
Its external dimensions are: 6,790 mm × 4,679 mm × 910 mm; each unit weighs 30,000 kg.
Overall Process Plan
- Design Principles
To minimize the number of lifting, turning, and transfer operations while reducing impact on the side walls, the process plan adopts a design principle of centralized operations.
- Overall Process Flow
(1). Incoming materials
(2). Layout inspection of allowance
(3). Rough machining to 8 mm allowance per side
(4). Stress-relief heat treatment
(5). Rough machining to 5 mm allowance per side
(6). Stress-relief heat treatment
(7). Rough machining to 3 mm allowance per side
(8). Stress-relief heat treatment
(9). Sandblasting and primer application
(10). Semi-finish machining to 1 mm allowance per side
(11). Vibratory aging
(12). Magnetic particle inspection
(13). Finish machining
(14). Inspect guide rail mounting groove cylindricity and concentricity
(15). Dye penetrant inspection
(16). Dimensional inspection
Machining of Arc Grooves in Guide Rail Mounts
Analysis of Vertical Lathe Machining Solution
(1)Technicians use an oversized CNC vertical lathe to ensure dimensional consistency of the arc grooves across four large guide rail mount workpieces.
This is necessary to machine the guide rail mounting slots, which have a maximum arc radius of R8 200 mm.
(2)Technicians precision-turn the installation slots for all four pieces using a combined turning method, ensuring dimensional consistency across all guide rail mounts.
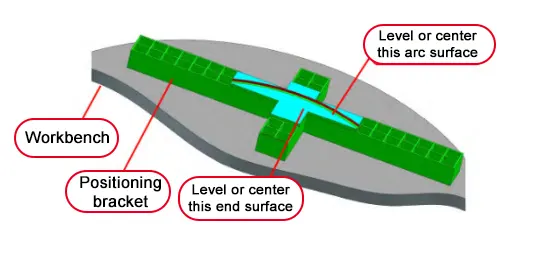
(3)Engineers designed a locating fixture, as shown in Figure 4.
Its reference surface was used for locating, leveling, and centering during the turning process of all 4 guide rail mounts.
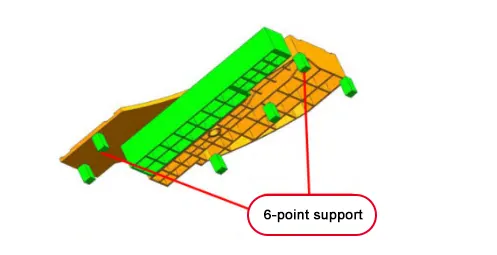
(4)Support the guide rail base on the vertical lathe as shown in Figure 5.
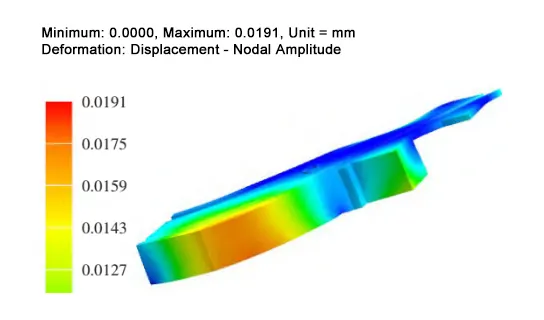
Based on finite element analysis results, this setup ensures that deformation caused by the workpiece’s self-weight is less than 0.02 mm, as illustrated in Figure 6.
(5) Guide Rail Base Placement: Position the locating bracket on the vertical lathe chuck.
Level the locating bracket. Find the center based on the reference circle on the locating bracket.
Install the four guide rail bases onto the locating bracket.
(6)Machining challenges for vertical lathes: For super-large vertical lathes, the worktable must remain stable during turning operations, with end face and radial runout ≤ 0.06 mm.
This is required to meet the following tolerances:
Flatness of the arc groove end faces on the four guide rail seats: 0.04 mm.
Cylindricity of the two guide rail mounting slots: Φ0.07 mm.
Such ultra-large, high-precision vertical lathes are scarce resources, making it difficult to meet production schedule requirements.
(7) Design and manufacture of a dedicated centering support:
Due to the guideway seat’s maximum arc dimension reaching R8 200 mm, the dedicated support’s overall dimensions reach 12,000 mm.
Ensuring the support’s own rigidity and precision results in high fabrication costs.
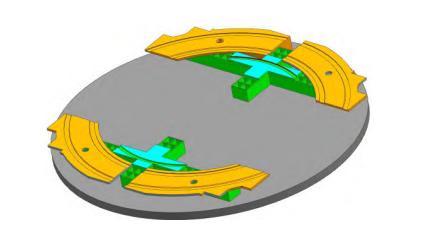
(8) Placing all four guide rail seats simultaneously on the vertical lathe, as shown in Figure 7, presents significant challenges due to the large workpiece dimensions.
Centering is difficult and time-consuming.
Analysis of Gantry Milling Machining Plan
(1)Gantry milling on a single guide rail seat.
The support method is consistent with that of a vertical lathe, i.e., six-point support.
Technicians level the end face and check straightness against the reference surface, as shown in Figure 8.
Use a φ160 face milling cutter to mill the bottom surface of the guide rail seat’s arc groove, leaving a 0.2 mm allowance on the arc side.
Employ a φ20 solid carbide end mill to mill the arc side surface.

(2) Arc groove inspection of the guide rail seat: Utilize a high-precision laser tracker to inspect the bottom plane and side surfaces of the arc groove.
After technicians finish gantry milling, they measure the flatness of the guide rail groove bottom at 0.040 mm and the cylindricity of the guide rail groove at 0.057 mm.
(3) The gantry milling method facilitates quick and convenient support alignment.
Technicians do not require specialized fixtures during machining, and the processing meets the design accuracy requirements.
All remaining machining operations for the guide rail base can be performed within the gantry milling setup by technicians.
Conclusion
The use of gantry milling for machining large arcs achieves machining accuracy that meets design specifications.
This process method, employing gantry milling for large arcs and laser tracking inspection, offers advantages such as safety, reliability, good manufacturability, and strong versatility.
It introduces a novel machining approach for large arc fabrication.
