China CNC Milling » Blog » Research on High-speed Milling Processing Technology of Beam-Rib in Aircraft Wing Box
FAQ
What materials can you work with in CNC machining?
We work with a wide range of materials including aluminum, stainless steel, brass, copper, titanium, plastics (e.g., POM, ABS, PTFE), and specialty alloys. If you have specific material requirements, our team can advise the best option for your application.
What industries do you serve with your CNC machining services?
Our CNC machining services cater to a variety of industries including aerospace, automotive, medical, electronics, robotics, and industrial equipment manufacturing. We also support rapid prototyping and custom low-volume production.
What tolerances can you achieve with CNC machining?
We typically achieve tolerances of ±0.005 mm (±0.0002 inches) depending on the part geometry and material. For tighter tolerances, please provide detailed drawings or consult our engineering team.
What is your typical lead time for CNC machining projects?
Standard lead times range from 3 to 10 business days, depending on part complexity, quantity, and material availability. Expedited production is available upon request.
Can you provide custom CNC prototypes and low-volume production?
Can you provide custom CNC prototypes and low-volume production?
Hot Posts
Currently, the aerospace manufacturing industry widely applies high-speed milling.
This is due to its unique advantages, including high precision, high efficiency, low cutting forces, and superior surface quality.
As early as 1920, German scholar Salomon proposed in his high-speed cutting research that cutting temperature does not always increase with cutting speed.
Instead, upon reaching a critical threshold, cutting temperature actually decreases as cutting speed increases.
Su et al. conducted comparative experiments between conventional and high-speed machining of workpieces.
They discovered that high-speed cutting yields superior surface quality compared to conventional machining.
Wang’s research on high-speed gear cutting principles revealed that as cutting speed increases, cutting forces decrease and workpiece surface roughness improves.
Aircraft wing inter-chord ribs are numerous, and traditional machining methods struggle to meet rapidly growing aircraft demands.
Inefficient batch production and excessive machine-time consumption significantly elevate factory production costs.
High-speed milling is currently widely used in the aerospace manufacturing industry.
Both are active and correct; the choice depends on whether you want to emphasize the industry (your original) or the technique (the alternative).
This involved designing high-speed milling processes, programming strategies, and specialized finishing fixtures.
It also established a comprehensive high-speed milling workflow for inter-chord ribs.
This significantly improved batch production efficiency and product quality in manufacturing facilities.
Structural Characteristics and Process Analysis of Aircraft Wing Box Beam Inter-ribs
Aircraft wing box beam inter-ribs serve as the lateral framework maintaining the skin profile shape.
Numerous in quantity, they taper gradually from the fuselage to the wingtip, with larger inter-rib dimensions typically ranging from 5 to 6 meters.
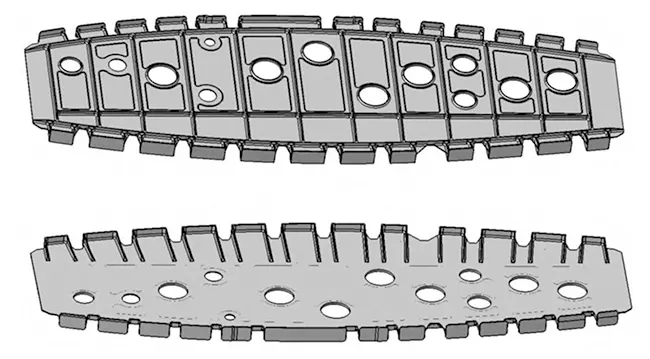
Inter-beam ribs share similar structural features, primarily comprising channel cavities, edge plates, T-shaped stiffeners, and weight-reduction holes (as shown in Figure 1).
With wall thicknesses typically ranging from 0.8 to 3.5 mm, they are classified as thin-walled components.
The assembly mating surfaces are the five-coordinate contour surfaces of both flanges, demanding high positional accuracy (typically -0.15 to 0 mm).
Wall thickness tolerance is ±0.15 mm, and mass tolerance is ±0.02 g.
Operators must strictly control part deformation during machining to meet flatness requirements, ensuring that warpage does not exceed 0.4 mm over the entire length.
Such complex structural components are typically CNC-machined from aluminum alloy plates with thicknesses ranging from 50 to 200 mm.
Material removal rates exceed 90%, and uneven removal on both sides of the material makes the parts highly susceptible to warping and deformation during machining.
Notches on the flanges and thin-walled web structures result in low part rigidity.
This makes them prone to tool chatter caused by excessive cutting forces during machining, which in turn leads to poor surface quality.
The key focus of process design lies in enhancing batch production efficiency while minimizing part deformation and surface roughness during machining.
Process Design for High-Speed Milling of Wing Box Ribs
The cutting speed (Vc) for high-speed milling of aluminum alloys typically exceeds 1000 m/min.
Compared to conventional milling, this process achieves a 4-6 times higher material removal rate while reducing cutting forces by 30%.
The extremely rapid milling speed dissipates significant heat generated during material removal, minimizing localized heat accumulation in the machined area.
This makes it particularly suitable for processing aluminum alloy workpieces with low melting points.
The theoretical outer surfaces on both sides of the inter-ribs are typically angled straight faces.
Machining with a three-axis machine using a line-cutting approach consumes significant machine time and results in stepped surfaces.
The most effective method involves using a five-axis machine with tool swiveling, employing the tool’s side edge for machining.
This approach eliminates stepped surfaces and reduces machine time associated with line cutting.
The high-speed milling process design for aircraft wing box inter-ribs focuses on controlling workpiece deformation.
It also aims to ensure wall thickness and surface quality, as well as to enhance batch production efficiency.
Operators primarily achieve batch efficiency gains during roughing, where 1–2 flipping operations remove most of the stock.
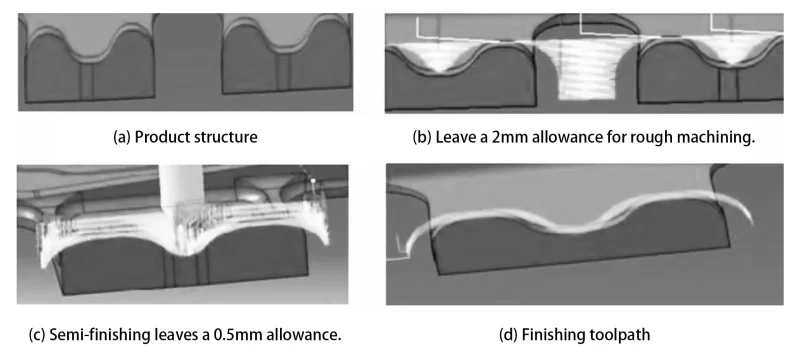
Considering the rib structure and deformation characteristics, operators maintain a 2 mm single-side allowance after roughing.
Finishing operations primarily focus on controlling wall thickness and surface quality.
Tool chatter is the main factor affecting these parameters.
Therefore, a semi-finishing step is added before finishing to remove most of the remaining stock, limiting the finishing allowance to 0.3–0.5 mm.
Selecting appropriate milling speeds and smaller cutting depths effectively reduces cutting forces, thereby minimizing tool chatter.
The overall process design is thus: Rough mill both sides of the blank → Mill reference edges, drill reference holes → Rough mill slot cavity surfaces (leaving 2 mm allowance), machine bolt holes → Rough mill reference surfaces (leaving 2 mm allowance) → Finish mill reference surfaces → Enlarge reference holes → Remove side material frames → Clamp vacuum milling fixture → Semi-finish mill slot cavity surfaces (leaving 0.5 mm allowance) → Measure web thickness, adjust web finish milling program → Finish mill slot cavity surfaces → Mill notches for clamping.
During rough milling of slot cavity surfaces, the flange plates and web heights between beams are not at the same level.
Therefore, operators retain a web height allowance in this operation to provide support during rough milling of the reference surface.
After finishing the reference surface, significant stock removal occurs.
Therefore, operators add an additional reference hole enlargement step to prevent deformation of the hole inner wall from affecting subsequent alignment.
Furthermore, they add a web thickness measurement step after semi-finishing.
Based on actual measurements, operators promptly adjust the finishing program offset to ensure the web remains within tolerance.
Part Fixturing and Error-Proofing Process Design
In batch production environments, standardized and efficient fixtures are critical factors for enhancing manufacturing productivity.
Traditional bolt-and-clamp fixturing methods are cumbersome to operate and unstable during clamping.
They also require programming considerations for fixture height and position to prevent trajectory interference.
Therefore, engineers designed a countersunk bolt clamping method for beam-rib structures during rough machining.
This approach fully utilizes counterbores and flange plate notches.
It employs pneumatic clamping with hex socket bolts to simplify operations, enhance clamping stability, and avoid tool path interference.
This standardizes the clamping method and improves efficiency.
During semi-finish and finish milling, the thin web wall thickness results in low overall rigidity.
Engineers selected a vacuum milling fixture with bolt clamping.
The milling fixture features primary and secondary locating holes that engage with the locating reference surface, forming a “two-hole-one-surface” positioning method.
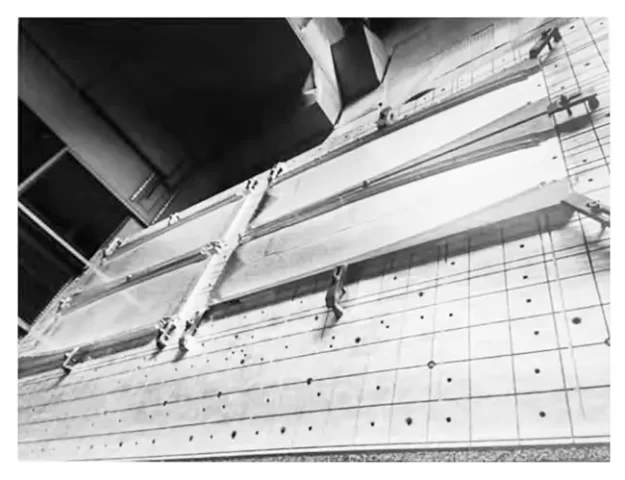
Engineers divide the milling fixture’s support surface into a grid pattern.
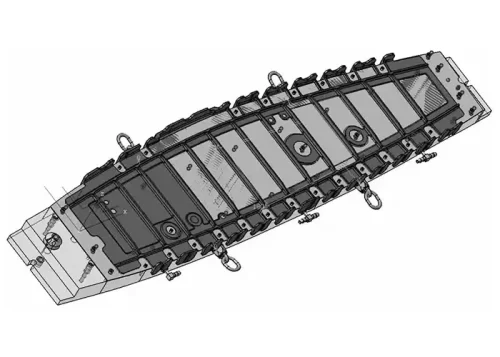
Sealing strips secure the workpiece reference surface to the vacuum milling fixture via vacuum suction, supplemented by countersunk bolts for clamping, as shown in Figure 2.
This clamping method leaves no process connections after workpiece completion, eliminating quality risks associated with subsequent manual grinding.
It also enhances the structural rigidity of the part’s edge plate, reducing the risk of tool and edge plate chatter during machining.

Error prevention in process design is also a critical factor in ensuring product quality.
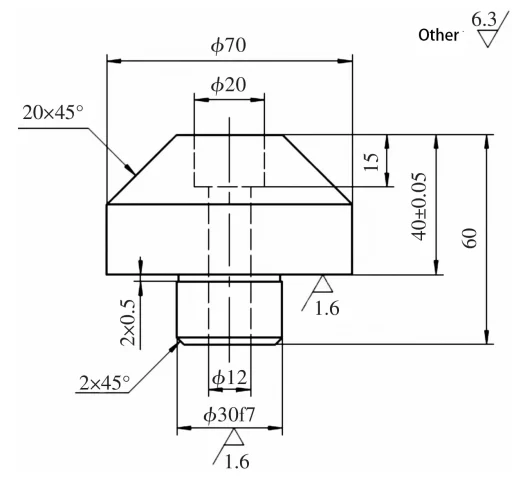
The tool-tapping pin serves as an additional reliable safeguard for operators during tool changes.
Its structure is shown in Figure 3. Before executing the program, the tool path circles the tapered surface of the tool-tapping pin.
If the tool diameter or base angle is incorrect, milling marks will appear on the pin.
Operators can verify tool accuracy by inspecting the condition of the tool-tapping pin.
During rough machining, operators can mill the tool probe at the blank’s edge.
For finish machining, utilize the built-in tool probe of vacuum-mounted milling fixtures.
Adaptive Machining Method for Controlling Web Thickness
In actual production, each machining operation introduces errors.
Eliminating the cumulative impact of these errors throughout the entire process to ensure strict wall thickness and quality tolerances is paramount in finishing operations.
Programming for finishing operations often adopts an overly conservative approach, adhering to the principle of “better to exceed upper tolerances than lower ones.”
This frequently results in the need for manual grinding to remove excess material after machining, or compromises on quality tolerances while meeting wall thickness tolerances.
Therefore, operators should add a trial milling program before performing the final milling of the web.
Both the trial and final milling programs must use the same tool, coordinate system, and toolpath.
The only difference is elevating the Z-axis of the trial program by 0.5 mm relative to the final program.
After the trial milling, operators measure the wall thickness at various points on the web using an ultrasonic thickness gauge.
If the theoretical web thickness is δ and the finishing program has a 0.02 mm offset, the theoretical dimension after trial milling would be (δ + 0.52 mm).
Considering manufacturing tolerances, the actual measurement will inevitably deviate from the theoretical dimension.
If the actual measurement result is (δ + 0.42 mm), this indicates a Z-axis deviation of -0.1 mm in the program.
To ensure the theoretical dimension remains within tolerance during the final milling of the web, operators adjust the program to raise the Z-axis by 0.1 mm.
If gaps exist between the vacuum milling tool’s support surface and the workpiece reference surface, inconsistent slot cavity deviations can occur across the web.
In this case, operators can individually adjust the offset values for each region during fine milling program creation.
Engineers achieve this adaptive machining process design through measurement-based tuning.
It reduces subsequent manual grinding workload and quality risks while ensuring strict adherence to quality tolerances.
Group Machining Solution Design
As product structures grow increasingly complex and machining requirements become more refined, the number of CNC programs required for products continues to rise.
Frequent manual program calls by operators not only increase time costs but also heighten the risk of program call errors.
Furthermore, wing spars typically feature two perfectly symmetrical components on the left and right sides.
Therefore, engineers design a grouped machining mode that chains programs based on the workbench dimensions, allowing operators to clamp both left and right components simultaneously.
By having the main program call subroutines for machining, operators achieve unattended grouped processing.
This approach not only reduces CNC setup time but also eliminates quality risks caused by frequent program calls, as shown in Figure 4.
High-Pressure Spray Cooling Process Design
During high-speed milling operations, the spindle’s extremely high rotational speed creates a high-temperature, high-pressure zone within the milling area.
Additionally, intense centrifugal forces make it difficult for traditional poured coolant to reach the milling zone, resulting in inadequate cooling and lubrication effects that accelerate tool wear.
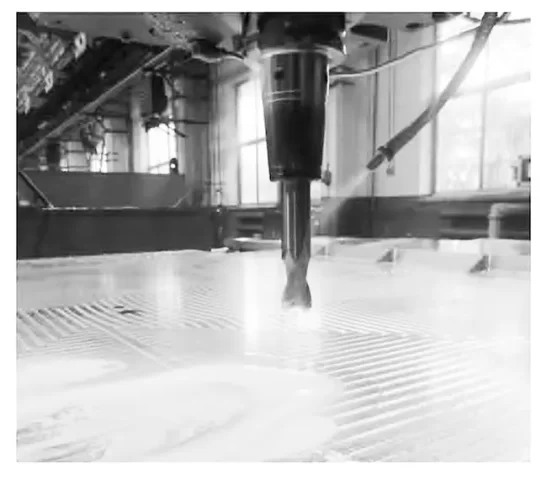
Therefore, engineers designed a high-pressure spray cooling system that uses an oil-air mixture.
During high-speed machining, a high-pressure nozzle propels the oil-air mixture toward the machining zone at high velocity (as shown in Figure 5).
Under high pressure, the mixture rapidly atomizes, forming a protective film between the tool and workpiece to achieve lubrication and cooling.
Simultaneously, the high-speed airflow promptly blows away chips and carries away significant cutting heat, further reducing heat accumulation in the machining area.
CNC Programming Strategy for High-Speed Milling of Wing Box Beam Inter-ribs
High-speed milling CNC programming possesses distinct characteristics compared to conventional CNC programming.
The fundamental strategy involves high cutting speeds and small cutting depths, with layered milling employed whenever feasible.
During programming, operators must avoid abrupt changes in milling load.
Particularly during finishing operations, operators must strictly maintain consistent cutting depths.
This prevents sudden variations in cutting forces that could induce chatter and compromise surface quality.
High-speed milling also requires ensuring smooth tool paths and consistent feed rates.
Operators should incorporate arc transitions where tool paths change significantly.
In addition, they should implement corner-approach deceleration a safe distance before corners to maintain a stable machining process.
Groove Cavity Machining
For rough machining of groove cavity surfaces, employ a symmetrical layered strategy.
Machine symmetrically from both ends toward the center, and avoid machining the full depth in a single pass.
Instead, perform layered machining in 10 mm increments.
This approach effectively minimizes deformation in workpieces requiring large material removal.
When high-speed milling groove cavity web structures, significant axial forces act on the tool and workpiece during contact.
Therefore, operators should position the tool entry point as close as possible to the stiffened rib structure.
Employ a helical tool entry trajectory, which minimizes impact forces on the tool and spindle compared to vertical or angled entries.
This ensures smoother machining and effectively reduces tool chipping.
For high-flange plates on both sides of beam-interconnected ribs and deep-cavity structures, design long-short tooling strategies based on lean manufacturing principles.
Before precision corner milling, opt for plunge milling to remove most corner stock, preventing tool-bite caused by sudden increases in corner removal volume.
Edge Plate and Rib Processing
The thickness of inter-beam ribs typically ranges from 2 to 3.5 mm, resulting in relatively low structural rigidity.
Therefore, the rib height is usually milled to precision before milling the rib thickness.
At this stage, leaving a margin on the rib side ensures adequate structural rigidity.
Operators select a top-down machining approach for inclined ribs or ribs of unequal height.
Rough machining removes most of the excess material, while semi-finishing leaves a 0.5 mm margin to ensure uniform finishing allowance, as shown in Figure 6.
The flange plates on both sides of the web serve as assembly surfaces, demanding high precision and surface quality.
During finishing, machining typically proceeds inward from the flange profile to maintain high rigidity throughout the machining zone.
For five-axis closed-angle undercut machining on flange plates, smaller tool sizes are typically used, usually in the range of φ6–10 mm.
Therefore, operators use auxiliary extension bars during tool clamping to enhance stability when machining with these smaller tools.
VERICUT Simulation Application
Engineers apply simulation technology to ensure the rationality of tool paths and milling parameters during machining.
It helps prevent unexpected errors such as excessive allowance milling, machine tool collisions, and overtravel.
In addition, it enhances CNC programming proficiency, shortens production preparation cycles, and reduces machining costs.
Engineers establish the tooling, tool holders, machining coordinate systems, and fixture positions in the simulation to realistically simulate actual machining conditions.
These elements must precisely match the corresponding physical components.
Programs involving five-axis operations must incorporate machine simulation to prevent spindle collisions.
Furthermore, simulation results enable estimation of actual machining cycles, thereby controlling product development timelines.
Conclusion
Researchers have proposed a comprehensive high-speed milling workflow through their research on the high-speed milling process for aircraft wing box interbeam ribs.
This workflow utilizes pre-stretched sheet metal as the raw material.
The study elaborates in detail on key technologies, including specialized finishing fixtures, adaptive measurement-based machining, group machining, and high-pressure spray cooling.
The researchers analyzed and validated technical essentials in programming strategies for high-speed milling of inter-chord ribs, introducing programming approaches tailored to the structural characteristics of these ribs.
The designed high-speed milling process for aircraft wing box inter-chord ribs effectively minimized deformation during CNC machining.
It reduced quality risks from human intervention and subsequent grinding workload.
In addition, it significantly enhanced factory batch production efficiency and workpiece surface quality.
A standardized high-speed milling process flow for interbeam ribs has been established.
It simplifies production control while providing valuable reference for high-speed milling processes of other thin-walled components.
