China CNC Milling » Blog » Research on CNC-Material Collaborative Control Mechanism for Surface Quality of Mechanical Molds
FAQ
What materials can you work with in CNC machining?
We work with a wide range of materials including aluminum, stainless steel, brass, copper, titanium, plastics (e.g., POM, ABS, PTFE), and specialty alloys. If you have specific material requirements, our team can advise the best option for your application.
What industries do you serve with your CNC machining services?
Our CNC machining services cater to a variety of industries including aerospace, automotive, medical, electronics, robotics, and industrial equipment manufacturing. We also support rapid prototyping and custom low-volume production.
What tolerances can you achieve with CNC machining?
We typically achieve tolerances of ±0.005 mm (±0.0002 inches) depending on the part geometry and material. For tighter tolerances, please provide detailed drawings or consult our engineering team.
What is your typical lead time for CNC machining projects?
Standard lead times range from 3 to 10 business days, depending on part complexity, quantity, and material availability. Expedited production is available upon request.
Can you provide custom CNC prototypes and low-volume production?
Can you provide custom CNC prototypes and low-volume production?
Hot Posts
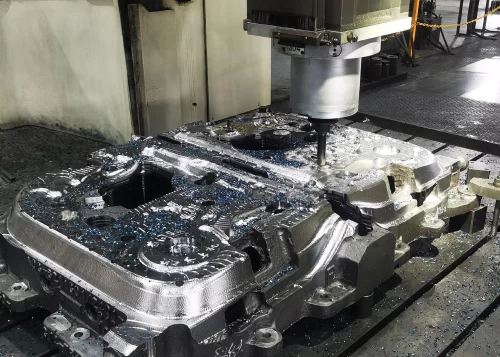
As mold materials evolve toward high-hardness, high-strength specialty alloys, the thermal-mechanical response during CNC machining has become increasingly complex.
This complexity makes it difficult for traditional control methods to consistently maintain stable surface quality.
In recent years, intelligent CNC systems have shown great potential in improving mold surface quality.
They achieve this through high-precision machining path regulation, error compensation, and dynamic response optimization.
This paper takes a metallurgical materials perspective to develop a multidimensional quality control system.
The system integrates path control, characterization analysis, and intelligent prediction.
Relationship Between Microstructure and Surface Properties of Materials
Alloy Microstructural Characteristics and Surface Forming Mechanisms
Special alloy steels for molds, such as H13 hot-work tool steel and Cr12MoV cold-work tool steel, exhibit distinct microstructural morphologies prior to CNC machining.
These microstructural features directly influence surface forming behavior during subsequent processing.
Taking H13 steel as an example, its quenched and tempered microstructure mainly consists of tempered martensite and uniformly dispersed carbides.
In contrast, Cr12MoV steel primarily contains reticular ledeburite and spheroidal carbides.
Observation via metallographic microscopy and scanning electron microscopy reveals that the size and distribution uniformity of carbides within the microstructure are closely related to the hardness and plasticity of the matrix phase structure.
These factors play a decisive role in cutting forces, machining stability, and final surface quality.
In practical machining, alloys with dense microstructures and uniformly distributed carbides typically exhibit superior cutting stability and consistent surface formation.
Evaluating surface hardness gradients before and after machining via Vickers hardness testing (HV) and nanoindentation techniques further reveals how cutting heat and plastic deformation influence surface microstructural reconstruction.
Coarse carbides readily induce localized stress concentrations during cutting, leading to microcrack formation and deteriorated surface quality.
Therefore, refining the initial microstructure and controlling carbide size form the foundation for enhancing surface roughness and fatigue resistance after CNC machining.
Integrating characterization methods that assess both metallographic features and mechanical responses provides precise guidance for optimizing machining process parameters.
Influence of Microhardness and Residual Stress Distribution
During CNC machining, mold materials endure high-frequency thermo-mechanical loading, readily inducing surface microstructural rearrangement.
This leads to significant alterations in microhardness distribution and residual stress states.
Such changes directly impact the mold’s wear resistance, fatigue resistance, and dimensional stability during actual service.
Metallographic analysis reveals microstructural evolution in the processed surface layer, including grain refinement, increased dislocation density, and even white layer formation.
These structural alterations constitute the fundamental mechanisms behind hardness enhancement and stress redistribution.
Systematic characterization of machined cross-sections using optical and scanning electron microscopy enables clear identification of the work-hardened layer thickness.
It also reveals recrystallization features and the microstructure of the heat-affected zone.
Regarding mechanical properties, Vickers microhardness testing reveals a hardness gradient curve perpendicular to the surface.
This curve reflects the depth of plastic deformation and the transition zone to the base material properties.
Furthermore, X-ray diffraction or micro-area residual stress analyzers reveal residual compressive stress zones in the processed region, effectively delaying crack initiation and enhancing fatigue life.
However, stress concentration at the interface region may lead to premature failure due to thermal fatigue or stress corrosion.
The distribution of carbides and the phase transformation behavior in different materials determine the relaxation rate of processing-induced stresses.
They also affect the retention capability of the hardened layer.
Study on Microstructural Evolution Behavior
During CNC machining, the surface layer of mold materials undergoes complex thermo-mechanical coupling effects, leading to significant microstructural evolution.
The combined effect of high-temperature instantaneous heat flux density and mechanical shear stress causes severe plastic deformation of grains in the machined zone.
This results in dislocation entanglement, the formation of subgrain structures, and dynamic recovery phenomena.
Metallographic analysis and transmission electron microscopy (TEM) reveal that shear bands are often accompanied by grain refinement and grain boundary rotation.
They also lead to the formation of twisted grain structures, reflecting the microstructure’s dynamic response to thermo-mechanical coupled loading.
Regarding mechanical properties, microhardness testing and electron backscatter diffraction (EBSD) quantify surface hardening and orientation changes.
Processing-induced recrystallization and phase transformations are significantly influenced by the initial microstructure, temperature rise rate, and strain rate coupling.
In high-alloy steels, localized dissolution-precipitation cycles of certain carbides in hot spots affect surface strength-toughness balance and crack resistance.
CNC Machining Characteristics of Special Alloys
Analysis of Cutting Mechanics in High-Strength Alloy Materials
High-strength alloy materials such as H13 and Cr12MoV exhibit distinct cutting mechanics during CNC machining due to their high hardness, thermal strength, and complex microstructures.
During machining, these materials exhibit high deformation resistance, difficult chip formation, and severe tool wear.
These challenges are primarily due to the mechanical mismatch between the carbide-reinforced phases and the matrix phase within the alloy.
Metallographic microscopy and energy dispersive spectroscopy reveal that the uniformly distributed M7C3 and MC carbide particles in these alloys readily cause localized stress concentration in the cutting zone.
This intensifies friction and heat accumulation at the tool-chip interface.
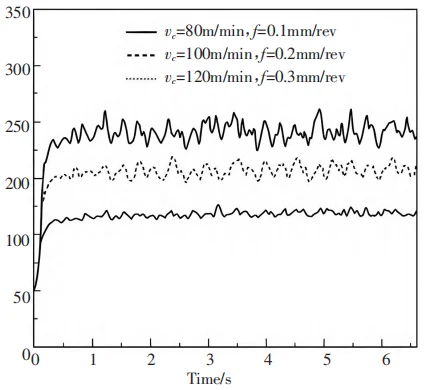
Combining a strain tester with a triaxial force measurement system yields cutting force curves under various cutting parameters, as shown in Figure 1.
Figure 1 demonstrates significant variations in the steady-state levels and fluctuation amplitudes of cutting forces under different cutting speeds and feed rates.
These fluctuations are highly correlated with the internal microstructural inhomogeneity of the material.
The formation and propagation of shear bands are governed by grain orientation, carbide distribution, and matrix toughness.
These metallurgical factors determine the plastic flow behavior of the material under high strain rates.
Mechanism of Heat Accumulation and Thermal Softening Response in Materials
During CNC machining of high-strength alloy mold materials, significant heat accumulation often occurs in the cutting zone due to high strain rates and frictional heat.
This heat directly causes thermal softening in the material’s surface layer.
Under elevated temperatures, the evolution rate of alloy matrix subsystems accelerates, triggering dynamic recovery and recrystallization of grains.
Carbide particles may undergo dissolution or coarsening, thereby reducing the material’s yield strength and hardness.
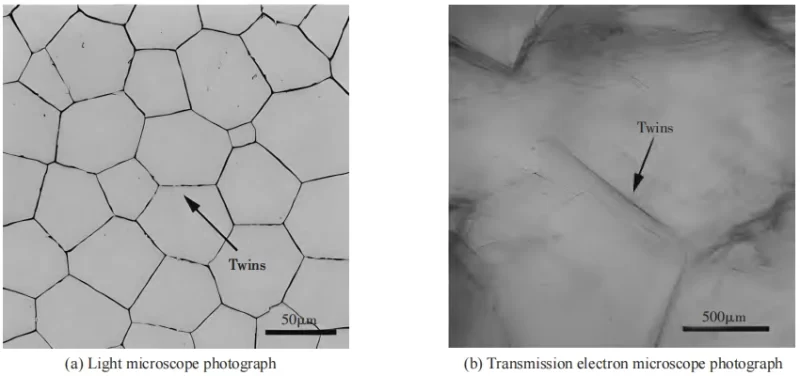
Examination of the heat-affected zone (HAZ) using metallographic microscopy and transmission electron microscopy reveals characteristic features such as reduced grain size and increased twin structures.
A decreased dislocation density is also observed, indicating pronounced thermal softening.
Further real-time monitoring of the temperature field distribution in the machined zone using infrared thermal imaging technology, as shown in Figure 2, provides valuable data.
When combined with dynamic mechanical analysis or high-temperature indentation testing, this approach enables quantitative analysis of the effects of thermal softening on cutting loads and surface residual stresses.
High-carbon alloy steels like Cr12MoV exhibit pronounced thermal softening thresholds between 600–800°C due to their high carbide content and hardness.
Excessive thermal softening causes unstable cutting forces and surface defects like “white layer” formation, compromising mold surface integrity.
Synergistic Application of Surface Modification Technologies
Regulatory Role of Laser Surface Treatment Technology
Laser surface treatment achieves material surface microstructure reconstruction and strengthening through localized heating at high speed and high energy density.
Metallographic analysis of mold steels such as H13 and Cr12MoV after laser quenching or laser cladding revealed the formation of fine lamellar martensite or subgrained structures in the treated zones.
In these zones, carbides exhibited a dispersed distribution.
This treatment effectively enhanced the strength and wear resistance of the hardened layer.
Optical microscopy and scanning electron microscopy (SEM) reveal a significantly refined grain structure in the heat-affected zone, along with an increased grain boundary area.
These features help inhibit crack propagation and the initiation of fatigue cracks.
Regarding mechanical properties, microhardness gradient testing confirms a significant increase in surface hardness after laser modification.
The depth of the hardened layer is controllable and typically reaches 0.3–0.6 mm.
X-ray diffraction analysis indicates that the rapid cooling induced by laser thermal shock introduces a residual compressive stress field in the surface layer, further enhancing fatigue resistance.
Laser treatment has minimal impact on surface roughness, making it suitable for post-CNC machining re-hardening.
Through metallurgical microstructure control and multidimensional mechanical characterization, laser modification achieves targeted enhancement of mold surface properties.
This provides robust material assurance for maintaining high-stability machining quality.
Influence Mechanism of Ultrasonic Vibration-Assisted Machining
Ultrasonic vibration-assisted machining effectively addresses surface quality degradation in high-strength mold steel during conventional CNC machining.
It does so by superimposing ultrasonic frequencies (typically 20–40 kHz) and micro-amplitude vibrations in either the cutting direction or the normal direction.
The primary mechanism lies in periodic intermittent cutting, which significantly reduces the average cutting force and frictional heat between the tool and workpiece.
This suppresses heat accumulation and plastic collapse of materials in the cutting zone, thereby minimizing the formation of surface microcracks and residual scratches.
From a metallurgical perspective, ultrasonic vibration-assisted machining promotes stable microstructural reconstruction in the processed area.
Metallographic examination reveals that the surface grains of ultrasonically processed H13 tool steel exhibit greater uniformity and more regular sub-structural orientation.
Additionally, no severe slip bands are observed at the grain boundaries.
Microhardness testing indicates a 10–15% increase in surface hardness compared to conventional cutting, with more uniform hardening layer depth, reflecting ultrasonic vibration’s positive regulation of work hardening and heat-affected zones.
Ultrasonic vibration-assisted machining introduces a more stable residual compressive stress field in the surface layer, enhancing the mold’s fatigue crack resistance .
The high-frequency strain rate excitation induced by ultrasonic vibration accelerates dislocation motion, significantly strengthening dynamic recovery and grain refinement mechanisms.
Macro-scale observations reveal superior surface roughness control and consistent contour accuracy.
Experimental Analysis
Comparison of Surface Roughness Under Different CNC Strategies
To evaluate the impact of CNC technology on mold surface quality under different control strategies, comparative machining experiments were conducted using three typical CNC strategies on the same mold sample design.
Each strategy employed identical cutting parameters, with Ra values serving as the evaluation metric.
Experiments were repeated three times, and the average was taken.
Test locations included three typical surface areas: the inner curved surface, the stepped plane, and the sharp edge transition zone.
The comparison results are shown in Table 1.

As shown in Table 1, under the conventional control strategy, the surface roughness of all three regions of the test specimen exceeded 0.45 μm.
An increase in Ra values was observed in the complex contour area (sharp edge transition zone), indicating deficiencies in dynamic response and error adaptation capabilities.
After introducing the composite control of constant speed and constant load, Ra values decreased by over 15% across the board, with particularly significant improvements in the curvature variation zone.
Further implementation of an intelligent control strategy combining a BP neural network prediction model with a thermo-mechanical compensation mechanism controlled Ra values below 0.35 μm across all regions, achieving a maximum reduction of 47%.
This demonstrates the strategy’s superior performance in ensuring surface consistency, dynamic trajectory stability, and tool mechanical control.
Analysis of Surface Defect Rate and Re-machining Frequency
To further quantify the impact of different CNC strategies on surface quality stability, this study statistically analyzed the surface defect rate and the number of re-machined parts (based on Ra value exceeding specifications or surface anomalies) for each strategy during batch processing of 20 parts on the same experimental platform.
Comparative data are presented in Table 2.

As shown in Table 2, the surface defect rate under conventional control strategies reached 25%, with a significantly high number of reworked parts.
After adopting the constant speed + constant load strategy, the defect rate dropped to 12.5%, reflecting that its response mechanism to load variations effectively suppresses heat accumulation and tool marks.
The neural network-based intelligent control strategy further reduced the defect rate to 5%, with rework being essentially negligible.
The results demonstrate that in precision mold machining, intelligent control technology not only enhances individual part quality but also significantly improves batch consistency and production efficiency.
Conclusion
This study investigates the influence of different machining strategies on mold surface quality by focusing on typical high-strength mold materials.
Combining CNC technology with metallurgical characterization methods, it systematically examines the underlying microstructural response mechanisms.
The research demonstrates that metallographic analysis, microhardness testing, and residual stress measurement can clearly reveal the microstructural evolution behavior of materials under thermo-mechanically coupled loading.
Meanwhile, intelligent CNC systems achieve surface hardness gradient control and stress distribution optimization through dynamic compensation and neural network prediction.
