China CNC Milling » Blog » Research on Allowance Allocation Technology for a Specific Crankshaft Turning-Milling Composite Process
FAQ
What materials can you work with in CNC machining?
We work with a wide range of materials including aluminum, stainless steel, brass, copper, titanium, plastics (e.g., POM, ABS, PTFE), and specialty alloys. If you have specific material requirements, our team can advise the best option for your application.
What industries do you serve with your CNC machining services?
Our CNC machining services cater to a variety of industries including aerospace, automotive, medical, electronics, robotics, and industrial equipment manufacturing. We also support rapid prototyping and custom low-volume production.
What tolerances can you achieve with CNC machining?
We typically achieve tolerances of ±0.005 mm (±0.0002 inches) depending on the part geometry and material. For tighter tolerances, please provide detailed drawings or consult our engineering team.
What is your typical lead time for CNC machining projects?
Standard lead times range from 3 to 10 business days, depending on part complexity, quantity, and material availability. Expedited production is available upon request.
Can you provide custom CNC prototypes and low-volume production?
Can you provide custom CNC prototypes and low-volume production?
Hot Posts
As the automotive industry advances toward greater mechanical automation, modularization, and component precision, its design philosophy continues to evolve.
The standards for automotive engines and parts also change annually.
Notably, precision components with complex structures, compact functional zones, and powerful capabilities have emerged within the industry.
FAW’s independently developed TD engine exemplifies such components.
This progression undoubtedly represents another significant elevation in the technical demands placed upon the automotive sector.
Crankshaft: Core Component and Machining Challenges
As a core component of the engine, the crankshaft holds a uniquely vital position.
It converts the energy transmitted from the engine into driving force, powering the operation of other components.
Its machining quality directly impacts the engine’s reliability, stability, and lifespan.
In the passenger vehicle sector, the development of V6, V8, and certain engine types has driven increasingly stringent demands for crankshaft precision and performance.
Concurrently, the industry sets higher standards for torque load capacity, crankshaft rigidity and strength, and operational balance.
Taking a specific engine crankshaft as an example, its application in passenger vehicle platforms presents unique characteristics.
These include exceptionally long dimensions, a complex structure, and high torque transmission.
Taking a specific engine crankshaft as an example, its application in passenger vehicle platforms presents unique characteristics.
These include exceptionally long dimensions, a complex structure, and high torque transmission.
Actual machining presents challenges such as susceptibility to vibration and deformation, along with difficulties in controlling dimensional and geometric accuracy.
Machining Process and Study Focus
The process route is notably lengthy, comprising 29 operations including forged blank – rough turning – heat treatment – semi-finish turning – heat treatment – finish turning – rough grinding – gear hobbing – heat treatment – finish grinding.
Taking the turning process in crankshaft machining as an example, crankshafts present numerous production challenges.
Even when processed on advanced equipment such as turning-milling machining centers, they remain difficult to machine as precision components.
Key constraints affecting final product quality include the complex structural characteristics of crankshafts and the limitations of the tools used.
The machining processes on turning-milling centers and the rationality of tool parameter settings also play critical roles.
This paper analyzes and describes the deformation behavior of forged crankshaft blanks and the methods for allocating machining allowances during the turning-milling composite process.
Analysis of Blank Allowance Allocation Strategy
A certain type of crankshaft features a complex structure and considerable length.
Consequently, during the blank forging process, factors such as forging dies and manufacturing techniques can cause varying degrees of bending deformation at different locations within the blank.
This results in uneven blank allowances and may even render the blank unmachinable, as illustrated in Figure 1.
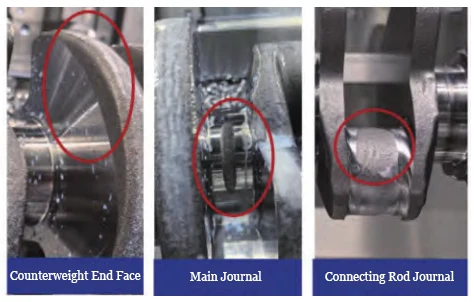
The main manifestations are as follows:
1. Axial deformation:
The blank undergoes axial deformation, shortening toward the center from both ends.
2.Radial deformation:
The entire blank experiences radial bending deformation, with maximum deformation at a specific location, preventing complete machining of the shaft diameter.
3.Connecting rod journal deformation:
Significant angular errors occur between connecting rod journals, with maximum deviations exceeding 4°.
We should analyze the crankshaft’s deformation patterns from three aspects—axial, radial, and connecting-rod journal angles—based on where the deformation occurs.
After this analysis, engineers can optimize the allowance allocation strategy.
Forging forms the crankshaft blank. In the turning–milling composite machining process, operators begin with rough turning.
Prior to rough turning, it is essential to analyze the blank’s deformation patterns.
This ensures precise alignment between the locating shaft diameter and the clamping position, while also guaranteeing uniform distribution of allowances across all sections.
This analysis is critical for ensuring the quality and efficiency of subsequent machining operations.
Analysis of Deformation Patterns in Forged Crankshaft Blanks
Axial Deformation
After forming during forging, crankshaft blanks undergo significant deformation.
Numerous factors influence axial deformation in forged crankshaft blanks, including forging temperature, forging pressure, cooling rate, material composition, and microstructure.
Particularly during cooling, temperature-induced deformation significantly impacts the crankshaft.
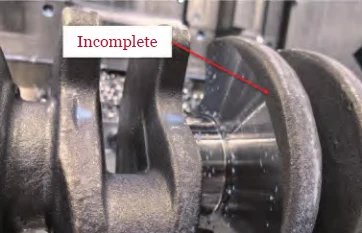
This deformation causes axial undercutting during machining, as illustrated in Figure 2.
To identify the root cause of undercutting, engineers conducted analytical experiments on forged blanks.
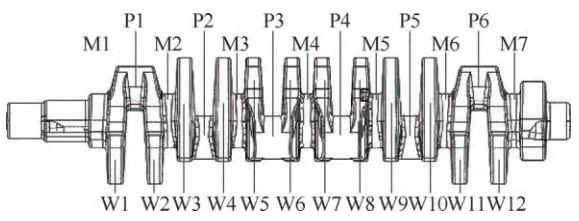
For further analysis, engineers designated specific regions of the crankshaft blank as shown in Figure 3.
To address potential deformation issues in forged crankshaft blanks, engineers conducted a detailed dimensional error analysis before actual machining.
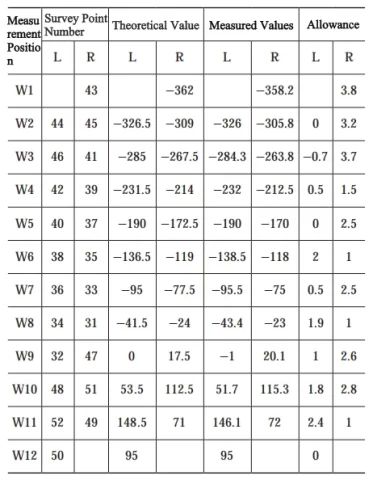
They selected ten crankshaft blanks and performed experimental analysis on the axial blank allowances on both sides of the W1 to W12 counterweights.
To obtain accurate data, they measured the axial dimensions of each counterweight and calculated the axial blank allowances at each position, as shown in Figure 4.
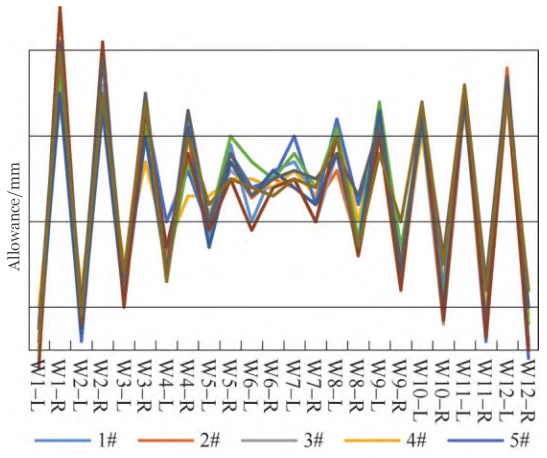
The experimental results obtained through the above data analysis indicate that the axial stock allowance of the crankshaft blank gradually stabilizes from both ends toward the center.
Combined with the trend of stock allowance variation, this demonstrates that the axial deformation of the crankshaft blank progresses from both ends toward the center.
This finding facilitates a better understanding and control of blank deformation.
It also provides robust data support for subsequent machining and heat treatment processes, ensuring stability and precision throughout crankshaft manufacturing.
Radial Deformation
Figure 5 illustrates the radial deformation of the crankshafts.
In particular, bending deformation at the main journals represents another critical issue that significantly impacts subsequent machining processes.
This deformation not only directly compromises the machining accuracy of crankshaft turning.
It may also induce vibrations during processing, which can potentially lead to machining interruptions in severe cases.
To thoroughly investigate the deformation patterns of crankshaft main journals, engineers selected ten crankshaft blanks as research subjects.
They systematically analyzed and tested the radial circular runout of these crankshaft journal surfaces relative to the axis.
This provided robust data support for subsequent process optimization and quality control.
To ensure data accuracy, engineers performed three-point precision measurements on each journal, taking into account the measurement location on the raw blank surface.
They then plotted a circle through data fitting.
They calculated the offset between the center of the fitted circle and the axis, reflecting the runout of the main journal relative to the axis.
Engineers also documented detailed records of the runout deviation for each main journal.
This process helped them thoroughly explore deformation patterns in the crankshaft main journal section and provided a basis for subsequent optimization and improvement.
Through this analysis, the following experimental results were obtained: Deformation of crankshaft blank main journals generally falls into two categories.
1.Symmetrical V-shape.
The M4 main journal at the center exhibits the maximum deformation.
Taking the M4 main journal as the dividing line, the deformation of all other journals gradually decreases toward both sides of the crankshaft.
This forms a relatively symmetrical V-shaped deformation pattern, as shown in Figure 6.

2.Asymmetric V-shape.
With either the M1 or M2 main journal exhibiting the greatest deformation, the deformation gradually decreases toward both sides.
This presents an asymmetric V-shaped deformation pattern biased toward the left side, as shown in Figure 7.

Based on these two deformation patterns, a solid basis can be provided for selecting subsequent turning positioning benchmarks.
Deformation of Connecting Rod Jaws
The forging precision of crankshaft connecting rod jaws is also a critical factor affecting crankshaft machining.
Angular errors along the circumference of the connecting rod primarily manifest this issue.
The crankshaft features two sets of six connecting rod journals, symmetrically paired with the M4 main journal as the dividing line, and evenly distributed at 120° intervals around the circumference.
During blank forging, angular errors develop in the connecting rod journals along the circumferential direction.
In subsequent machining, this leads to uneven distribution of machining allowances.
Figure 8 shows defects that occur because certain connecting rod journals cannot be fully machined.
To investigate the deformation patterns of crankshaft connecting rods, engineers selected ten crankshaft blanks as research subjects.
They set connecting rod journal P1 as the 0° reference point, as shown in Figure 9, and measured the angles of connecting rod journals P2 and P3 relative to P1, as depicted in Figure 10.
They then analyzed the measurement data.
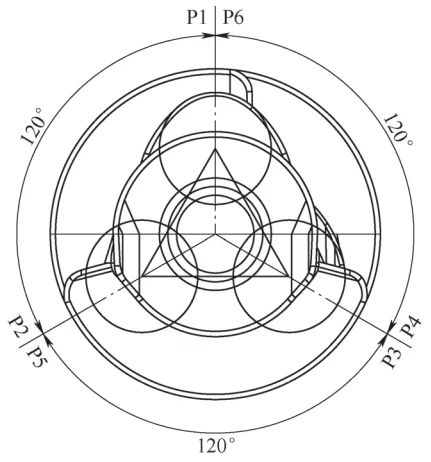
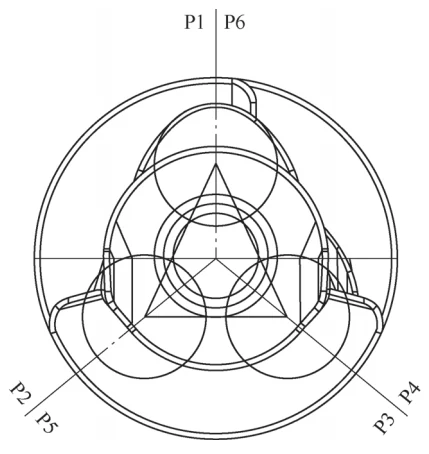
Analysis of the measurement results yielded the following conclusion: The angles between connecting rod journals on forged blanks do not achieve the ideal uniform 120° distribution.
Instead, they exhibit a distribution pattern resembling an isosceles triangle.
This distribution characteristic occurs when one connecting rod journal forms two angles with the other two journals.
These angles are nearly equal and simultaneously exceed 120°, creating an isosceles triangle-like distribution state, as shown in Figure 10.
The Impact of Allowance Allocation on Production
Excessive Tool Wear and Cost Wastage
Forged blanks are well known for their high surface hardness, typically ranging from 30 to 40 HRC.
Simultaneously, the surface quality of these blanks is often suboptimal, riddled with numerous micro-hard spots.
This undoubtedly poses a severe challenge to machining tools.
During the initial turning operation, operators place extremely high demands on the tool’s strength and toughness.
The slightest misstep can lead to severe tool wear or even tool breakage, resulting in unnecessary cost losses.
Within the production process, turning and milling operations are critical stages.
The primary purpose of the initial machining pass is to remove the oxide scale from the blank.
However, uneven distribution of the machining allowance can cause a series of problems.
First, an excessively large or small cutting volume can accelerate tool wear or even cause tool breakage.
Second, even if the tool does not break, severe wear can negatively affect subsequent dimensional accuracy and create latent risks for future breakage.
Therefore, strict control of all parameters during machining is essential to ensure uniform stock allowance, thereby safeguarding tool durability and maintaining stable machining quality.
Uneven Cutting Allowances Result in Residual Stresses Varying Across Different Sections.
During crankshaft machining, both turning and milling processes involve cutting operations that generate cutting forces from multiple directions.
Because of the crankshaft’s unique structural characteristics, the stresses often cannot release effectively.
This is especially true at the junction between the main journal and connecting rod journal, where stress concentration frequently occurs.
This phenomenon directly leads to deformation of the finished crankshaft due to stress accumulation, threatening its overall quality and performance.
More critically, the residual stress state after crankshaft machining profoundly impacts subsequent heat treatment processes.
During heat treatment, existing stresses not only interfere with crystallization processes and potentially exacerbate crankshaft deformation.
They also generate new stresses, further intensifying part distortion.
More critically, residual stresses can cause hardening and embrittlement of the crankshaft material structure.
In extreme cases, this may lead to crack formation and fracture incidents, undeniably increasing the complexity and risks of the manufacturing process.
Therefore, stress control during crankshaft machining is paramount.
Engineers must implement effective measures to minimize stress accumulation, optimize the heat treatment process, and refine the allocation strategy for machining allowances.
This ensures the consistent quality and reliable performance of the crankshaft.
Optimization of Rough Stock Allowance Allocation Strategy
In actual production processes, operators inspect rough stock through sampling methods to ensure product quality and efficiency, with particular focus on dimensional accuracy.
However, they do not prioritize deformation issues in rough stock or the spatial relationships between different sections during the initial inspection.
These problems typically emerge gradually during subsequent machining operations.
Therefore, to effectively prevent and reduce deformation issues during machining, it is crucial to enhance analysis.
Implementing specific methods for rough stock allowance allocation also becomes essential.
Design and Implementation of Axial Allowance Allocation for Blank Blocks
1. Design of Axial Allowance Allocation for Blank Blocks
To ensure uniform allowance distribution across each crankshaft blank, engineers must conduct a detailed analysis of the blank.
They should perform this analysis through an additional measurement process before actual machining.
This step enables precise determination of the required compensation strategy, ensuring neither overcutting nor undercutting during the initial machining stage.
This not only eliminates material property variations caused by uneven allowance distribution but also prevents adverse effects on subsequent heat treatment processes.
Based on the analysis of axial deformation trends in the blank, the measurement reference is first established.
Subsequently, engineers formulate a blank analysis strategy: using the virtual center of the M4 main journal as the reference, they distribute the blank allowance symmetrically toward both sides.
This ensures the symmetry of each connecting rod journal pair while achieving uniform axial allowance distribution.
This approach guarantees the machining quality of the crankshaft blank, laying a solid foundation for subsequent machining and heat treatment processes.
2.Implementation of Axial Allowance Allocation
Using the turning–milling composite measurement function, engineers inspect the axial dimensions of the crankshaft blank to be machined and calculate the center position of the M4 main journal.
At the same time, they measure and record the positional data relative to the reference center for both left and right faces of all counterweights W1 to W12, as shown in Table 1.
Based on the measurement data, they analyze the axial positional allowance of the blank and apply specific compensation.
This ensures the most uniform allowance possible and eliminates the impact of axial deformation in the forged blank on subsequent machining.
Design and Implementation of Main Journal Allowance Allocation
1.Design of Main Journal Allowance Allocation
Based on measurement data analysis of the crankshaft blank’s main journals, formulate an allowance allocation plan for actual machining.
Utilize the measuring function of the turning-milling composite machining center to measure each main journal with the equipment probe.
Fit the eccentricity between the actual journal center and the theoretical journal center to determine the crankshaft bending deformation.
Export data to the turning-milling composite system.
Engineers apply machining compensation based on the radial bending degree of the crankshaft journals, ensuring a rational allocation of rough stock allowance.
2.Implementation of Journal Allowance Allocation
Engineers analyze the measurement data and determine the compensation amount for the locating journal to complete its machining. They employ two primary methods.
(1)Shimming Method
Determine the eccentricity of the crankshaft blank’s main journal based on data and calculate the eccentricity value.
Use the eccentricity formula to compute the shim thickness. Apply shims to the three-jaw chuck for eccentricity compensation, as shown in Figure 12.
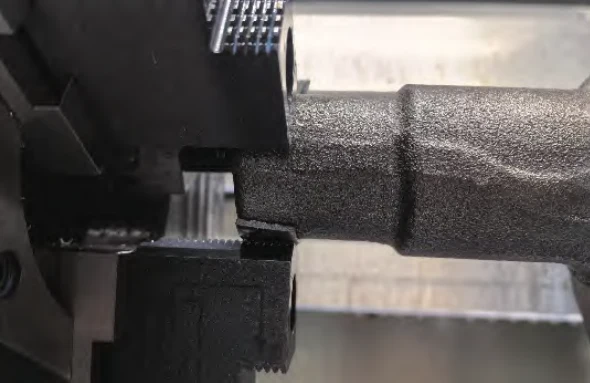
The shim clamping method can only serve as a one-time rough reference. While this approach improves allowance distribution, it suffers from unstable clamping.
During subsequent machining, axial cutting forces cause axial movement, compromising crankshaft machining accuracy.
(2)Machining the Locating Shaft Diameter
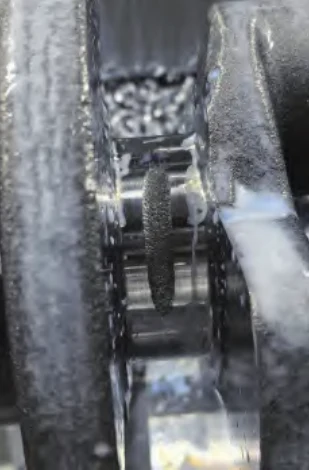
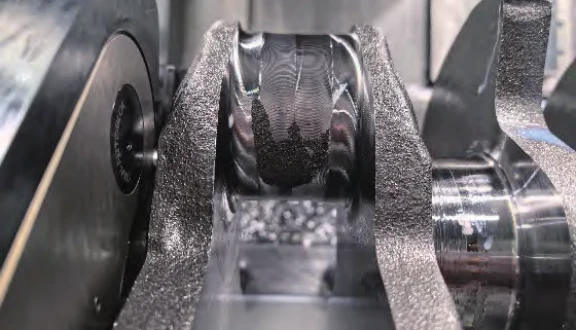
Engineers conducted a detailed analysis of the eccentricity magnitude and direction based on system-generated data to ensure precise alignment between the crankshaft main journal and the machine tool axis.
They then precision-machined the locating shaft diameter, as shown in Figure 13.
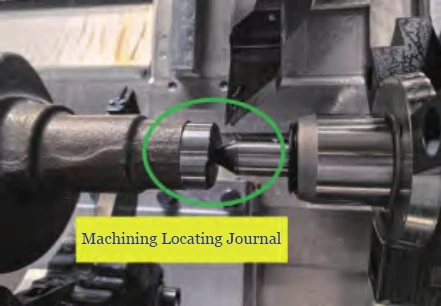
This clamping reference not only ensures uniform distribution of radial allowances but also enhances clamping reliability and reusability, significantly improving machining efficiency and quality.
This optimization measure lays the foundation for subsequent machining operations.
Design and Implementation of Connecting Rod Journal Allowance Allocation
1.Design of Connecting Rod Journal Allowance Allocation
The crankshaft connecting rod journal and counterweight block exhibit axial errors, while the main journal has radial errors.
These errors originate from circumferential angles. To ensure subsequent crankshaft machining accuracy, it is necessary to incorporate circumferential allowance analysis.
The proposed approach is as follows:By default, two connecting rod journals at the same angular position share identical angles. Select one connecting rod journal for measurement.
Utilizing the two-point measurement method on a turning-milling composite machining center, fit three circles circumferentially.
Calculate the angle between each center point and the circumferential center point to derive deviation values.
Perform angular and positional compensation to optimize the circumferential indexing strategy.
2.Implementation of Connecting Rod Neck Allowance Allocation
During actual machining, engineers should first conduct in-depth analysis and optimization for both the counterweight (axial) and main journal (radial) directions.
This ensures the final machining quality and precision.
Only after effective control and compensation of allowances in both these directions should further analysis and optimization of the circumferential direction proceed.
This occurs because if engineers cannot effectively compensate for axial and radial allowance distribution issues, subsequent analysis and compensation efforts for the circumferential direction become meaningless.
Once they confirm that both axial and radial allowances can be adjusted through compensation, they implement specific methods.
These methods ensure precise processing of the circumferential allowance on the connecting rod journal.
(1)First, precisely measure the angle of each connecting rod journal, as shown in Figure 14.
Based on this data, determine the angular differences and deviation directions between each connecting rod journal along the circumferential direction.
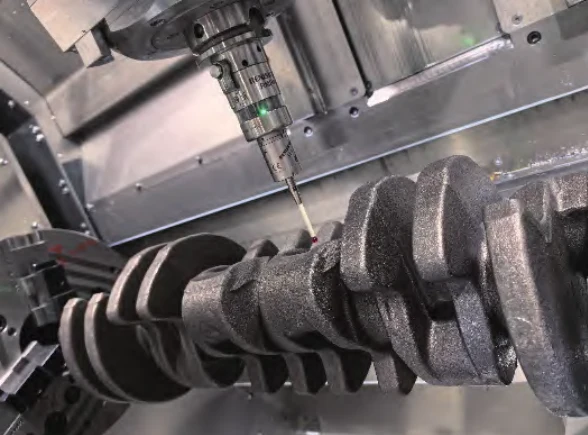
(2)Perform corresponding angular compensation within the specified range based on the stock allowance.
(3)Calculate and optimize the C-axis zero point for compensation, ensuring both reasonable and precise allowance distribution for the circular connecting rod journal.
Upon completing these steps, the C-axis reference for subsequent machining is established, thereby ensuring the precision and quality of the entire machining process to achieve optimal results.
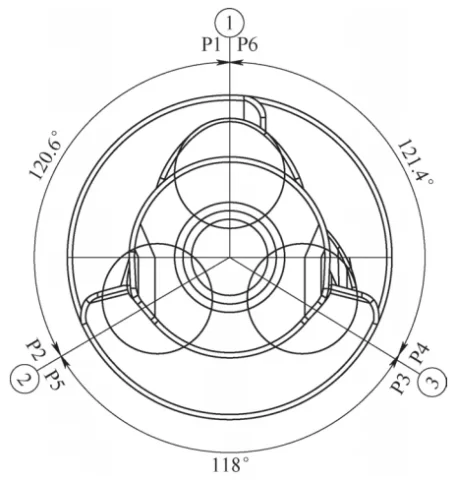
The measurement results are shown in Figure 15. The angle between the connecting rod journal and ② is 120.6°, while the angle between ① and ③ is 121.4°.
Using connecting rod journal ① as the reference, it is defined as the C-axis zero point.
At this point, the angular errors of connecting rod journals ① and ② are 0°, +1.4°, and -0.6°, respectively.
The crankshaft is then compensated counterclockwise by 0.4° relative to the C-axis zero point.
After compensation, the angular errors of connecting rod journals ①, ②, and ③ relative to the C-axis zero point are -0.4°, +1°, and -1°, respectively.
Through the above compensation method, the concentrated errors in connecting rod journal ① are distributed across the three connecting rod journals, ensuring subsequent machining accuracy.
③ relative to the C-axis zero point are -0.4°, +1°, and -1°, respectively.
Through this compensation method, the concentrated error in the connecting rod journals is distributed across all three journals, ensuring stability and pass rate in subsequent machining operations.
Conclusion
Through the implementation of the aforementioned three optimization measures during production, we successfully resolved the issue of uneven allowance distribution during machining.
This issue was caused by axial deformation and radial bending deformation of the crankshaft blank’s main journals.
Simultaneously, the allowance distribution for the connecting rod journal angles became more uniform, effectively addressing the challenge of uneven blank allowance distribution.
These improvements ensure the overall quality and performance stability of the crankshaft, laying a solid foundation for subsequent machining and heat treatment processes.
