David Chuang
Quality Control of Large Structural Components in Digital Manufacturing Environments
China CNC Milling » Blog » Quality Control of Large Structural Components in Digital Manufacturing Environments
FAQ
What materials can you work with in CNC machining?
We work with a wide range of materials including aluminum, stainless steel, brass, copper, titanium, plastics (e.g., POM, ABS, PTFE), and specialty alloys. If you have specific material requirements, our team can advise the best option for your application.
What industries do you serve with your CNC machining services?
Our CNC machining services cater to a variety of industries including aerospace, automotive, medical, electronics, robotics, and industrial equipment manufacturing. We also support rapid prototyping and custom low-volume production.
What tolerances can you achieve with CNC machining?
We typically achieve tolerances of ±0.005 mm (±0.0002 inches) depending on the part geometry and material. For tighter tolerances, please provide detailed drawings or consult our engineering team.
What is your typical lead time for CNC machining projects?
Standard lead times range from 3 to 10 business days, depending on part complexity, quantity, and material availability. Expedited production is available upon request.
Can you provide custom CNC prototypes and low-volume production?
Can you provide custom CNC prototypes and low-volume production?
Hot Posts
As digital technologies are applied more deeply and widely in aircraft design, manufacturing, and inspection, manufacturers face higher demands on the precision of aircraft product manufacturing and assembly.
Large structural parts (frames, beams, panels, joints, etc.), as primary load-bearing components, have long processing cycles.
They also involve complex manufacturing processes.
In addition, they require numerous inspection elements and high-precision inspection requirements.
Current inspection methods still rely on conventional verification techniques for routine product acceptance.
This severely limits acceptance efficiency.
It also fails to meet production schedule demands.
To address the dual challenges of inspection accuracy and efficiency, manufacturers are exploring new approaches to product acceptance.
They implement these approaches within three-dimensional design environments and digital manufacturing conditions.
These approaches aim to further enhance inspection precision.
They also aim to improve operational efficiency.
Analysis of Key Quality Control Factors for Large Structural Components
Large structural components form the critical framework and aerodynamic profile of aircraft airframes.
They feature complex assembly coordination relationships and demand high machining precision.
Large structural components feature large dimensions, intricate geometries, and diverse materials.
These factors present significant challenges in manufacturing technology and process quality control.
During aircraft manufacturing, manufacturers categorize large structural components by their structural characteristics for production organization.
Typical elements include panels, frames, beams, ribs, stringers, spars, skeletons, and joints.
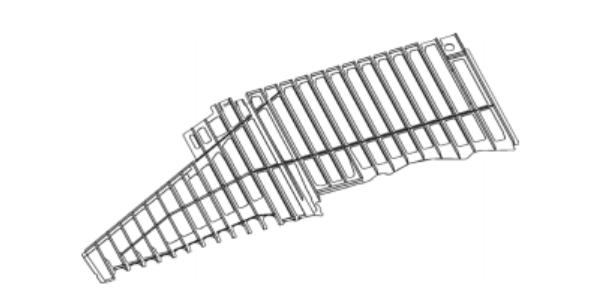
Panels form the aerodynamic shape and serve as primary load-bearing components.
Panel structures, as shown in Figure 1, primarily feature shapes like slots, ribs, lower limits, through holes, and bosses.
These components feature relatively large outer dimensions with thin ribs and webs.
Their final state typically forms curved surfaces or sections that correspond to the theoretical outer edges.
Except for mating holes and connection holes, other areas have larger tolerances.
Wall panel parts use pre-stretched aluminum alloy sheet blanks.
Manufacturers typically machine these blanks on CNC milling machines to create structural elements.
After machining, they undergo plastic forming to achieve the final shape.
Process Characteristics
Large structural components, due to their specialized application requirements, exhibit characteristics of large-scale and complex structures.
They also feature diversified materials and require high manufacturing precision.
Their process features are as follows:
1) Parts feature complex structural forms, with most external shapes related to aircraft aerodynamic profiles.
Peripheral contours also involve intricate assembly coordination with other components, making clamping difficult and machining technically challenging.
2) Blanks may utilize die-forged or pre-stretched thick plates.
Manufacturers commonly use sheet metal blanks to reduce tooling costs and shorten production cycles.
These require substantial machining allowances and are prone to stress generation during processing.
3) Rib structures exhibit intricate geometries with minimum wall thicknesses below 1mm, resulting in low rigidity and susceptibility to deformation during machining.
4) Precision assembly demands impose stringent requirements on part dimensions and geometric tolerances.
For instance, web dimensions require tolerances of ±0.1mm, necessitating high machining accuracy.
5)As next-generation aircraft performance advances, manufacturers increasingly adopt new high-performance materials.
Difficult-to-machine materials—represented by titanium alloys, ultra-high-strength steels, and low-density lightweight materials—account for a growing proportion.
These materials present significant cutting challenges and cause severe tool wear.
Dimensional Elements
Primarily encompass the following aspects:
1) Internal and external shape control elements of parts, mainly referring to constraints on overall dimensional relationships for part assemblies.
These are typically formed by single or double curved surfaces.
Inspection methods predominantly utilize coordinate measuring machines for contact measurement.
2) Control elements for part ribs, flanges, and web thickness dimensions, primarily referring to constraints on structural dimensions within the part body.
Manufacturers typically define these by parallel dimensions or transition dimensions.
Inspection methods primarily involve sequential point-by-point measurement using conventional gauges (vernier calipers, micrometers).
3) Geometric dimensioning and tolerancing (GD&T) control elements.
These primarily constrain positional dimensions of structural features like ribs, recesses, and reference holes within the part.
Typically, manufacturers define a single location with two or more dimensional constraints.
Manufacturers establish inspection methods based on design, manufacturing, and inspection benchmarks, using direct or indirect measurement techniques.
4) Control elements for mating zones, reference surfaces, and intersection holes primarily involve constraints on structural dimensions with assembly relationships.
These dimensions critically impact assembly quality. Inspection methods predominantly employ contact measurement using coordinate measuring machines (CMMs).
5) Surface quality control elements encompass surface roughness, residual stresses, and flatness of machining tool marks.
Inspectors primarily conduct the inspection through visual observation and tactile examination.
Challenges in Inspection
Primarily encompass the following three aspects:
1) Complex part structures necessitate multiple inspection methods to meet requirements, demanding high skill levels from inspectors.
2) Numerous dimensional features, predominantly typical dimensions, require frequent repetitive operations by inspectors.
This leads to visual or perceptual fatigue, increasing error rates and reducing efficiency.
3) Parts demand high dimensional accuracy, imposing stringent requirements on inspection environments, measurement equipment, and methodologies.
Inspectors must account for measurement conditions, develop optimized techniques, and proficiently operate high-precision inspection tools for dimensional verification.
Digital Manufacturing and Processing Solutions
Digital manufacturing refers to product manufacturing technologies that employ digital simulation methods to digitally describe the manufacturing process.
As computer digital technology, network information technology, and manufacturing technology continue to integrate and develop, manufacturers increasingly implement intelligent control in their enterprises.
Manufacturers are also applying it in manufacturing systems and process management.
Digital manufacturing technology has found extensive application in fields such as aerospace and automotive manufacturing.
Simulation Software Application
Within a 3D design environment, computer programming software assists in formulating machining plans.
Manufacturers can effectively prevent potential quality issues during machining by simulating the entire part processing workflow using simulation software on computers.
CNC Program Verification Control
Verification of CNC programs used for machining parts involves inspection across seven key aspects:
① Determination of programming basis.
② Establishment of process models.
③ Definition of machining operations and generation of toolpath trajectories.
④ Post-processing software handling.
⑤ Simulation verification of CNC programs.
⑥ Proofreading and verification of CNC programs.
⑦ On-site trial machining and program finalization to establish validated CNC programs, thereby solidifying the CNC machining process and ensuring stability.
Digital Inspection
With the widespread adoption of digital measuring equipment, the inspection process for large structural components fully leverages the measurement accuracy of measuring machines.
It also takes full advantage of their broad application range.
In a single measurement station and stable environment, digital measuring devices should be used to their maximum potential.
These devices include coordinate measuring machines, image measuring instruments, and 3D scanners.
Manufacturers use them to inspect parts effectively.
This reduces measurement errors that may arise from manual inspection and enhances inspection quality.
Advantages of Digital Manufacturing
Compared to traditional manufacturing, digital manufacturing incorporates a digital virtual control entity.
This entity comprises computers, networks, software, models, reports, and graphical components.
It goes beyond the traditional elements of “people, machines, materials, methods, and environment.”
Manufacturers transform production process information into digital data, establish mathematical models, and enable intelligent management.
Digital manufacturing enhances manufacturers’ capabilities in production planning.
It also improves workflow management.
The following notable characteristics illustrate these enhancements:
1)By utilizing high-performance machining equipment, manufacturers complete multiple machining processes with a single setup and positioning.
Manufacturers achieve this through program control and tool changing, allowing them to form parts in a single operation.
This reduces the number of fixtures and lowers manufacturing costs.
2) Implementing digital manufacturing management minimizes human intervention, ensuring stable machining quality and consistent repeatability.
This meets aerospace demands for high-precision product manufacturing.
3) Enables rapid changeovers for multi-variety, small-batch production, reducing part setup and process turnaround times.
This boosts production efficiency and shortens development cycles.
4) Utilizing digital machining simulation technology enables verification of CNC machining processes.
This verifies the correctness of CNC programs and the rationality of cutting parameter selection.
It also predicts tool life and supports online accuracy compensation.
In addition, it corrects errors in CNC programs before actual machining and optimizes process parameters.
As a result, manufacturers enhance machining accuracy and reduce scrap rates.
Quality Control Plan for the Development Process
First article inspection involves comprehensive process control and finished product inspection of the first piece or batch of components or assemblies produced.
Its purpose is to ensure that products meet design requirements.
It is a common quality management method.
This method evaluates the effectiveness of product prototyping, resumption of production, production process control, and process planning.
Manufacturers can leverage the high precision of digital machining for large structural components with complex geometries.
Manufacturers use this precision to implement the first article inspection method for product quality control.
By conducting full-process quality control and assessing quality results during the machining of the initial first articles, manufacturers can effectively determine the conformity of parts.
This assesses whether the parts meet design requirements.
Quality Control Records During First Article Inspection Implementation
Primarily include the following aspects:
1) Process Documentation.
When issues arise during first article manufacturing, the personnel identifying the problem (e.g., operators, inspectors) complete the First Article Production Process Issue Record Form.
This form details problems with process documents, tooling, equipment, and proposed improvements.
Process technicians provide corrective actions, and inspectors confirm the identified issues and proposed solutions.
2) Dimensional Inspection Records.
Based on part digital models and technical specifications, inspectors collaborate with process engineers to identify critical quality elements.
They measure and document actual values for each dimensional element generated during machining operations.
Manufacturers may measure process dimensions but do not record them unless they affect subsequent processes.
Complete the First Article Inspection Report, documenting: –
Inspectors identify inspection elements based on the technical requirements on drawings.
Using measurement equipment, including gauges, inspectors record the measurement results.
The inspector assigned is noted.
An indication is given of whether characteristic identification is present.
Manufacturers continue this process until they complete all machining operations for the part.
3) Appraisal Documentation.
Upon completion of all machining processes, prepare the following documentation.
This includes the First Article Production Process Issue Record, the First Article Inspection Report, product drawings, and technical specifications.
Submit these materials to the unit’s First Article Appraisal Team for review.
The appraisal primarily examines the production process across six key areas:
① Whether production procedures were followed as per regulations.
② Whether special processes were validated beforehand.
③ Whether equipment used was qualified.
④ Whether production conditions are under control.
⑤Inspectors determine whether discrepancies between documentation and actual production have been resolved.
⑥ Whether product quality characteristics conform to digital models and drawings.
The unit’s first-article inspection team may be led by the technical manager.
It can comprise relevant personnel from design, engineering, inspection, production, heat treatment, surface treatment technology, or quality control.
Manufacturers may invite customer representatives to participate when necessary.
Key Points for Inspection and Quality Review During Initial Article Verification Implementation
During the final stage of initial article verification implementation, a comprehensive review must be conducted.
This process ensures that the formation of product quality characteristics aligns with the inspection results and planned outcomes.
Reviewers should base this review on design models and drawing requirements.
It should utilize quality control records from all production stages, including personnel, machinery, materials, methods, environment, and measurement.
1) “Personnel” refers to operators and inspectors documented in manufacturing records.
They must possess relevant job qualifications.
They perform production operations and part measurements according to process documentation requirements.
In addition, they record production process information along with the actual measured values of quality elements.
Strict implementation of self-inspection, mutual inspection, and specialized inspection processes is required to ensure quality traceability during production.
2) “Machinery” refers to auxiliary production tools such as equipment and tools used in manufacturing.
These must be intact and in good working order, with process and routine maintenance, upkeep, and management performed as required.
3) “Materials” encompass raw materials, semi-finished products, and components used.
All material grades and conditions must be correct.
Where necessary, processes (such as spectral analysis or chemical composition analysis) shall be established for re-inspection.
4) “Method” refers to the documentation requirements for production processes, including design documents, process specifications, quality records, and foundational management files.
These documents must be complete, clear, and valid.
When production deviates from documented requirements, change procedures must be followed.
These procedures should be specified, documented, and confirmed for implementation.
5)“Environment” refers to the environmental control of the production site.
It ensures that supporting infrastructure and conditions, such as temperature and humidity in the work environment, meet requirements and remain under control.
6) “Measurement” refers to the quality elements of process inspection.
Appropriate measuring tools with suitable accuracy and range must be selected.
They must be verified and calibrated by a metrology department or measurement institution.
Additionally, they must remain within their validity period.
Specialized measurement personnel must possess the corresponding job qualifications.
They perform inspections according to specific measurement methods. They also record actual measured values in a standardized manner.
Batch Production Process Quality Control Plan
During the mass production phase, with design finalization complete and design changes relatively infrequent, the production line operates smoothly.
Therefore, after the first-piece inspection of a part is approved and the CNC machining program is finalized, the qualified internal and external dimensions verified during the first-piece inspection can serve as representative benchmarks .
Subsequent parts can undergo spot checks on their typical and significant dimensional features based on these dimensions.
Leveraging the high stability of digital machining, large structural components can be inspected for identical parts where all manufacturing conditions remain unchanged.
These conditions include personnel, equipment, materials, methods, environment, and measurement.
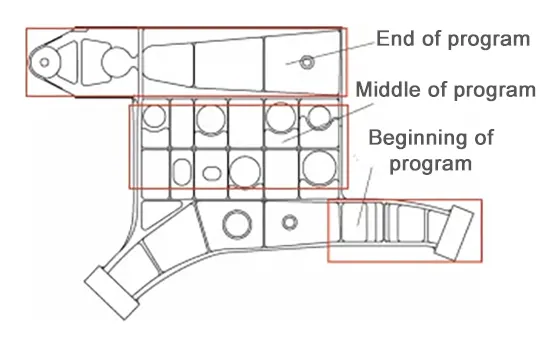
In such cases, inspection can focus on verifying only the dimensional elements processed at the “start, middle, and end” of the CNC program.
This approach significantly enhances machining inspection efficiency while reducing repetitive operations for inspection personnel.
An application example of segmented quality control for a frame product is shown in Figure 2.
The product’s machining process comprises five CNC program segments, with each segment generating 100 dimensional elements, totaling 500 dimensional elements for the entire frame.
Adhering to the principle of unchanged manufacturing conditions, only representative dimensions are selected for product quality verification.
This selection also takes into account the measurement accuracy and application scope of digital measuring equipment.
These dimensions come from the first, middle, and last segments of each program.
This approach not only meets quality control requirements but also significantly accelerates part production schedules.
Closing Remarks
Inspection methods were validated for multiple large structural components and compared with results from traditional inspection methods.
The findings show that quality control of large structural components under digital manufacturing conditions is effective.
It achieves stable product quality outcomes.
This not only verifies that the production process possesses the machining capability to meet design requirements.
It also ensures that process design, tooling equipment, operators, and environmental factors can consistently produce products meeting design specifications.
Moreover, it enables focused monitoring of critical and vulnerable points in the production process, allowing timely resolution of issues identified during manufacturing.
This prevents larger technical risks and economic losses in subsequent production.
It also enhances production and inspection efficiency.
Additionally, it ensures stable and reliable product quality.
Optimizing traditional inspection methods by exploring product manufacturing characteristics within a 3D design environment ensures product quality stability.
It also enhances inspection efficiency and standardizes processing environment specifications.
Additionally, it meets the evolving demands for intelligent, high-speed, precise, and high-quality development in digital product manufacturing and inspection technologies.
