China CNC Milling » Blog » Precise Fabrication of Micro-Blind Hole on Thin-walled Parts by Electrical Discharging Machining
FAQ
What materials can you work with in CNC machining?
We work with a wide range of materials including aluminum, stainless steel, brass, copper, titanium, plastics (e.g., POM, ABS, PTFE), and specialty alloys. If you have specific material requirements, our team can advise the best option for your application.
What industries do you serve with your CNC machining services?
Our CNC machining services cater to a variety of industries including aerospace, automotive, medical, electronics, robotics, and industrial equipment manufacturing. We also support rapid prototyping and custom low-volume production.
What tolerances can you achieve with CNC machining?
We typically achieve tolerances of ±0.005 mm (±0.0002 inches) depending on the part geometry and material. For tighter tolerances, please provide detailed drawings or consult our engineering team.
What is your typical lead time for CNC machining projects?
Standard lead times range from 3 to 10 business days, depending on part complexity, quantity, and material availability. Expedited production is available upon request.
Can you provide custom CNC prototypes and low-volume production?
Can you provide custom CNC prototypes and low-volume production?
Hot Posts
With the advancement of microelectronics and micromechanics, the demand for machining minute features on components has grown significantly.
This trend places higher demands on micro-feature machining technologies.
Characteristics of Thin-Walled Curved Components
In the field of mechanical processing, micro-hole machining typically involves diameters ranging from micrometers (μm) to millimeters (mm).
The specific diameter range varies depending on the machining technique used and the properties of the material.
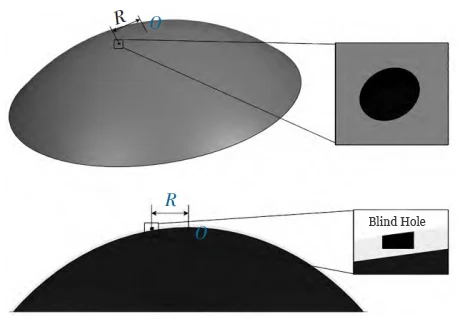
Consider the thin-walled curved stainless steel part shown in Figure 1.
This thin-walled component has a height of several millimeters, an outer contour diameter of nearly 30 mm, and a thickness of only 50 μm.
The machining task requires operators to produce blind holes with depths of 10, 20, and 30 μm (precision requirement: ±3 μm) at distances R from the part center, specifically R = 1 mm, 3 mm, and 5 mm, respectively.
Blind hole machining on thin-walled curved surfaces presents several challenges.
The thin walls are prone to perforation, and the curved geometry increases the risk of tool breakage.
In addition, achieving precise depth control is difficult.
Comparison of Micro-Machining Methods
Operators typically employ three primary processing methods: femtosecond laser machining, micro-drilling, and micro-EDM.
Femtosecond laser processing utilizes high-energy laser beams to cut, weld, or engrave materials without contacting the workpiece.
This method generates no macroscopic cutting forces, remains unaffected by curved surfaces, and delivers high processing speeds, although controlling depth remains challenging.
Micro-drilling, by contrast, employs appropriately sized drill bits that perforate materials through rotation and linear advancement.
While operationally straightforward, this force-based process risks thin-wall deformation.
Variations in curvature angles at different radii R increase the susceptibility of micro-drills to breakage.
Micro-EDM is a non-contact machining method that utilizes the thermal effects of electrical discharges for micro-material removal.
It imposes no macroscopic cutting forces on thin-walled parts.
Its discharge sensing capability allows full utilization of the coordinate differences before and after machining.
This enables the calculation of precise blind hole depths and supports high-precision blind hole machining.
However, it demands precise monitoring and control of the electrical discharge state.
Application of EDM and DBEDG Technology
Considering the strict blind hole depth requirements for the workpiece shown in Figure 1 and the need for machining on the curved surface of a thin-walled part, electrical discharge machining (EDM) becomes suitable.
Its non-contact nature and controllable machining depth can effectively meet these requirements.
In theory, operators can achieve high-quality blind holes by accurately monitoring and controlling the electrical discharge state.
To address the demand for high-quality blind hole machining on thin-walled parts, this paper employs double-block electrical discharge grinding (DBEDG) technology to fabricate high-precision micro-electrodes.
Utilizing the fine discharge control system of the self-developed machine tool enables precise depth control for minute blind holes.
This approach effectively resolves the machining challenges associated with micro-blind holes on thin-walled components.
Key Technologies for Micro Blind Hole Electrical Discharge Machining
Microelectrode Fabrication Techniques
Currently, the primary methods for fabricating microelectrodes include wire electrode grinding with reverse clamping and block electrode grinding with reverse clamping.
The former produces electrodes with good cylindricity and high dimensional accuracy but operates at a slow speed.
The latter, while faster, yields electrodes with poor cylindricity, thicker heads, and thinner bases.
To achieve higher-quality microelectrodes, this experiment employs the DBEDG method.
As shown in Figure 2, the DBEDG process involves: a cylindrical electrode locating its central axis by contacting surfaces A and B, then feeding along this axis while maintaining rotation.
Electrical discharge occurs between the electrode and the two inclined surfaces, gradually reducing the electrode diameter during feed until it reaches the predetermined diameter (d-2δ).
Subsequently, the gap between the workpiece electrode and the tool electrode reaches a critical value, preventing further spark discharge.
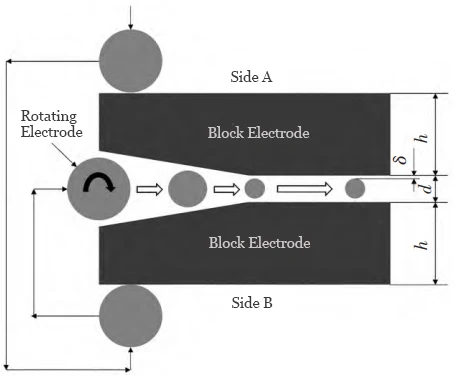
Under constant discharge parameters, the discharge gap δ is a fixed value.
At this point, operators can obtain a cylindrical electrode of the specified diameter by controlling the gap d between the two block electrodes.
To ensure high-quality machining of microelectrodes, operators must manufacture both block electrodes with high precision and make them as identical as possible.
Surfaces A and B must be parallel to each other and perpendicular to the top surface.
Operators measure perpendicularity using a dial indicator with an accuracy of 1 μm.
The width h of the block electrodes must be equal to ensure that when the electrode feeds axially along the center position, the distance to both sides of the gap is equal.
During electrode preparation, the gap between block electrodes must be strictly parallel to the X-axis to ensure the electrode feeds along the predetermined path.
Micro-EDM Discharge State Detection Technology
The micro-EDM discharge state detection system is a system capable of real-time monitoring and control of the electrical discharge machining process.
Its principle primarily relies on the sudden drop in voltage division caused by changes in inter-electrode channel impedance.
Detection circuits capture this change to determine the discharge state.
Efficiently and accurately distinguishing different pulse discharge states during machining is essential.
In particular, identifying abnormal discharges from normal ones provides a basis for subsequent gap adjustment and control.
This helps minimize abnormal discharge occurrences, thereby enhancing machining precision and efficiency.
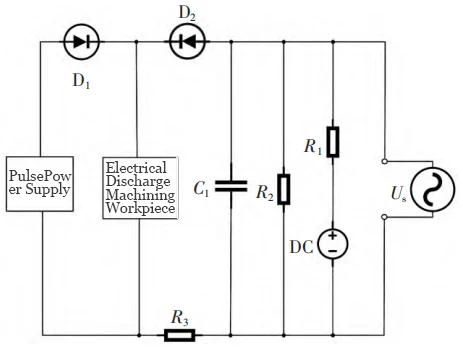
Figure 3 illustrates the principle diagram for discharge state detection during EDM.
During electrical discharge, the impedance between electrodes varies with discharge conditions, manifesting as changes in terminal voltage Uδ.
Therefore, operators can accurately determine the state of the pulse discharge by monitoring variations in the terminal voltage Uδ..
Micro Blind Hole Depth Control Technology
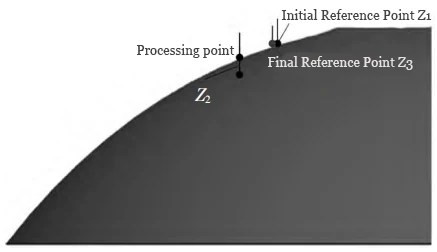
As shown in Figure 4, operators select a reference point 1 mm away from the machining point.
Operators position the electrode on the reference point surface and use the discharge sensing system to determine the Z1 coordinate at the electrode base.
The electrode is then placed on the machining point surface and fed downward by the Z2 distance.
Finally, the electrode is placed on the reference point surface to obtain the electrode bottom coordinate Z3.
The blind hole depth h equals the electrode feed distance minus the electrode wear length, i.e., h = Z2 – IZ1 – Z3I.
Experimental Design
Experimental System Construction
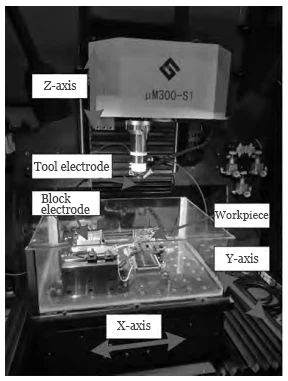
Operators conducted the experiment on a self-developed micro-EDM machine, model μM-300-S1, as shown in Figure 5.
The machine tool’s linear axis resolution is 0.1 μm, with positioning accuracy reaching 1 μm.
The precision motion platform, driven by a linear motor based on an air-bearing platform, incorporates a rapid adaptive servo control algorithm for the EDM process.
This enables sensitive process control, effectively preventing contact deformation of the workpiece.
During machining, operators mount the tool electrode on the spindle and secure the workpiece in a multi-degree-of-freedom adjustable fixture.
The fixture is used to level the workpiece.
Processing Steps
1. Prepare Microelectrodes
Fabricating microelectrodes is the first step in micro-EDM.
Generally, electrode materials require excellent electrical conductivity and sufficient strength.
Operators must customize the shape and dimensions of the electrode according to the workpiece design and machining requirements.
For this experiment, the team fabricated cylindrical microelectrodes from pure tungsten counterblocks.
The microelectrodes are made of tungsten material (70% tungsten content) with a diameter of 0.114 mm.
To achieve consistent pit bottom morphology, the lower end of the electrode must remain flat.
Before performing each discharge machining of a small pit, operators inspect the lower end of the electrode under a microscope.
When the lower end develops a blunt, rounded contour, operators remove a small amount of material using discharge machining to achieve a flat, uniform end.
Figure 6 shows a comparison of the micro-electrode tip before and after trimming.
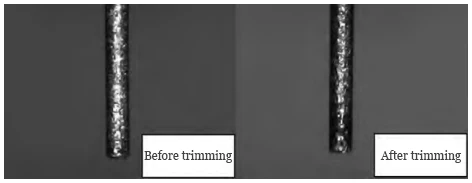
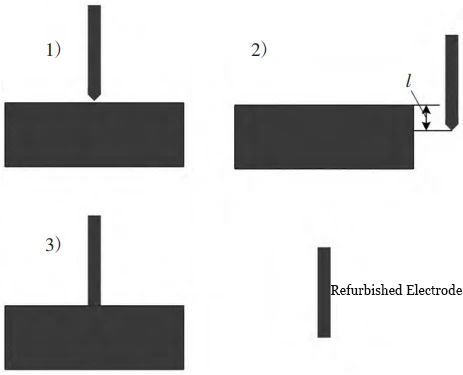
Figure 7 shows the flowchart for trimming the tip of a microelectrode. The removal process consists of three steps:
a. Determine the bottom coordinates of the tool electrode via Z-axis spark discharge sensing;
b. Lower the tool electrode by the required removal length l alongside the counter-clamp block;
c. Move the tool electrode horizontally toward the counter-clamp block and remove material via spark discharge.
2. Set Machining Parameters
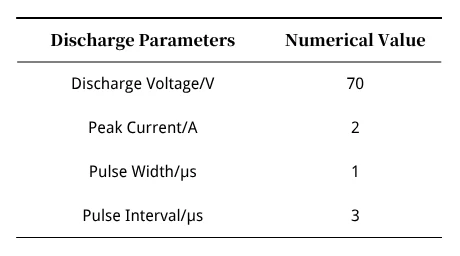
Based on the workpiece material, electrode properties, and the required machining accuracy and efficiency, configure the EDM parameters such as discharge voltage, current, pulse width, and pulse interval.
The machining parameters for this experiment are shown in Table 1.
3. Electrical Discharge Machining (EDM)
The micro-electrode is aligned with the machining position on the workpiece, followed by electrical spark discharge.
During machining, the electrode rotates at a speed of 30,000 to 50,000 rpm.
The thermal effect of the electrical spark causes the workpiece material to instantly vaporize or melt, forming microscopic cavities or channels.
4. Condition Monitoring and Control
During the machining process, it is necessary to monitor the discharge status in real time and adjust the machining parameters based on actual machining conditions.
This ensures machining stability while also enhancing machining precision and efficiency.
5. Cleaning and Inspection
After machining is complete, the workpiece must be cleaned to remove impurities and residues generated by the electrical discharge machining process.
It is then examined under a microscope to verify the quality and precision of the blind hole machining.
Analysis of Experimental Results
To mitigate the impact of random factors in individual experiments, each set of parameters underwent five machining trials during testing, totaling 45 machining trials.
Post-machining images of the parts under a microscope are shown in Figure 8.
The images reveal burr-free blind hole edges, good roundness, smooth bottoms, and visible metallic luster.
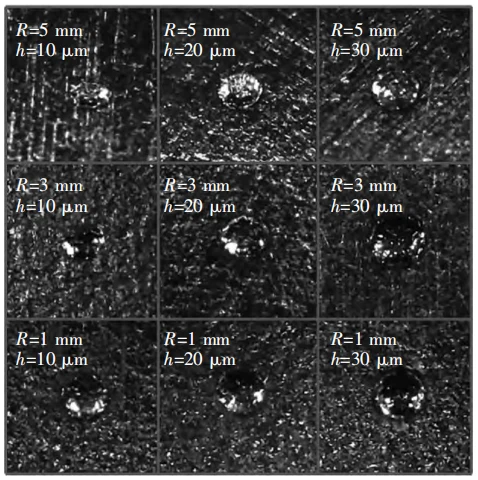
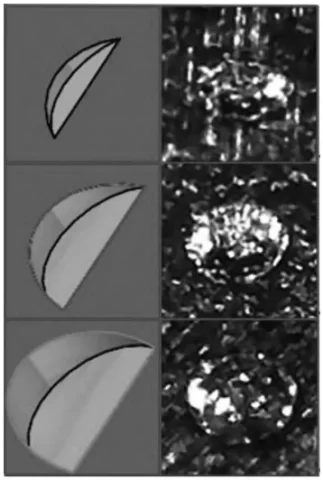
Figure 9 shows a comparison between the microscopic image and the 3D image of a blind hole at R=5mm.
From top to bottom, the figure displays blind holes with depths of 10, 20, and 30μm.
It can be observed that the shape of the machined blind holes closely resembles that of the 3D image.
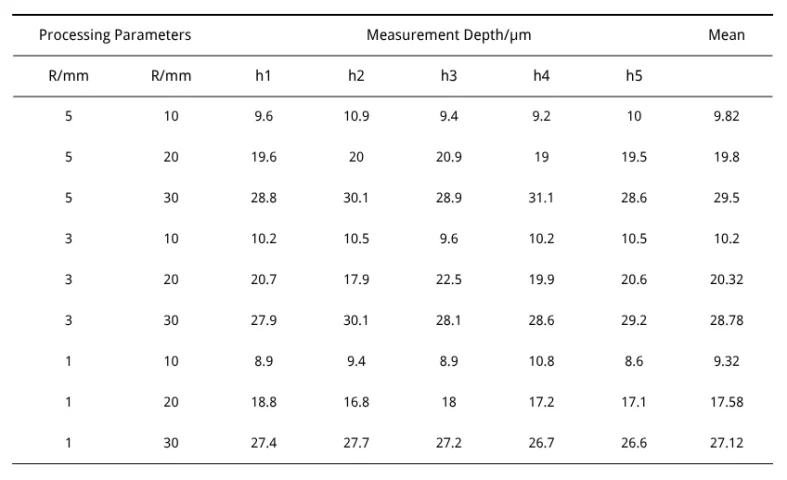
Using the depth control method described in the text for depth measurement, the obtained blind hole depth data are shown in Table 2.
When R=3mm and R=5mm, the error in the measured depth mean does not exceed 0.5μm.
However, when R=1mm, the error in the measured depth mean does not exceed 3μm, indicating a larger depth error at this setting.
Analysis reveals that when R values are small, the surface of thin-walled parts becomes flatter, requiring more material removal.
This leads to increased electrode wear, resulting in larger IZ1-Z3I values.
When the set machining depth Z2 remains constant, this causes h = Z2 – IZ1 – Z3I to become smaller.
This manifests as a reduced actual machining depth, consequently leading to greater depth measurement errors.
Conclusion
Experimental research on blind hole machining of thin-walled curved parts demonstrates that micro-EDM achieves high precision, excellent shape, and controllable depth in blind holes on thin-walled surfaces, effectively meeting production requirements.
This confirms micro-EDM as a reliable machining method that cannot be replaced by femtosecond laser processing or micro-drilling.
