China CNC Milling » Blog » Measurement Method for Cone Taper Using a Roundness Tester and Uncertainty Analysis
FAQ
What materials can you work with in CNC machining?
We work with a wide range of materials including aluminum, stainless steel, brass, copper, titanium, plastics (e.g., POM, ABS, PTFE), and specialty alloys. If you have specific material requirements, our team can advise the best option for your application.
What industries do you serve with your CNC machining services?
Our CNC machining services cater to a variety of industries including aerospace, automotive, medical, electronics, robotics, and industrial equipment manufacturing. We also support rapid prototyping and custom low-volume production.
What tolerances can you achieve with CNC machining?
We typically achieve tolerances of ±0.005 mm (±0.0002 inches) depending on the part geometry and material. For tighter tolerances, please provide detailed drawings or consult our engineering team.
What is your typical lead time for CNC machining projects?
Standard lead times range from 3 to 10 business days, depending on part complexity, quantity, and material availability. Expedited production is available upon request.
Can you provide custom CNC prototypes and low-volume production?
Can you provide custom CNC prototypes and low-volume production?
Hot Posts
Taper, as a critical dimension in the mechanical processing industry, demands increasingly higher standards for measurement efficiency.
It also requires greater accuracy and range as advanced manufacturing continues to evolve.
Traditional processing industries rely on instruments such as taper plug gauges, comparators, sine gauges, and coordinate measuring machines to inspect taper.
However, using taper gauges, comparators, and sine gauges introduces significant human error.
These methods also have a limited measurement range and insufficient precision of comparison tools.
These limitations hinder effective and accurate taper inspection during actual production.
While coordinate measuring machines (CMMs) effectively address these issues, their measurement principle involves point-by-point sampling followed by circular fitting.
This approach cannot accurately reflect the overall taper quality of machined parts due to limitations in the number and placement of measurement points.
This necessitates additional roundness measurements using a roundness tester.
Only by combining data from both instruments can the overall taper condition be accurately assessed.
This approach significantly reduces work efficiency and increases measurement costs due to the need for both a coordinate measuring machine and a roundness tester.
Therefore, considering all factors, selecting a roundness tester for taper measurement ensures measurement accuracy while improving efficiency and reducing investment costs.
This paper introduces the method of using a roundness tester to inspect taper, along with specific experiments and uncertainty evaluation.
Measurement Principle
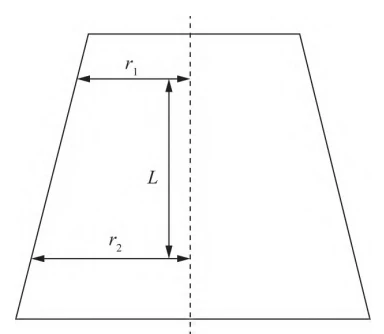
Using a roundness gauge, measure the radius difference between the two sections of the cone and the distance between them, as shown in Figure 1.
The taper angle α can then be calculated using the following formula:

In the formula: α is the taper angle of the cone,”; r₁ is the radius of the smaller end circular cross-section, μm;
r₂ is the radius of the larger end circular cross-section, μm;
L is the straight-line distance between the two cross-sections, μm.
Measurement Method
Since taper plug gauges are the most common taper tools, the measurement method is explained using a 7/24 specification 60 (Lp=155 mm) taper plug gauge as an example.
Preparation Before Measurement
After thoroughly cleaning the taper plug gauge, place the gauge and all associated equipment in the instrument room.
Maintain a constant temperature of (20±0.5)°C for 8 hours, with hourly temperature fluctuations not exceeding 0.5°C, to minimize measurement errors caused by temperature variations.
Calibration Before Instrument Use
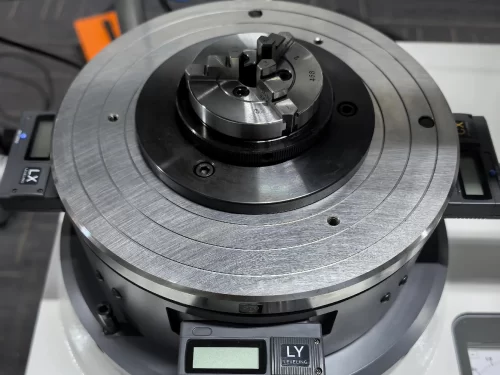
After temperature stabilization, level the rotary stage of the roundness tester.
Then use a standard sphere to calibrate the instrument’s concentricity and radial deviation.
Employ third-grade gauge blocks to correct the instrument’s axial error.
Save the calibration data obtained for subsequent roundness tester measurements.
Aligning and Leveling the Test Piece
Secure the taper plug gauge in a suitable fixture on the rotating workbench to prevent wobbling and measurement errors.
Manually position the test piece at the exact center of the workbench. Adjust the short measuring rod to contact the test piece.
Align the test piece precisely to achieve concentricity.Use a roundness gauge to correct rotational offset.
Minimize physical contact with the test piece during placement to reduce temperature-induced measurement errors.
Measurement Section
During the measurement process, factors such as measuring force may cause the actual position of the measuring point to shift, resulting in random errors.
Additionally, the Z-axis scale of the roundness tester has relatively low precision.
Therefore, the probe is positioned perpendicular to the axis of the workpiece to minimize errors in the B-axis direction.
After adjusting the stylus, measure the center-mounted gauge.
Select the first measurement section 3mm from the work surface near the cone.
After measurement, select the second section 155mm along the Z-axis from the first section.
Use the least squares method to fit the circles measured at both sections.
The difference in R-axis positions between the fitted circles at the two sections is taken as the radius difference r2-r1.
The difference in the B-axis positions between the two sections is taken as the distance L.
The cone taper is calculated by applying the inverse trigonometric function to the ratio of these distances.
Uncertainty Assessment
Using the Tokyo Seimitsu RNEX200SD2-12 roundness tester and a 7/24 taper plug gauge with specification 60 (LP=155 mm), the Δr standard value should be 47.263 mm.
This example illustrates the measurement uncertainty under conditions where the ambient temperature is 20°C and the hourly temperature variation does not exceed 0.5°C.
Measurement Model
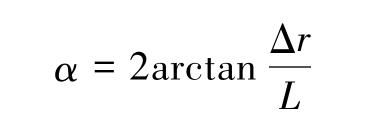
In the formula: α is the cone taper angle,”;
Δr is the radius difference between the two circular sections after fitting, in μm;
L is the straight-line distance between the two sections, in μm.
Since r and L are mutually independent, the sensitivity coefficient is set to 1.
Calculating Uncertainty Components
(1)Uncertainty Component u₁ Introduced by Measurement Repeatability
The taper angle of this taper plug gauge was measured 10 times repeatedly.
The arithmetic mean was taken as the final measured result.
Its standard deviation s was calculated using the Bessel formula to determine the uncertainty component μ₁ introduced.
The measurement results are shown in Table 1.
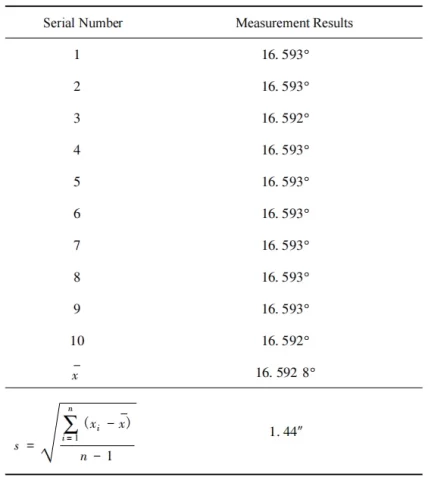
Therefore, u = 1.44″
(2)Uncertainty Component u2 Introduced by R-axis Direction Accuracy
The roundness gauge used in this measurement has an R-axis scale accuracy of (0.5 + L/180) μm.
When measuring the circular sections of each layer of the tapered angle, their normal directions are consistent.
The difference in radius between the two cross-sectional circles is used for calculation, allowing the detection errors at corresponding points on each cross-section to cancel each other out.
Based on empirical estimation, it conforms to a uniform distribution. Therefore.

Convert to angle:

(3)Uncertainty Component u3 Introduced by Z-axis Direction Accuracy
Due to the absence of corresponding Z-axis scale accuracy and relevant technical documentation controlling its measurement precision, the uncertainty of the roundness tester’s B-axis direction was evaluated.
This evaluation used the comparison measurement method with 200 mm and 40 mm third-class gauge blocks.
During measurement, the probe direction must be parallel to the worktable.
However, since the axial error requirement for the probe is less than 0.05 μm, the uncertainty component introduced by this factor can be considered negligible.
The uncertainty component is primarily introduced by the following two aspects:
① The uncertainty component uL1 introduced by measurement repeatability
② The uncertainty introduced by the gauge block is uL2
After repeating the measurement of the gauge block 10 times, its standard deviation is taken as uL1. The measurement results are shown in Table 2.
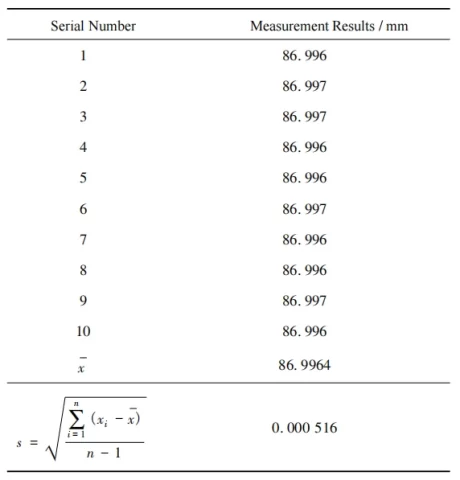
Therefore, uL1 = 0.516 μm.
The uncertainty component introduced by the gauge blocks can be obtained by consulting the gauge block verification procedure and calculating it as uL2 = 0.13 μm.
After combining all uncertainty components, the uncertainty component u3 = 0.54 μm introduced by the accuracy in the B-axis direction is converted to an angular value:

Synthetic standard uncertainty u

Taking k=2, the expanded uncertainty U=ku=5.4″, k=2.
Conclusion
(1) Based on actual measurements, the primary source of uncertainty when using a roundness tester to measure taper is introduced along the B-axis direction.
Due to uncertainties in the B-axis scale accuracy and insufficient display resolution, the uncertainty along the B-axis must be evaluated separately.
(2) Using a roundness tester for taper measurement can meet the requirements for measuring the vast majority of workpieces.
However, due to variations in roundness tester precision, specific uncertainties must be calculated individually.
(3) Roundness gauge taper measurement significantly meets the demands of the machining industry, enhancing work efficiency and quality while reducing the cost of precise measurement.
If the Z-axis accuracy of roundness gauges can be improved, they are expected to replace coordinate measuring machines and comparators.
This would allow them to calibrate standard plug gauges and other metrological instruments.
(4) Calculating the Z-axis uncertainty of roundness gauges using gauge blocks is constrained by factors such as gauge block grade, resolution, and block dimensions.
Given that significant improvements in the B-axis accuracy of commercially available roundness gauges are unlikely in the near term, future research could focus on deriving specific uncertainty conversion formulas.
These formulas would pertain specifically to the B-axis.
This could be achieved by experimentally determining the straightness of the sensor along the B-axis guide and the straightness between the reference rotation axis and the B-axis guide.
