China CNC Milling » Blog » Effect of Laser Shock Treatment on Bending Deformation of 301L Stainless Steel
FAQ
What materials can you work with in CNC machining?
We work with a wide range of materials including aluminum, stainless steel, brass, copper, titanium, plastics (e.g., POM, ABS, PTFE), and specialty alloys. If you have specific material requirements, our team can advise the best option for your application.
What industries do you serve with your CNC machining services?
Our CNC machining services cater to a variety of industries including aerospace, automotive, medical, electronics, robotics, and industrial equipment manufacturing. We also support rapid prototyping and custom low-volume production.
What tolerances can you achieve with CNC machining?
We typically achieve tolerances of ±0.005 mm (±0.0002 inches) depending on the part geometry and material. For tighter tolerances, please provide detailed drawings or consult our engineering team.
What is your typical lead time for CNC machining projects?
Standard lead times range from 3 to 10 business days, depending on part complexity, quantity, and material availability. Expedited production is available upon request.
Can you provide custom CNC prototypes and low-volume production?
Can you provide custom CNC prototypes and low-volume production?
Hot Posts
With the rapid development of rail transit, the comprehensive performance requirements for rail vehicle materials are increasingly demanding.
Traditional carbon steel materials are gradually failing to meet the high standards demanded by modern rail transit.
The current development trend in the rail transit industry clearly points toward intelligent, green, and lightweight directions.
To achieve this goal, continuous innovation and development of new technologies, processes, and materials are essential.
Advantages of 301L Stainless Steel for Rail Vehicles
301L stainless steel is one of the primary materials for rail vehicles, offering high strength, excellent corrosion resistance, plasticity, toughness, and fire safety.
Component failure typically originates at the surface, making surface machining quality critical to wear resistance, fatigue strength, and corrosion resistance.
Factors such as surface microstructure, microhardness, and residual stress exert particularly significant influence on surface quality.
Laser Shock Forming (LSF) technology is an ultra-rapid cold plastic deformation process.
It is conducted at extremely high strain rates. The process features non-contact operation and flexible forming capabilities.
Compared to conventional forming methods, LSF eliminates the need for dies.
It significantly enhances the fatigue resistance and corrosion resistance of workpiece surfaces.
It also achieves dual benefits of material forming and surface modification.
Mechanism of Laser Shock Forming
This technology primarily relies on irradiating metal surfaces with short-pulse (nanosecond-level) laser beams of high power density (exceeding 10⁹ W/cm²).
During this process, the sacrificial layer on the metal surface absorbs laser energy and undergoes rapid explosive vaporization, generating high-pressure plasma.
The formation of plasma produces shock waves in the gigapascal (GPa) range.
These shock waves propagate into the material carrying gigapascal-level energy.
They cause plastic deformation of the surface layer.
The application of LSF technology significantly enhances material surface properties.
It also provides an efficient and flexible solution for forming complex-shaped components.
Review of Related Research on Laser Shock Forming
Hu et al. conducted research on laser shock forming of 1060 aluminum alloy plates, analyzing the effects of different laser process parameters on plate deformation and bending angle.
They proposed the shock bending mechanism and stress gradient mechanism to explain whether convex or concave bending deformation occurs in plates under laser shock action.
Pence et al. investigated the effects of specimen thickness and laser energy on micro-bending in plates using nanosecond lasers.
Results indicated that under identical laser parameters, specimen thickness is the dominant factor determining plate deformation mode.
At laser energies of 0.2–0.5 J, plates with a thickness of 0.25 mm exhibited concave deformation, while plates with a thickness of 1. 75 mm, convex deformation occurs.
Experimental data revealed that low-intensity laser pulses effectively reduced the likelihood of foil fracture.
Further analysis indicated that as laser pulse energy increased, the forming depth of the foil initially rose and then declined.
Results indicated that higher laser impact energies generated greater residual compressive stresses, though the stress values did not increase linearly.
Doubling the laser impact energy only increased the average surface residual compressive stress by 1.3 to 1.4 times.
Research Motivation and Scope
Currently, there is limited international research on laser shock peening technology applied to 301L stainless steel.
Therefore, this study subjected 301L stainless steel to laser shock treatment to investigate the bending deformation patterns, three-dimensional microstructure, and residual compressive stress variations observed after laser shock peening.
Test Materials and Methods
The test material was 301L stainless steel.
After cleaning the test specimen surface with anhydrous ethanol, laser shock peening was performed using a laser shock peening apparatus equipped with an Nd:YAG laser.
Specimen Design and Dimensions
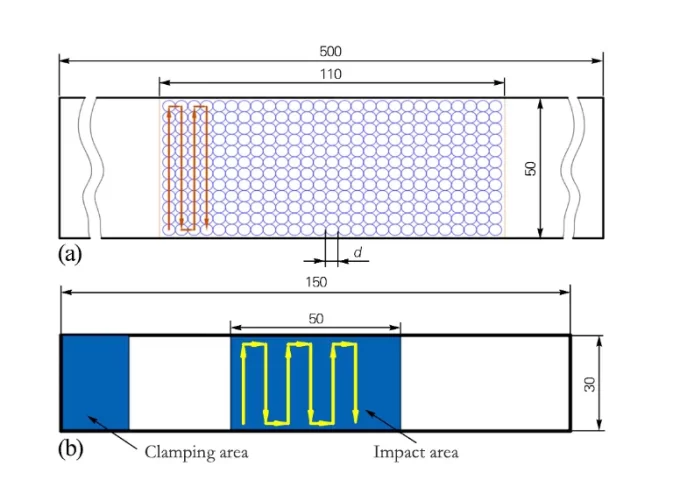
The dimensions of the test specimen for verifying forming were 500 mm × 50 mm × 3 mm, with a laser impact zone of 110 mm × 50 mm.
The test specimen for investigating surface integrity measured 150 mm × 30 mm × 3 mm, with the left end clamped 30 mm during impact. with a laser impact area of 50 mm × 30 mm.
A 0.13 mm thick black adhesive tape was selected as the absorption layer, as shown in Figure 1.
Laser Shock Peening Process Parameters
The laser impact process parameters were: laser energy density of 15 GW/cm², spot diameter of φ4 mm, pulse width of 15 ns, frequency of 5 Hz, and duty cycles of 0%, 10%, 20%, and 30%. cm², spot diameter φ4 mm, pulse width 15 ns, frequency 5 Hz, with overlap ratios of 0%, 10%, 20%, and 30%.
The laser impact method was single-sided impact.
The number of impacts for the formed test specimens ranged from 1 to 9, while the test specimen for surface integrity investigation underwent a single impact.
Measurement Methods and Characterization Techniques
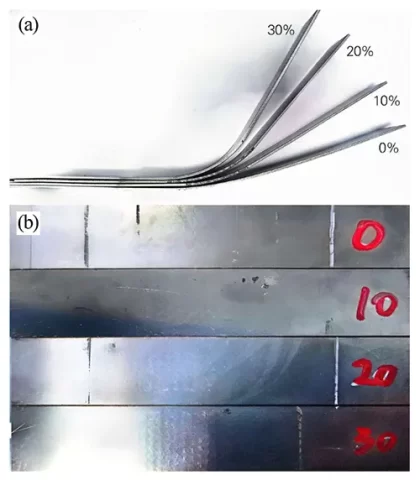
Figure 2 shows the macroscopic morphology of the 301L stainless steel plate after laser shock-induced bending deformation.
After laser shock treatment, the specimen surface was cleaned.
The curvature radius was measured using a Sivak digital radius gauge.
Surface roughness and micro-area three-dimensional morphology were measured using a Contour GT-K white light interferometer (WLI) with a 5x objective lens.
Residual stress was measured using an LXRX-type X-ray stress analyzer. using a Mn target with a collimator diameter of φ4 mm.
Test Results and Analysis
Bending Deformation
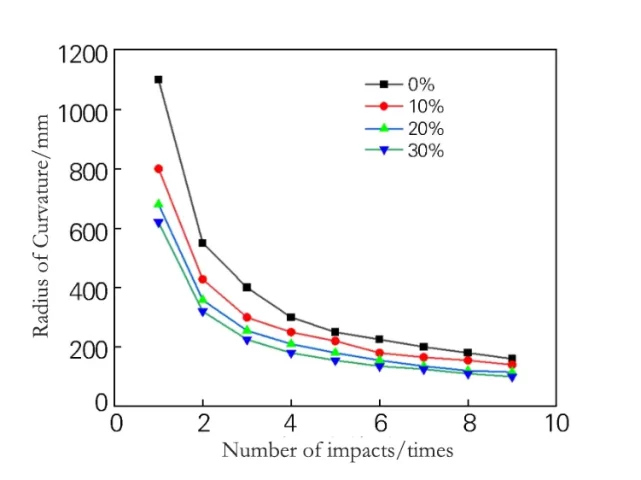
Figure 3 shows the variation curves of the curvature radius of 301L stainless steel plates with different lap ratios as a function of impact cycles.
As seen in Figure 2(a), the 301L stainless steel plate warps toward the laser impact surface, exhibiting convex bending.
As shown in Figure 3, the curvature radius exhibits a gradual decreasing trend with increasing laser impact cycles, and the rate of decrease progressively slows.
› Effect of Overlap Ratio on Curvature Radius and Deformation
Under identical laser process parameters, increasing the overlap ratio from 0% to 30% results in a gradual reduction in curvature radius and a corresponding increase in deformation magnitude.
The increase in overlap ratio significantly affects both the radius of curvature and the deformation amount.
Within a certain range, the radius of curvature exhibits a negative correlation with both the overlap ratio and the number of impacts.
› Mathematical Modeling of Curvature Radius Evolution
Fitting the relationship equations between the radius of curvature and the number of impacts for 301L stainless steel plates with overlap ratios of 0%, 10%, 20%, and 30% using a third-order polynomial yields:
R0 (x) = -6.1x³ + 115.6x² – 711.6x + 1654 (1)
R10 (x) = -4.2x³ + 78.6x² – 488.4x + 1181 (2)
R20 (x) = -3.5x³ + 66.6x² – 414.6x + 1002 (3)
R30(x) = -3.4x³ + 64.7x² – 396.6x + 929.6 (4)
In the formula: R₀(x), R10(x), R20(x), and R30(x) represent the radii of curvature at overlap ratios of 0%, 10%, 20%, and 30%, respectively.
By introducing the overlap ratio, a mathematical relationship can be established between the radius of curvature R, the overlap ratio x, and the number of impact cycles y:
R(y, x) = a(y)x³ + b(y)x² + c(y)x + d(y) (5)
a(y) = -0.0048y² + 0.23y − 6. 1 (6)
b(y) = 0. 0878y² − 4. 28y + 114. 86 (7)
c(y) = 0. 5y² − 25. 6y + 706. 9 (8)
d(y) = y² – 53.57y + 1654 (9)
› Work-Hardening and Diminishing Deformation with Increasing Impacts
The rate at which the curvature radius decreases when laser-induced giant shock pressure waves act on the specimen surface slows down with increasing impact frequency.
This occurs because the laser treatment of the specimen surface induces a work-hardening effect, which significantly reduces deformation during subsequent impact processes.
Following the initial impact, pronounced indentations form on the specimen surface.
The presence of these indentations diminishes the effectiveness of the absorption layer, thereby adversely affecting the specimen’s overall deformation behavior.
› Mechanism of Overlap-Induced Plastic Deformation Enhancement
The overlap ratio is also a key factor influencing specimen deformation.
As the overlap ratio increases from 0% to 30%, the curvature radius gradually decreases while deformation progressively increases.
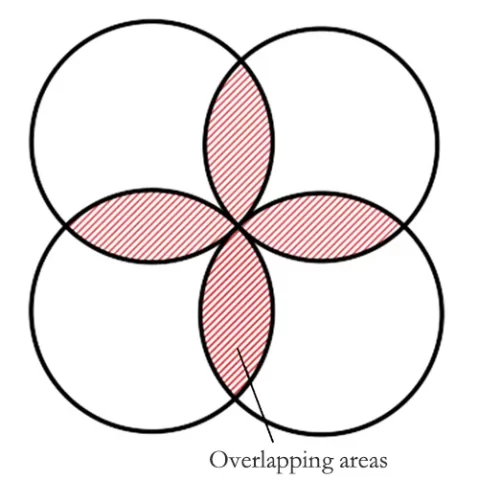
With a higher overlap ratio, the overlapping area of laser exposure on the specimen surface expands, as shown in Figure 4.
Consequently, under identical laser process parameters, the specimen surface experiences a greater number of laser impacts.
Increasing the overlap ratio essentially increases the number of laser impacts per unit area on the specimen.
This leads to greater plastic deformation, thereby increasing the deformation extent of the 301L stainless steel plate.
› Surface Roughness Evolution with Overlap Ratio
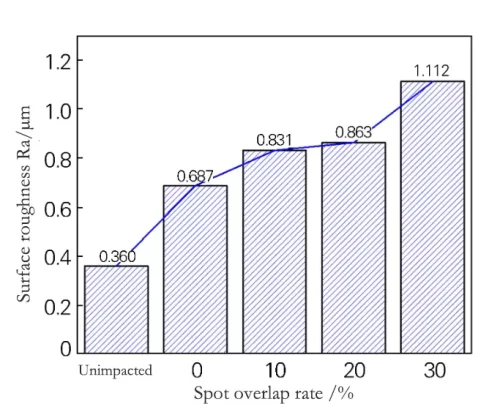
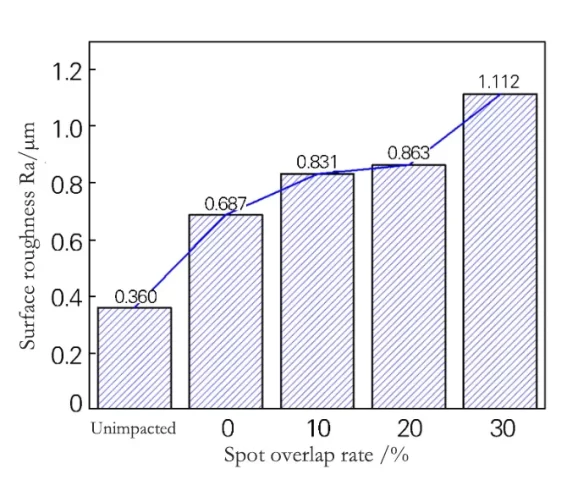
Figure 5 shows the surface roughness of 301L stainless steel specimens at different overlap ratios.
As shown in Figure 5, the surface roughness of the 301L stainless steel specimen without laser impact treatment is 0.360 μm;
At an overlap ratio of 0%, the roughness increased to 0.687 μm.
As the overlap ratio increased, the surface roughness exhibited an upward trend, reaching 1.112 μm at an overlap ratio of 30%.
During laser shock peening, overlapping spots cause micro-protrusions to undergo repeated strengthening plastic deformation, leading to the formation of wrinkles and slip bands.
These factors collectively contribute to the increase in surface roughness.
› Three-Dimensional Surface Morphology of the Impact Zone
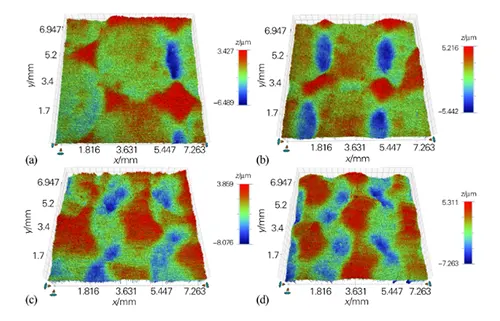
Figure 6 shows the three-dimensional morphology of the impact zone on the surface of 301L stainless steel specimens under different lap ratios following a single laser shock pulse.
Significant differences in surface morphology were observed across specimens with varying lap ratios.
When lap ratios were 0%, 10%, 20%, and 30%, the corresponding surface pit depths were 9.916, 10.658, 11. 935, and 12.574 μm, respectively.
As the lap ratio increased, the shape of surface pits gradually transformed from initially tangential circles to overlapping circles, with pit depths at the overlap region progressively increasing.
The pit depth in the overlap region was significantly higher than that in the non-lap region, indicating that the overlap region underwent multiple laser impacts, resulting in more pronounced pit depths and increased plastic deformation of the surface.
Surface Residual Stress
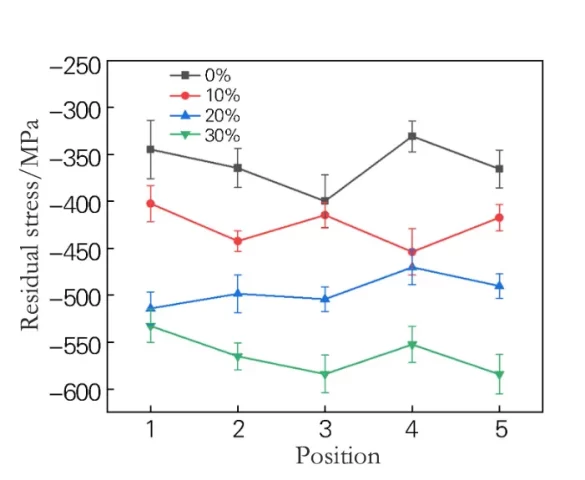
Residual stress measurements were conducted on five points along a straight line within the impact zone of 301L stainless steel plates subjected to a single laser shock at different overlap ratios using an X-ray stress tester.
The results are shown in Figure 7. As depicted in Figure 7, laser shock can induce significant residual compressive stress on the surface of 301L stainless steel, with the magnitude of residual compressive stress increasing as the overlap ratio increases.
For a single impact, when the overlap ratios were 0%, 10%, 20%, and 30%, respectively, the maximum residual compressive stresses corresponding to the convex surface were 399, 453, 514, and 584 MPa, while the average residual compressive stresses were 361, 426, 496, and 564 MPa, respectively.
When the overlap ratio increased from 0% to 10%, the average residual compressive stress rose by 18%; from 10% to 20%, it increased by 16%; and from 20% to 30%, it rose by 14%.
Overall, for every 10% increase in overlap ratio, the residual compressive stress increase remained stable within the 14% to 18% range, exhibiting a pattern of steady growth with increasing overlap ratio.
The formation of high residual compressive stresses on the laser-impacted surface region results from the material’s plastic deformation followed by a springback process constrained by surrounding material.
Simultaneously, the laser impact induces numerous fine, uniformly distributed grains in the surface layer, enriched with high-density dislocations.
Therefore, adjusting the spot overlap ratio can significantly enhance residual compressive stresses, thereby improving fatigue life.
Conclusion
1) The curvature radius of 301L stainless steel after laser shock treatment exhibits a negative correlation with both spot overlap ratio and impact frequency.
The study establishes a mathematical model linking the curvature radius to the overlap ratio and impact frequency.
Under identical laser shock parameters, the curvature radius continuously decreases with increasing impact frequency, though the rate of decrease gradually slows.
When the number of laser impacts is low, the overlap ratio significantly influences the reduction in curvature radius.
However, as the number of impacts increases, this influence diminishes markedly.
2) As the spot overlap ratio increases, pitting on the surface of 301L stainless steel becomes more pronounced.
The depth of pits in the overlap region increases, accompanied by a corresponding rise in surface roughness.
3) The enhancement effect on residual compressive stress exhibits a positive correlation with the overlap ratio.
For every 10% increase in overlap ratio, the improvement in residual compressive stress stabilizes within the range of 14% to 18%.
Therefore, adjusting the overlap ratio of laser shock treatment can effectively enhance the material’s residual compressive stress, thereby improving fatigue life.
