David Chuang
Large Precision Injection Mold Design for New Energy Vehicle Rearview Mirror Inner Bracket
China CNC Milling » Blog » Large Precision Injection Mold Design for New Energy Vehicle Rearview Mirror Inner Bracket
FAQ
What materials can you work with in CNC machining?
We work with a wide range of materials including aluminum, stainless steel, brass, copper, titanium, plastics (e.g., POM, ABS, PTFE), and specialty alloys. If you have specific material requirements, our team can advise the best option for your application.
What industries do you serve with your CNC machining services?
Our CNC machining services cater to a variety of industries including aerospace, automotive, medical, electronics, robotics, and industrial equipment manufacturing. We also support rapid prototyping and custom low-volume production.
What tolerances can you achieve with CNC machining?
We typically achieve tolerances of ±0.005 mm (±0.0002 inches) depending on the part geometry and material. For tighter tolerances, please provide detailed drawings or consult our engineering team.
What is your typical lead time for CNC machining projects?
Standard lead times range from 3 to 10 business days, depending on part complexity, quantity, and material availability. Expedited production is available upon request.
Can you provide custom CNC prototypes and low-volume production?
Can you provide custom CNC prototypes and low-volume production?
Hot Posts
As one of the most critical exterior components of an automobile, the rearview mirror demands exceptionally high aesthetic standards.
It comprises the mirror housing and protective cover. Additionally, it contains the inner bracket, adjustment motor, folding motor, and folding pivot pin.
It further contains the turn signal indicator, wiring harness, and cable. The assembly also features the adjustment handle rod, sealing gasket, adjustment bracket, and adjustment support.
Finally, it includes the mirror lens and heating element. The inner brackets for both left and right rearview mirrors are plastic components.
They possess high dimensional precision and a complex structure. They also feature large lateral undercuts, directional inclination, and high production volume.
Manufacturers produce them via injection molding using injection molds.
Challenges
Currently, injection molds for rearview mirror inner brackets across similar vehicle models employ one-piece molded parts.
These parts use straight-through cooling water channels. Engineers set the lateral core-pulling safety distance at approximately 10 mm and integrate positioning springs internally.
In production practice, common issues arise.
The plastic part’s clamping force on both the moving and fixed mold halves is roughly equal, which frequently causes the molded part to stick to the fixed mold cavity.
Uneven mold temperature makes it difficult to achieve dimensional accuracy that meets assembly requirements, sometimes leading to deformation.
Additionally, insufficient lateral core-pulling distance often causes interference with the lateral core-pulling mechanism during demolding.
This makes part removal difficult. To date, researchers have not published any targeted findings addressing these issues.
Innovative Design Solutions and Practical Benefits
This paper addresses the sticking issue by employing a fixed mold spring block.
A conformal cooling system enhances part precision and reduces cycle time.
Increasing the safety clearance to 35mm resolves ejection difficulties.
Successful mold trials demonstrate significant application benefits.
They also provide valuable reference for designing injection molds for large, complex, and precision plastic parts.
Structural Analysis of Molded Plastic Parts
The mold produces two plastic components for the inner brackets of the left and right rearview mirrors of a new energy vehicle.
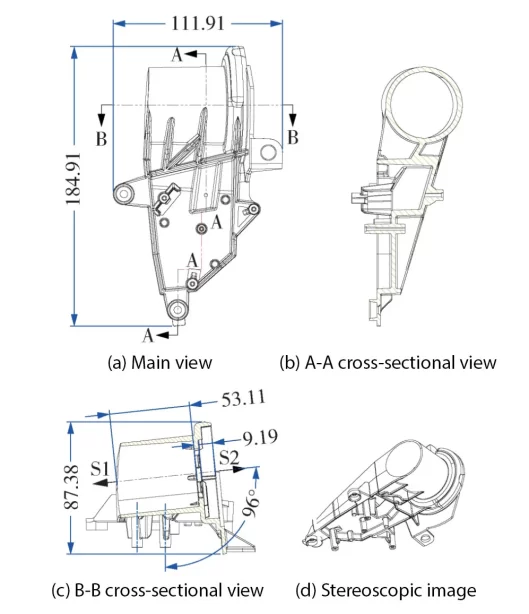
These parts exhibit symmetrical shapes, with Figure 1 depicting the left rearview mirror inner bracket.
The material consists of polypropylene reinforced with 45% glass fiber (PP/45%GF).
This reinforced polypropylene offers excellent molding processability, good dimensional stability, and a shrinkage rate of 0.5%.
These molded parts serve as internal assembly components.
They have high production volume and stringent dimensional accuracy requirements, necessitating MT2 precision (GB/T14486-2008).
The complex structure features two inclined undercuts, posing significant challenges for demolding.
Mold Structure Design
Mold Gate System Design
The customer requires a two-cavity mold to form two inner bracket plastic parts for automotive left and right rearview mirrors.
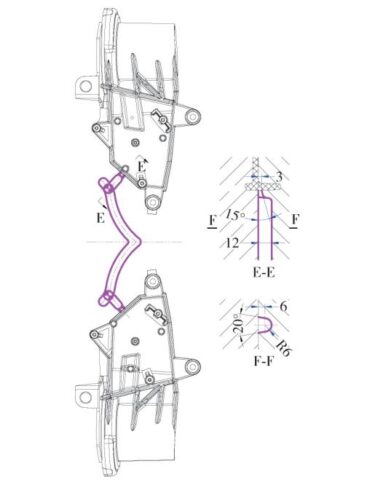
The injection mold employs a “standard runner with tapered side gate” gate system.
The runner has a “U”-shaped cross-section.
Figure 2 shows the shapes of the runner and gate, along with their primary dimensions.
Mold Forming Component Design
Mold Structure and Material Selection
The mold parting line is highly complex.
To facilitate manufacturing and maintenance, engineers adopt a split insert assembly structure.
Both the moving and fixed mold forming components consist of one moving insert and one fixed insert each.
Due to the addition of glass fiber reinforcement in the plastic, friction between the melt and the cavity increases.
Therefore, the fixed mold forming part material uses highly wear-resistant NAK80 mold steel with a hardness of 37–43 HRC.
(Alternatively, 2343ESR, SMV3W, or 8407 can be used, but the hardness must reach 46~49 HRC.)
The moving mold forming part material is P20 mold steel.
Design Features for Rigidity and Precision
To enhance mold rigidity and ensure mold longevity, engineers design multiple tapered inner mold tube positions.
These are located on the parting surface between the moving and fixed molds.
This also guarantees the precision of the molded plastic parts.
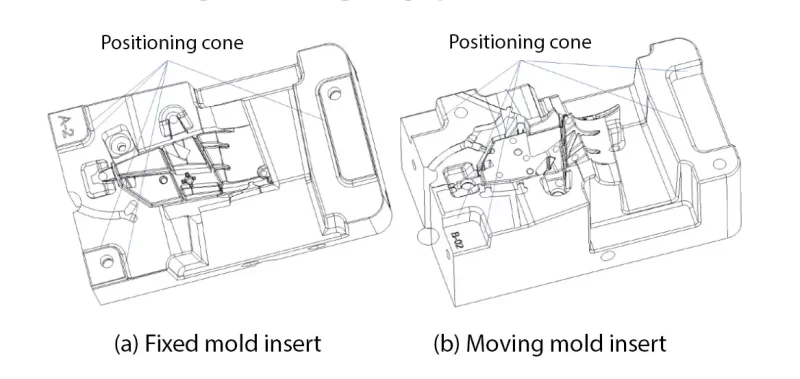
Figure 3 shows the three-dimensional view of the moving mold insert and fixed mold insert for forming the inner bracket of an automotive left rearview mirror.
This mold features multiple fixed and moving mold inserts and insert-through positions.
During production, friction and wear can easily cause flash and step differences in the molded parts.
To facilitate mold manufacturing and maintenance, all wear-prone components adopt an insert-fit structure.
To prevent filling difficulties caused by trapped air, the deep ribs spaced 10 mm apart also utilize an insert-fit structure.
Ejection Mechanism and Reliability
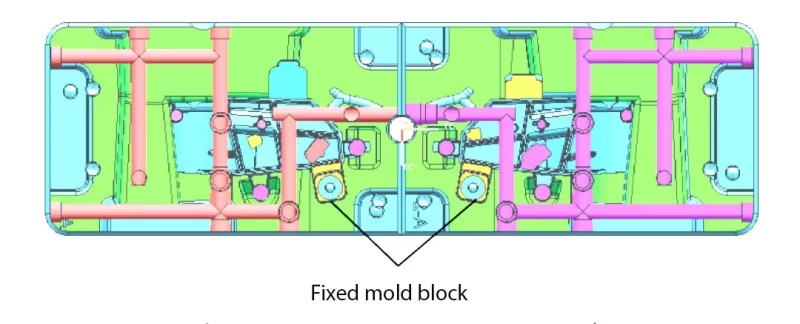
Due to the complex geometry of this plastic part, the clamping force on the fixed mold cavity is substantial.
To prevent the part from sticking to the cavity and deforming during mold opening, engineers designed a fixed mold ejector mechanism within the fixed mold insert, as shown in Figure 4.
Upon mold opening, the ejector blocks propel the molded part out.
Practice has proven this innovative structure to be highly safe and reliable, completely eliminating ejection failures of the molded parts.
Design of Mold Guide and Positioning System
The mold parting line features a highly complex geometry.
During injection molding, the mold forming components endure significant lateral expansion forces.
These forces make it challenging to maintain the flatness of the parting line at the mating surfaces of the injection-molded components.
To prevent misalignment between the fixed and moving mold inserts during molding, each mold component incorporates three locating tapered surfaces.
Each surface has a 5° inclination angle, as shown in Figure 4.
The guide system for the automotive left rearview mirror inner bracket injection mold consists of guide pins and bushings.
Engineers use four φ50 mm × 330 mm guide pins and four φ50 mm × 170 mm guide bushings between the moving and fixed mold halves.
The ejector fixed plate on the moving mold side employs four φ25mm × 170mm guide pins and four φ25mm × 55mm guide bushings.
The well-designed guiding and positioning system effectively ensures the dimensional accuracy of the molded parts, achieving MT2 precision according to GB/T 14486-2008.
It also meets the requirement of 2 million molding cycles.
Design of Side Core-Pulling Mechanism for Mold
The molded part features nine assembly pins, accompanied by multiple reinforcing ribs and outer walls adjacent to the pins.
These elements exert significant clamping force on the mold, necessitating formation solely by the moving core.
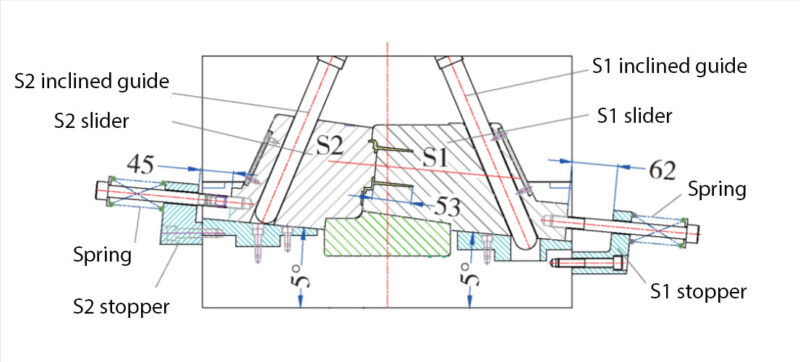
Under this parting line configuration, two undercuts—S1 and S2 (see Figure 1)—are present during demolding.
To facilitate smooth part ejection, the mold incorporates lateral core-pulling mechanisms.
Since the two undercuts are oriented at a 95° angle (rather than 90°) to the mold opening direction, engineers design both lateral core-pulling mechanisms as inclined structures.
These details are shown in Figure 5.
To minimize mold dimensions and reduce mold weight, both lateral core-pulling mechanisms utilize external stop blocks and external springs for positioning.
The customer reported that the inner bracket of rearview mirrors in other models of the same type frequently collided with the S2 slider 19 during demolding.
This collision hindered the removal of the molded part and consequently impacted the injection molding cycle time.
Therefore, in this design, engineers added a 35 mm safety margin to the S2 slider (19) when determining the lateral core-pulling distance.
This set the S2 core-pulling distance to 45 mm.
Although this safety margin increases the slider’s core-pulling distance, it significantly facilitates the removal of molded parts.
After the mold went into production, no further interference faults between molded parts and inclined sliders occurred, greatly improving the mold’s labor productivity.
Design of Mold Temperature Control System
Stringent Requirements for Mold Temperature Control
The complex structure and high dimensional accuracy of molded plastic parts impose stringent requirements on the design of the mold temperature control system.
It must achieve balanced cooling and rapid cooling, maintaining a temperature difference of 5°C to 10°C between mold inserts, cores, and the side core-pulling mechanism.
Since all assembly structures (e.g., studs) are located on the moving mold side, this mold design prioritizes cooling for the moving mold.
Advanced Cooling System Design
Beyond positioning cooling channels as evenly and close to the cavity surface as possible, engineers incorporated four additional spacer-type cooling wells.
Given the large dimensions of the mold’s four slides and their extensive molding area, engineers designed each slide with its own dedicated cooling water circuit.
Figure 6 shows the plan layout of the cooling water circuits, while Figure 7 presents a 3D schematic of the cooling water circuits.
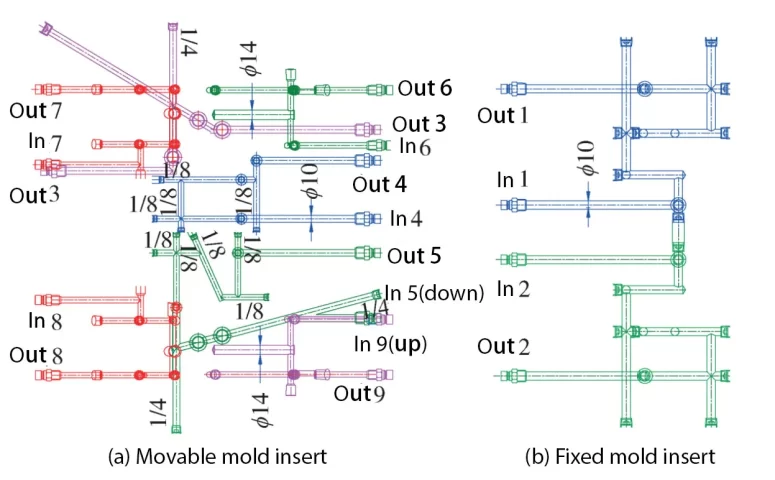
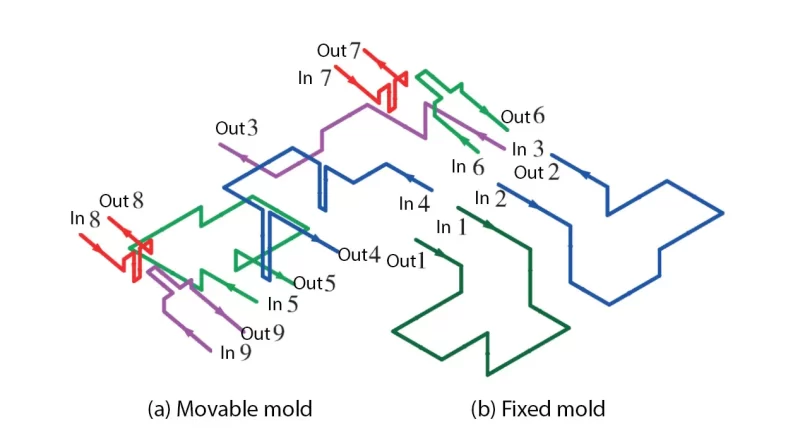
As shown in the diagram, the fixed mold features two cooling water channels, while the moving mold incorporates seven cooling water channels.
Specifically: Channel 1 serves as the cooling water channel for the fixed mold insert of the left rearview mirror inner bracket.
Channel 2 functions as the cooling water channel for the fixed mold insert of the right rearview mirror inner bracket.
Channel 3 provides cooling for the moving mold insert of the left rearview mirror inner bracket.
Cooling channel 4 serves the left and right rearview mirror inner bracket moving mold inserts with water wells.
Cooling channel 5 is for the right rearview mirror inner bracket moving mold inserts.
Cooling channels 6, 7, 8, and 9 provide cooling for the four slides, respectively.
Benefits of the Near-Contour Cooling System
This near-contour cooling system reduced the mold’s injection cycle time by approximately 10% and achieved dimensional accuracy of MT2 (GB/T14486-2008) for the molded plastic parts.
For this automotive rearview mirror inner bracket injection mold, we successfully achieved balanced and rapid cooling through our temperature control system.
This prevented deformation of the molded plastic parts caused by uneven mold temperatures.
Additionally, by controlling the water temperature and flow rate within the cooling water pipes, we effectively eliminated the impact of weld lines.
This improved the strength of the molded plastic parts.
This enhanced both the molding quality and the overall productivity of the mold.
Mold Venting System Design
The inner bracket for automotive rearview mirrors is a medium-to-large component featuring numerous reinforcing ribs.
Since the molded part requires cooling channels and these ribs are not particularly tall, no inserts were used.
This necessitates designing an effective venting system.
Poor venting can lead to extended cycle times at best, and at worst, compromise molding quality or even cause trapped air and severe scorching.
For automotive rearview mirror inner bracket injection molds, inadequate venting critically affects the success or failure of the mold design.
Therefore, it must be addressed with utmost care.
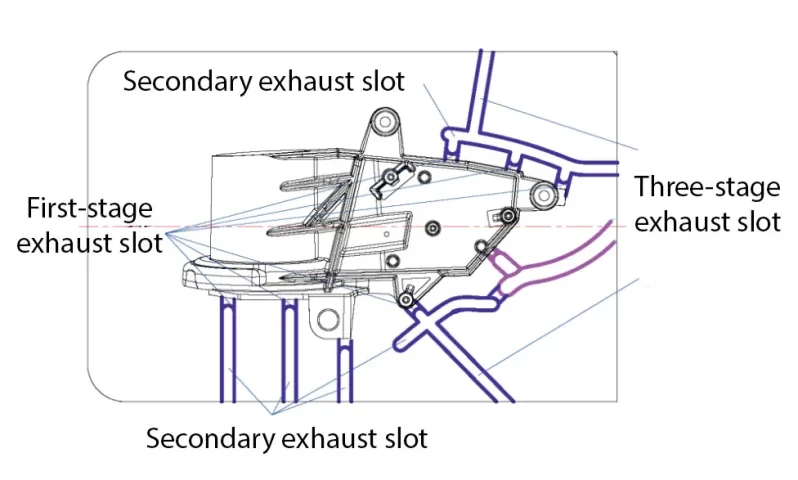
The mold primarily utilizes parting lines and ejector pins/tubes for venting.
Each cavity features eight vent slots designed along the parting line, each 6mm wide (see Figure 8).
While PP resin exhibits excellent flow properties, adding 45% glass fiber reinforcement reduces its flowability.
Based on prior experience, the primary vent slots were set to a depth of 0.05mm.
Mold Assembly Drawing and Working Process
Summary of Mold Design Improvements
In summary, to address issues encountered in injection molds for rearview mirror inner brackets of similar vehicle models, the mold designed in this paper employs a forming component with a fixed mold spring block.
This design improves mold performance and reliability.
It also utilizes a gating system with a conformal cooling channel and significantly extends the core-pulling distance of the inclined slider.
These modifications successfully eliminated the aforementioned defects and achieved satisfactory results.
The mold assembly drawing is shown in Figure 9.
With maximum dimensions of 750 mm × 500 mm × 540.5 mm, this mold qualifies as a large-scale injection mold.
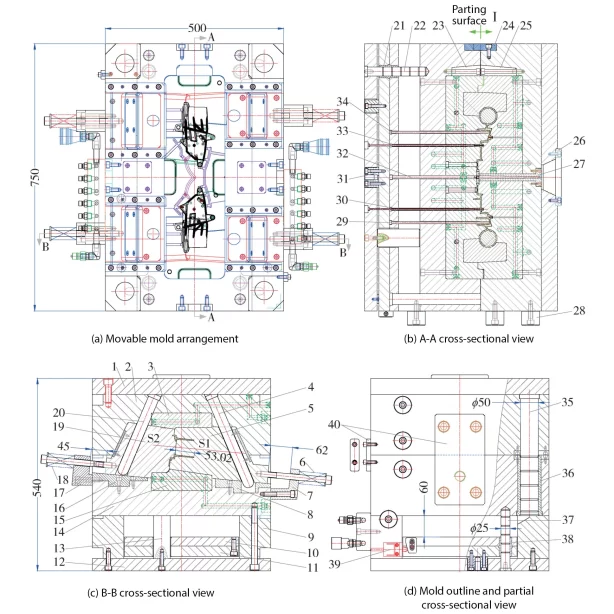
1-Fixed mold base plate; 2-Fixed mold A plate; 3-Fixed mold insert; 4-S1 tapered guide pin; 5-S1 slide block; 6-Spring; 7-S1 stop block; 8-Wear-resistant block; 9-Square iron; 10-Pushing plate fixed plate; 11-Pushing plate base plate; 12-Moving mold fixed plate; 13-Support pillar; 14-Moving mold B plate; 15-Moving mold insert; 16-Wear plate; 17-S2 stop block; 18-Spring; 19-S2 Slider; 20-S2 Tapered Guide Pin; 21-Ejector Plate Guide Bushing; 22-Ejector Plate Guide Pin; 23-Moving Mold Wedge Block; 24-Positioning Block; 25-Fixed Mold Wedge Block; 26-Positioning Ring; 27-Gate Sleeve; 28-Support Column; 29-Ejector Pin; 30-Ejector tube; 31-Injection molding machine top pin connecting column; 32-Main runner tie bar; 33-Ejector tube; 34-Ejector pin; 35-Guide pin; 36-Guide bushing; 37-Ejector plate guide pin; 38-Ejector plate guide bushing; 39-Cooling water connector; 40-Locking module
Mold Operation Process
The mold operation process is as follows:
The molten plastic enters the curved runner between the parting surfaces through the main runner in the sprue bushing (27).
It then flows into the two mold cavities via the rectangular side gates.
After filling is complete, the melt cools, compensates for shrinkage, and solidifies under holding pressure.
Once the molded part achieves sufficient rigidity, the injection molding machine pulls the moving mold plate 12 to open the mold.
The mold opens between the fixed mold plate (A2) and moving mold plate (B14).
This releases the molded part—the inner bracket for an automotive rearview mirror—from the fixed mold cavity.
During mold opening, moving mold slides (5 and 19) perform inclined side core pulling toward the outer edges of the molded part.
They are driven by inclined guide pins (4 and 20), respectively.
Slide 5 achieves a 62mm core pulling distance under stop block 7, while slide 19 achieves a 45mm core pulling distance under stop block 17.
The moving and fixed mold plates open to a distance of 300mm under the action of the injection molding machine’s hydraulic cylinder.
Ejection and Cycle Completion
After mold opening, the injection molding machine’s ejector rod pushes the ejector base plate (11) and ejector fixed plate (10) via connecting pin (31).
This action drives the ejector pin and ejector tube, ejecting the automotive rearview mirror inner bracket from the moving mold core.
After the automotive rearview mirror inner bracket is safely and smoothly ejected, the injection molding machine’s ejector rod pulls the part back.
It then accurately repositions it via connecting rod 31.
The limit switch 39 then opens, prompting the injection molding machine to close the mold’s moving platen.
The mold completes one injection molding cycle and begins the next injection molding cycle.
Conclusion
(1) The complex shape of the molded plastic part creates significant adhesion to the fixed mold cavity.
To prevent sticking, a fixed mold ejector mechanism was employed.
During mold opening, this mechanism ejects the part, ensuring it remains on the movable mold core and eliminating adhesion failures.
(2) As a critical structural component in automobiles, the rearview mirror inner bracket demands extremely high dimensional accuracy.
Effective control over weld lines and part deformation was achieved by adjusting the inner mold tube position and cooling water flow, yielding significant results.
(3) By increasing the safety clearance of the S2 side core-pulling slider 19, the mold effectively resolved the issue of the mirror inner bracket colliding with slider 19 during ejection.
This facilitates part removal and substantially enhances mold productivity.
(4) The mold features an advanced and rational structure, achieving successful trial molding on the first attempt.
After production commencement, all formed plastic part metrics met design specifications, with the molding cycle successfully controlled within 30 seconds, earning high recognition from the customer.
