China CNC Milling » Blog » Investigation into the Influence of Temperature on the Machining Accuracy of CNC Machining Center Spindles
FAQ
What materials can you work with in CNC machining?
We work with a wide range of materials including aluminum, stainless steel, brass, copper, titanium, plastics (e.g., POM, ABS, PTFE), and specialty alloys. If you have specific material requirements, our team can advise the best option for your application.
What industries do you serve with your CNC machining services?
Our CNC machining services cater to a variety of industries including aerospace, automotive, medical, electronics, robotics, and industrial equipment manufacturing. We also support rapid prototyping and custom low-volume production.
What tolerances can you achieve with CNC machining?
We typically achieve tolerances of ±0.005 mm (±0.0002 inches) depending on the part geometry and material. For tighter tolerances, please provide detailed drawings or consult our engineering team.
What is your typical lead time for CNC machining projects?
Standard lead times range from 3 to 10 business days, depending on part complexity, quantity, and material availability. Expedited production is available upon request.
Can you provide custom CNC prototypes and low-volume production?
Can you provide custom CNC prototypes and low-volume production?
Hot Posts
In the manufacturing process of components, machining accuracy is of paramount importance.
As the primary processing equipment, the machining precision of CNC machine tools directly impacts the accuracy grade of finished parts.
Various types of errors inevitably occur during CNC machining.
This is primarily due to the thermal deformation of moving pairs and mating surfaces under the influence of temperature during machine operation.
Such deformation causes deviations between the actual and theoretical positions of the tools and workpieces.
As a result, machining accuracy errors occur.
As machining parameters such as spindle speed, cutting depth, feed rate, and processing duration vary, the deformation state of CNC machine tools changes accordingly.
These deformations exhibit nonlinear dynamic behavior, making it difficult to accurately predict machining errors.
To effectively control machining errors, it is essential to conduct in-depth research and analysis on the causes and magnitude of errors during machine tool operation.
CNC machining errors result from the combined effects of various factors.
Among these, mechanical and thermal deformations—such as those in the spindle motor, tool-holder connections, and mating surfaces—significantly impact machining accuracy.
During precision machining, thermal deformation plays a primary role in affecting accuracy, while mechanical deformation has a secondary influence.
Therefore, minimizing thermal deformation is a key measure for enhancing machining precision.
However, during CNC machining, thermal deformation of the spindle constitutes one of the largest contributions to overall thermal distortion.
The spindle plays a critical role in CNC machines, responsible for driving the rotational motion of the workpiece or cutting tool.
Any displacement or deformation of the spindle inevitably causes relative displacement changes between the workpiece and the tool.
These changes lead to errors in the workpiece’s dimensional accuracy, geometric accuracy, and positional accuracy.
They also result in alterations to the surface quality.
Research indicates that machining errors caused by machine tool thermal deformation account for 45% to 65% of total errors.
While maintaining the machine tool’s original precision, thermal errors in the spindle typically exert the greatest influence on machine operation.
Therefore, studying how spindle thermal errors change with spindle operating conditions is crucial for enhancing machining accuracy.
Only by thoroughly understanding spindle thermal deformation can corresponding measures be taken to mitigate its impact, thereby improving the precision level of CNC machining.
This paper focuses on investigating thermal errors in spindles.
The researchers conducted in-depth experiments and theoretical analyses to derive effective methods for controlling spindle temperature in CNC machining centers.
Their findings validated the rationality of the research.
This holds significant importance for improving product quality and reducing production costs.
Materials and Methods
Experimental Materials
The experimental equipment used in this study included a Huazhong CNC XHK715 three-axis machining center and a Fluke RSE60 infrared thermometer.
Fluke SmartviewIR temperature analysis software was used for thermal data processing.
The cutting tool was a φ10 carbide end mill, and the workpiece material was LY12 hard aluminum with dimensions of 100 × 100 × 30 mm.
A BT40 ER32 tool holder was also employed in the setup.
Experimental Environment and Principles
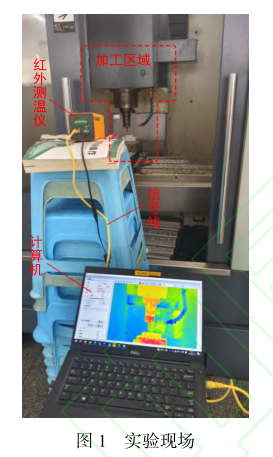
The researchers conducted the experiment at the machining center of Shaanxi Defense Industry Vocational and Technical College.Figure 1 shows the site layout.
The ambient temperature was maintained at 20°C, and the relative humidity was 50% RH.
The infrared thermometer was positioned 1.0 m from the measurement target.
Its infrared emissivity was set to 0.9, and the environmental optical transmittance was 1.
The temperature measurement principle of infrared thermometers utilizes the characteristics of infrared light.
By collecting and processing the infrared radiation emitted from the surface of the measured object, they obtain temperature information for that area.
Infrared light occupies the frequency range between visible light and microwaves.
Most objects emit this radiation from their surfaces.
The radiation intensity increases as the object’s temperature rises and decreases as the temperature falls.
By receiving and processing infrared radiation signals, infrared thermometers accurately measure surface temperatures.
These instruments transmit collected infrared radiation signals to a computer for processing and analysis using Fluke’s Smartview IR temperature analysis software.
This software possesses powerful capabilities, performing image processing on received signals to extract temperature information and visually presenting it as a thermal map.
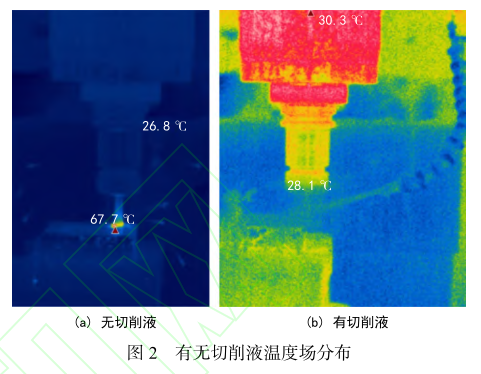
As shown in Figure 2, the thermal map displays temperature distributions across different locations within the processing area.
Differentiated color ranges reflect distinct temperature zones, enabling users to clearly understand temperature variations throughout the processing zone.
Employing infrared thermometers and Smartview IR software for temperature analysis empowers users to promptly monitor processing zone temperatures.
Through thermal maps, users can swiftly identify areas with abnormal temperatures and take immediate corrective actions to adjust temperatures.
This ensures temperature control remains within optimal ranges during processing, safeguarding product quality and production efficiency.
Additionally, this infrared temperature measurement technology operates non-contact, enabling temperature readings without disrupting the processing flow.
This enhances both the convenience and safety of temperature monitoring.
Experimental Method
Secure the aluminum workpiece in the vise on the machine tool. Install the infrared thermometer and auxiliary equipment.
Once temperature measurement preparations are complete, start the machine tool.
After the spindle temperature reaches dynamic equilibrium, commence the cutting experiment.
Prior to the experiment, input the machining program into the CNC system.
To ensure consistent cutting conditions throughout the experiment, the researchers maintained the cutting depth at 1 mm in the programmed sequence.
They also kept the spindle speed constant at 6000 rpm.
First, the researchers conducted a 15-minute cutting test without coolant (Figure 2a).
Subsequently, the researchers manually activated the coolant (Figure 2b) and performed a 15-minute machining run with coolant.
The researchers measured the spindle temperature changes and the resulting machining errors under both conditions.
Experimental Results and Analysis
Initial Startup Temperature Analysis
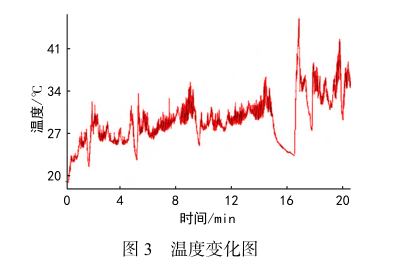
Figure 3 illustrates the spindle temperature variation within the first 20 minutes of machine tool startup.
The graph shows that during the initial startup phase, the spindle temperature remains relatively low, closely matching the ambient temperature.
As the machine tool continues to operate, the spindle temperature exhibits a nonlinear dynamic increase.
By approximately 18 minutes, the temperature stabilizes and reaches a state of dynamic equilibrium.
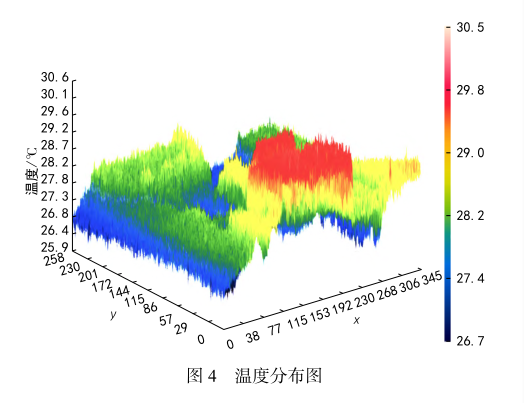
After the machine tool stabilizes during operation, the temperature distribution is shown in Figure 4.
As seen in the figure, the highest temperature is near the spindle, approximately 32°C.
Other areas exhibit lower temperatures comparable to the ambient temperature, around 20°C.
This indicates that temperature rise is unavoidable during spindle movement.
Results and Analysis of Cutting Fluid-Free Machining
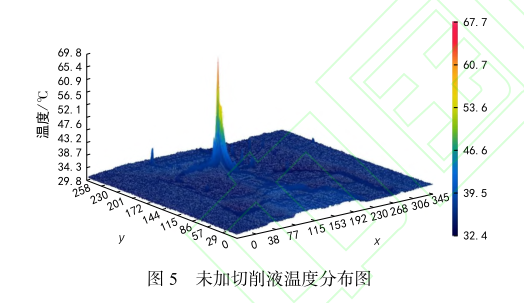
After the spindle temperature reached dynamic equilibrium, the temperature at the tool holder location rapidly increased during the 15-minute cutting fluid-free machining period.
The temperature distribution field is shown in Figure 5. As illustrated, the tool holder temperature changed rapidly, forming a maximum temperature of 65°C at the cutting edge.
This was primarily due to the cutting edge participating in the cutting process, where friction generated heat during machining, causing the rapid temperature rise.
Results and Analysis of Cutting Fluid Addition Experiment
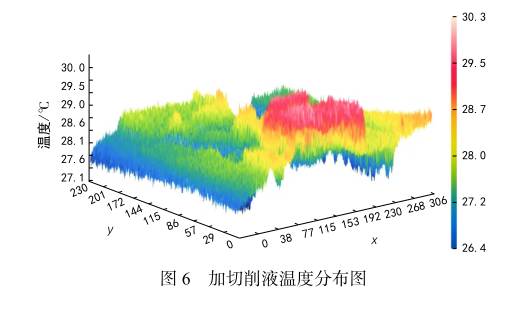
After 15 minutes of machining without cutting fluid, the researchers added the cutting fluid.
The temperature at the tool holder position rapidly decreased, with the temperature distribution shown in Figure 6.
As illustrated, under the cooling effect of the cutting fluid, the temperature followed the fluid flow, causing the tool holder temperature to drop rapidly.
The spindle temperature decreased to the stable operating temperature of the machine tool, i.e., 30°C.
Analysis of Machining Errors
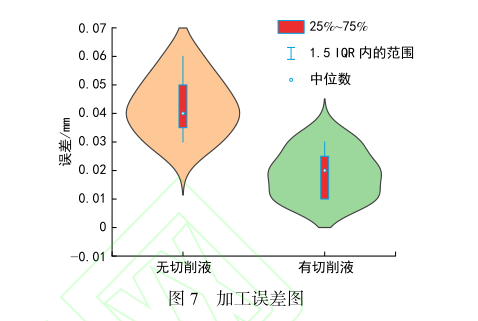
As shown in Figure 7, the machining errors without cutting fluid range from 0.03 to 0.06 mm.
With cutting fluid, the errors decrease and range from 0.01 to 0.03 mm.
These deviations primarily stem from temperature effects. Without cutting fluid, thermal deformation exerts a greater influence, resulting in larger errors.
This demonstrates that cutting fluid plays a positive role in enhancing machining precision.
Discussion and Measures
As a critical piece of equipment in machining, the precision and stability of a machining center’s spindle directly impact processing quality.
During prolonged high-speed operation, the spindle’s thermal deformation becomes increasingly prominent due to significant heat generated by friction and temperature rises caused by machining loads.
If not promptly corrected, this can lead to uncontrollable dimensional and geometric deviations in machined parts, severely compromising product quality.
The primary causes of spindle thermal deformation stem from two aspects:
First, during spindle operation, friction occurs at the contact surfaces between bearings and bearing housings, while relative motion exists between the shaft and balls, generating substantial heat.
Second, during machining, the spindle must withstand cutting torques from both the tool and workpiece, which further elevates its temperature.
To mitigate the impact of thermal deformation on machining quality, operators can implement several measures.
First, optimizing bearing and raceway designs can reduce friction heat generation during spindle operation.
For instance, employing high-precision bearings and premium lubricants minimizes friction-induced heat.
Second, implementing efficient spindle cooling systems—such as enlarging cooling channel cross-sections—enhances cooling effectiveness.
Introducing coolant directly into the spindle interior effectively lowers its temperature.
Additionally, preheating the spindle before machining ensures a more uniform temperature rise.
During part processing, continuous spindle temperature monitoring enables real-time compensation adjustments.
For instance, operators can control the spindle temperature by regulating the flow rate and temperature of the cooling medium.
Finally, post-processing cooling of the spindle can minimize its thermal recovery deformation.
For instance, operators can apply cooling media to restore the spindle to its initial state.
By implementing appropriate technical measures, operators can effectively control the spindle’s thermal deformation, thereby enhancing the machining center’s operational stability and improving processing quality.
This ensures the dimensional accuracy and surface finish requirements of machined parts, ultimately improving product quality and competitiveness.
In industrial production, the stability and precision of machining centers serve as critical indicators of equipment performance.
Addressing spindle thermal deformation enables better fulfillment of market demands and enhances corporate competitiveness.
Therefore, machining center manufacturers and users should deepen their understanding of spindle thermal deformation issues and implement specialized measures to manage them.
Conclusion
This study investigated the effects of temperature on spindle temperature variations in CNC machining centers and explored the underlying mechanisms, leading to the following conclusions:
(1) The temperature variation of CNC machining center spindles exhibits nonlinear characteristics, inducing thermal deformation in the spindle.
This deformation error transfers to the workpiece, causing dimensional and shape deviations in the machined part.
(2) When the spindle speed reaches 6000 r/min, the spindle achieves a steady-state temperature after approximately 18 minutes of initial operation.
At this point, a dynamic thermal equilibrium is established.
(3) At 6000 r/min spindle speed and 1 mm cutting depth, machining errors range from 0.03 to 0.06 mm without cutting fluid and from 0.01 to 0.03 mm with cutting fluid.
Cutting fluid significantly reduces machining errors caused by spindle deformation.
