China CNC Milling » Blog » How to process large radius sheet metal bending?
FAQ
What materials can you work with in CNC machining?
We work with a wide range of materials including aluminum, stainless steel, brass, copper, titanium, plastics (e.g., POM, ABS, PTFE), and specialty alloys. If you have specific material requirements, our team can advise the best option for your application.
What industries do you serve with your CNC machining services?
Our CNC machining services cater to a variety of industries including aerospace, automotive, medical, electronics, robotics, and industrial equipment manufacturing. We also support rapid prototyping and custom low-volume production.
What tolerances can you achieve with CNC machining?
We typically achieve tolerances of ±0.005 mm (±0.0002 inches) depending on the part geometry and material. For tighter tolerances, please provide detailed drawings or consult our engineering team.
What is your typical lead time for CNC machining projects?
Standard lead times range from 3 to 10 business days, depending on part complexity, quantity, and material availability. Expedited production is available upon request.
Can you provide custom CNC prototypes and low-volume production?
Can you provide custom CNC prototypes and low-volume production?
Hot Posts
In sheet metal bending processing, there are sometimes requirements for bending with extremely large radii, but due to equipment limitations, it is often difficult to meet these manufacturing requirements.
In such cases, solutions must be sought through process optimization.
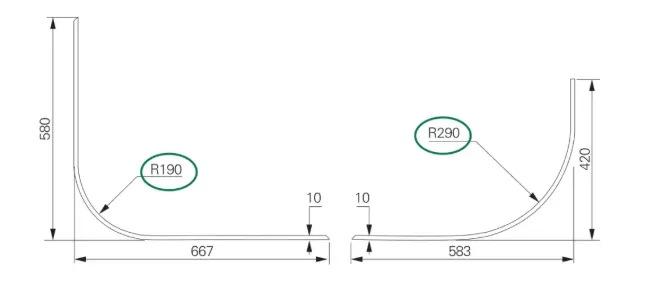
Take, for example, two partitions used inside the hydraulic oil tank of a large mining excavator, as shown in Figure 1. The material is Q355B, with a plate thickness of 10 mm and a plate width of 700 mm.
The design requirement is to achieve 90° right-angle bends with radii of R190 mm and R290 mm.
For such medium-thickness plate large-radius bending, the conventional process solutions are:
① Use a high-tonnage bending machine with a higher opening height and greater pressure tonnage to achieve one-time bending forming;
② Use a hydraulic press with specialized dies to achieve one-time forming;
③ Use a general-purpose bending machine with step-feeding bending to gradually “roll out” the large radius.
Option ① requires a high-tonnage bending machine, which the company currently does not have;
Option ② requires a press machine, and the mold costs are high. Additionally, due to the uneven thickness and hardness of the sheet metal, the bending angle needs to be fine-tuned, but this functionality is difficult to achieve on a press machine mold, so this option is not considered;
Option ③ can be implemented on a general-purpose bending machine without mold investment, but bending a large radius requires dozens of incremental steps, resulting in low bending efficiency, poor accuracy, and time-consuming and labor-intensive initial adjustment, which does not meet the requirements of mass production.
Therefore, a more economical and practical process path needs to be explored.
Establishment of the Process Solution
After comparative analysis and consideration of the company’s existing conditions, it is concluded that using lightweight dies on a general-purpose bending machine to bend these two types of large-radius plates is the most economical and efficient process path.
However, for medium-to-thick plate bending, general-purpose bending machines have two inherent limitations: first, the slide opening height is small and the stroke is short, making it impossible to install large dies; second, the machine’s pressure tonnage is low, posing a risk of incomplete bending.
Application of the Three-Point Bending Method
To address these limitations, the only feasible solution is to use the three-point bending method, also known as air bending.
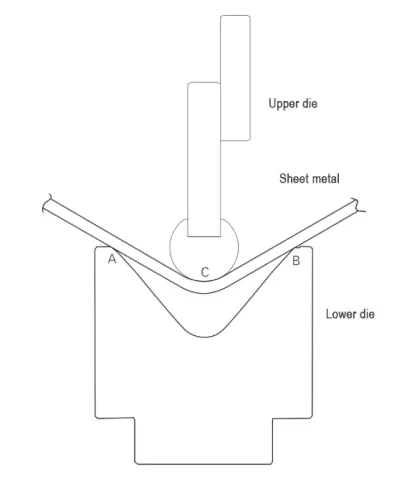
The three-point bending method involves the lowest point of the upper die’s R section and the two highest points of the lower die’s V groove coming into contact with the sheet material during bending.
As the upper die gradually presses down, the sheet material begins to bend, and the three-point contact state is maintained throughout the bending process.
Even when the predetermined bending angle is reached, the sheet material remains in a suspended state and does not come into large-area contact with the lower die, as shown in Figure 2.
Advantages and Drawbacks
The advantages of three-point bending include flexibility, the ability to adjust the bending angle arbitrarily, and lower bending pressure requirements.
However, it also has drawbacks, such as low angle accuracy due to springback, low precision of the inner R radius, and inability to control the shape of the suspended area.
Since the angle and R radius shape accuracy requirements for these two workpieces are not very high, it is worth giving it a try.
To facilitate understanding of the text content, it should be noted that the terms “left/right” and “length” mentioned in the text are based on the longitudinal cross-sectional view of the die, aiming to clarify the die design method.
As for the total length of the die, it only needs to be compatible with the width of the bent sheet material.
R190mm Bending Die Design
Start with the relatively smaller radius of R190mm.
Three-point suspended bending results in significant springback, so the upper die cannot directly use R190mm, and the bending angle cannot be limited to 90°. It is necessary to first estimate the actual radius and bending angle of the upper die.
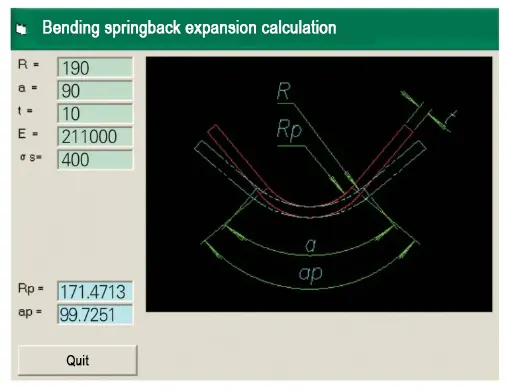
The actual radius and bending angle of the upper die can be calculated using the bending springback formula, but using an existing small program for calculation is more convenient.
After inputting the desired bending radius and angle, sheet thickness, elastic modulus, and ultimate strength into the program, the actual upper die radius is calculated to be R171.5mm, and the bending angle is 99.7°, as shown in Figure 3.
For design convenience, the upper die radius is rounded to R170mm, and the bending angle is set to 100°.
Here, the radius should be as accurate as possible, while the bending angle can be set slightly larger.
After obtaining the bending radius and angle, the die can be designed.
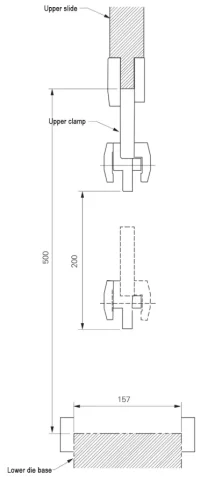
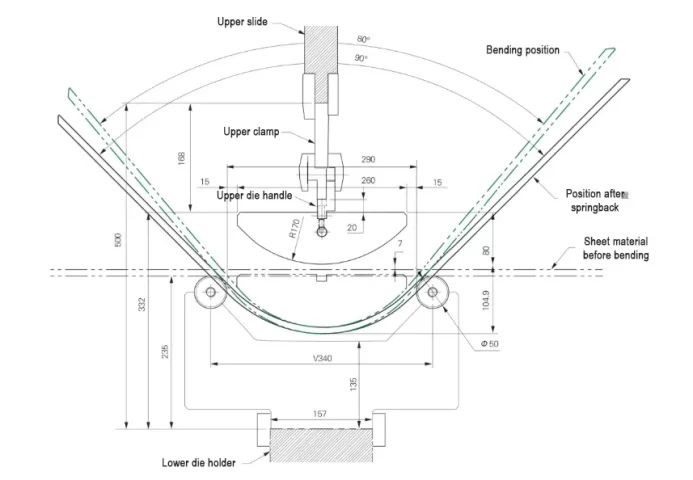
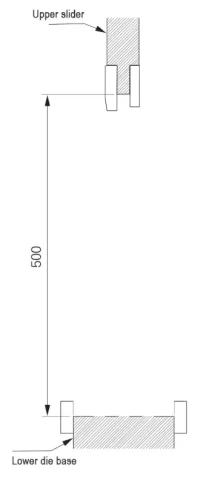
First, it is necessary to understand the basic structural parameters of the bending machine being used. The side structural diagram of a currently used upper-moving bending machine is shown in Figure 4, with a base width of 157mm, a maximum opening of the upper slide block of 500mm, and a stroke of 200mm.
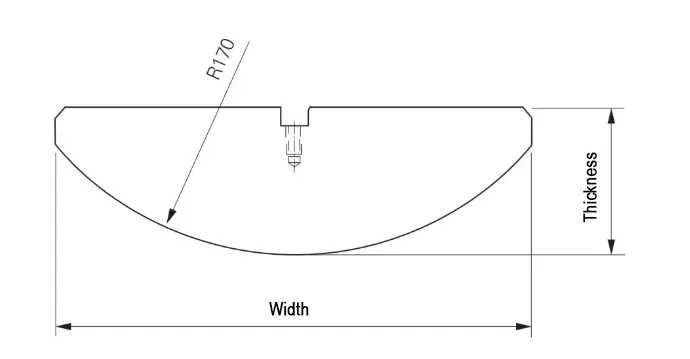
The three key parameters of the upper die are the radius R, width, and thickness, as shown in Figure 5.
Since the radius R has already been determined, the next step is to calculate the width of the upper die.
Based on the theoretical calculation value of 100° for the bending angle, the width corresponding to an arc radius of R170mm is 260.5mm, rounded to 260mm.
The thickness of the upper die will be determined later due to restrictions on the opening height.
Using two steel bars as the contact points for the lower die V-groove (i.e., points A and B in Figure 2) is the simplest method.
The diameter of the steel bars must be appropriate. If the diameter is too small, the lower die will lack sufficient strength and may scratch the sheet metal; if the diameter is too large, the lower die will become structurally bulky. Ultimately, 50mm-diameter guide rail steel bars were selected.
Determine the lower die slot width
The minimum width of the lower die slot must not be less than the upper die width plus twice the sheet thickness.
Since the upper die width is 260mm and the sheet thickness is 10mm, with an additional 5mm allowance on each side, the minimum width of the lower die is calculated as 260 + 15 × 2 = 290mm.
Since a 50mm-diameter steel bar is used, the center distance between the two steel bars is 290 + 50 = 340mm. We conventionally refer to this lower die as the V340 lower die.
Determine the Lower Die Height
Since the maximum opening of the bending machine is only 500mm, after subtracting the 168mm occupied by the upper clamping plate and upper die handle, only 332mm remains.
This 332mm must further subtract the thickness of the sheet material and the gap between the upper die and the sheet surface, leaving the remaining distance to be allocated between the upper and lower dies.
From the perspective of enhancing mold strength and preventing mold deformation, both the upper and lower dies should be made as thick as possible.
Additionally, since the lower die is V-shaped and must withstand significant tensile stress, it should be thicker than the upper die.
The total height of the lower die can be set to 235mm, and the thickness of the upper die to 80mm. Calculating this, the gap between the upper and lower dies before bending is 332-80-235=17mm, allowing a 10mm-thick sheet to be fed in smoothly.
The method for determining the thickness of the lower die at its center position (135mm) is to ensure that a certain gap is maintained between the sheet metal and the lower die even after the sheet metal is bent to its extreme position.
The thickness of the upper die and the height of the lower die typically require multiple revisions before final determination.
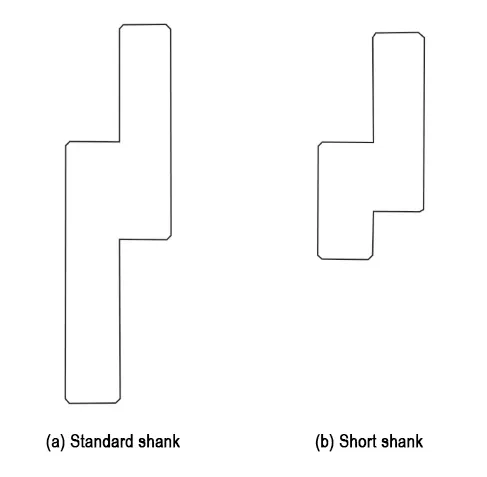
Shorten the Upper Die Handle
The standard upper die handle is too long, not only occupying excessive opening height but also compromising the stability of the large-radius upper die, leading to lateral swaying during bending.
Therefore, a custom-made short upper die handle was used, as shown in Figure 6, with the exposed length of the handle reduced to 20mm.
After these critical dimensions are determined, the upper die stroke is 104.9mm, which does not exceed the maximum stroke of the bending machine. This structural design is theoretically feasible, as shown in Figure 7.
R190mm Bending Die Specific Implementation
(1) Upper die fabrication.
The upper die is fabricated by machining an arc directly from a solid blank on a machining center, with a groove machined in the center of the upper surface for tool shank installation.
(2) Lower die fabrication.
Since all the pressure on the lower die during bending is borne by two steel bars, only the structure supporting the steel bars needs to be designed to achieve lightweight and low-cost mold objectives.
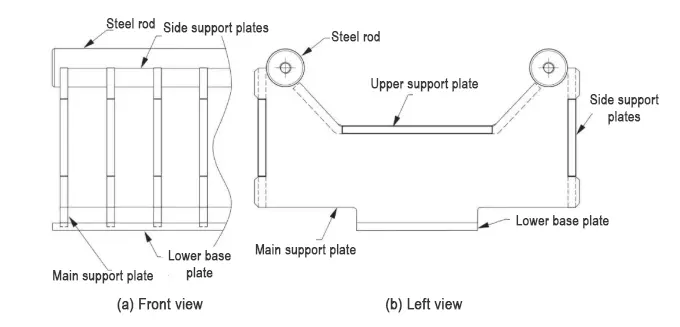
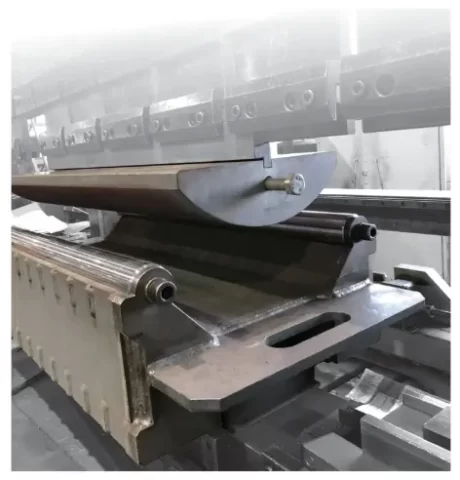
Ultimately, a sheet metal structure was designed and fabricated for this support frame, as shown in Figure 8.
As seen in Figure 8(b), the main support plate forms the primary contour of the lower die. The main support plate is supported by side support plates on both sides.
The upper surface of the groove is supported by a flat-bottomed boat-shaped bending plate, while the bottom is supported by a lower base plate, resulting in a rigid, long box-shaped structure.
Steel bars are placed in the grooves of the main support plate and secured at both ends with bolts.
There are a total of 13 main support plates, evenly distributed with a spacing approximately equal to the diameter of the steel bars, as shown in Figure 8(a).
R190mm Bending Die Effect Confirmation
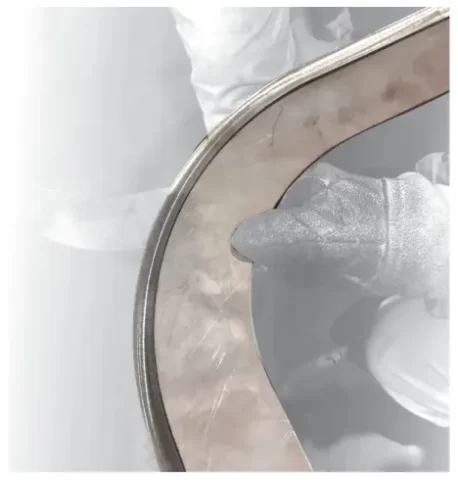
The actual production scene is shown in Figure 9. After bending, the arc section is confirmed using a clamping plate, showing complete adhesion with almost no gaps, as shown in Figure 10. The product’s physical photo is shown in Figure 11.
R290mm Bending Die Design
Design Challenges and Solutions
After successfully developing the R190mm bending die, we began to explore how to bend R290mm.
Due to the limited tonnage of the bending machine, we had to continue using the three-point bending method. We used a small program to calculate the actual radius of the upper die to be R248.9mm and the bending angle to be 104.8°.
Since the design process was the same as for the R190mm bending die, we will focus here on the new issues encountered during the design of the R290mm bending die.
Structural Adjustments for R290mm Die
The height and volume of the upper and lower dies for R290mm are significantly larger than those for R190mm.
Simply shortening the die handle was insufficient for clamping, so the upper clamping plate had to be removed to ensure the maximum opening height could be fully utilized by the die, as shown in Figure 12.
Structural Design and Reinforcement
The width of the upper die is temporarily set to 390mm. The guide rods remain 50mm in diameter.
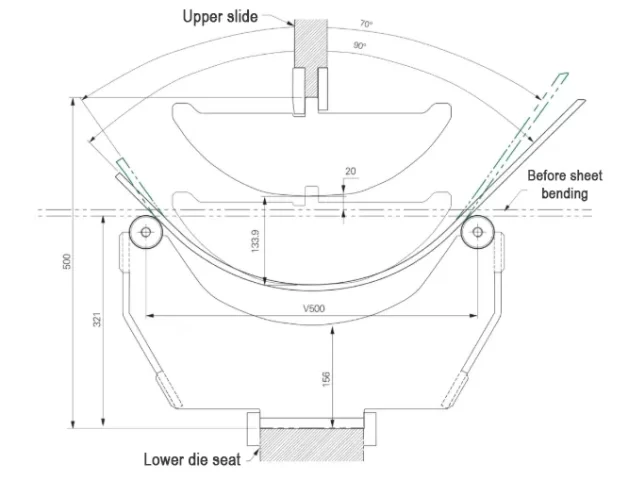
The lower die slot width is selected as V500, meaning the center distance between the guide rods is 500mm, as shown in Figure 13.

> Structural Differences and Reinforcement Design
Comparing Figure 13 with Figure 8 reveals that the V500 lower die and the V340 lower die differ structurally.
This is because the maximum opening height of the bending machine limits the height of the lower die, making it impossible to simply enlarge and reuse the original structure.
The V340 lower die has support plates on all four sides (top, bottom, left, and right), forming a nearly enclosed box-shaped structure with good deformation resistance.
Especially its upper support plate, which has a ship-shaped structure with a flat middle section and folded sides, making it easy to manufacture.
However, if the middle section of the V500 lower die were also made flat, it would result in insufficient thickness in the middle section, making it prone to deformation under pressure.
Therefore, within the limited space, it could only be made into an arc shape corresponding to the product, i.e., R280mm in Figure 13, to achieve the maximum lower die thickness.
Since the middle section of the lower mold has become an arc shape, it is difficult to manufacture an arc-shaped embedded upper support plate, and there is also no space reserved for embedding.
After careful consideration, it was decided to abandon this design and retain only the side and bottom support plates.
After being reduced to three support plates, the lower die’s torsional resistance decreases. To prevent deformation, the side support plates were bent at a 150° angle, as shown in Figure 13.
This design not only prevents the main support plate from tilting forward or backward but also restricts movement in the lateral direction, effectively serving part of the function of the upper support plate.
> End and Thickness Optimization
The initial design had the R280mm arc extending all the way to the steel bars at both ends, but this would reduce the V-groove wall thickness.
Therefore, the ends of the arc were modified to straight lines with a 70° angle, which both enhances the lower die strength and avoids interference with the sheet metal during bending.
Additionally, the thickness of all support plates was increased from the original 10mm to 16mm to accommodate the increased V-groove width.
Revise the upper die width
After selecting the center distance of the V-groove steel bars in the lower die as 500mm, the upper die width can be adjusted to 500-2×(25+10+5) = 420mm.
Pre-bending phenomenon
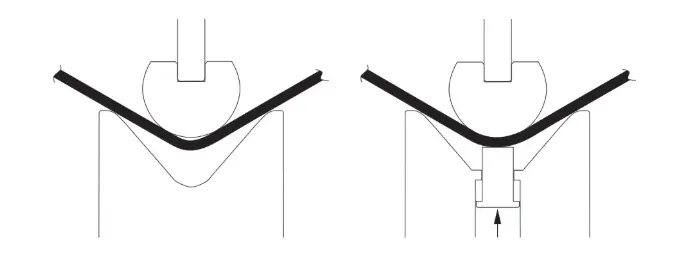
The pre-bending phenomenon refers to the situation where the sheet material leaves the tip of the upper die R ahead of time during bending, resulting in a gap, as shown in Figure 14.
This part of R does not match the expected R and is irregular, so this phenomenon needs to be eliminated or reduced.
The leading phenomenon was observed during testing with a radius of 190mm, but its impact on the product was minimal and could be ignored.
However, it became more pronounced during the production of a 290mm radius die, necessitating countermeasures.
> Conventional Countermeasure and Its Limitations
The conventional method to eliminate the leading phenomenon involves installing a pusher rod and spring inside the lower die to force the sheet material to maintain contact with the upper die throughout the bending process, thereby eliminating the leading phenomenon.
However, this method has two drawbacks: first, the lower die structure becomes more complex; second, installing springs reduces the bending machine’s pressure tonnage, posing a risk of incomplete bending.
> Experimental Adjustments to the Upper Die
Given that the product does not have high precision requirements for the radius R, it was decided to attempt to reduce this leading phenomenon by altering the shape of the upper die.
Three attempts were made. The first used the calculated R240mm for testing, resulting in a leading phenomenon with severe bulging in the middle section;
The second attempt modified the R240mm into an elliptical shape, reducing the R at the center and increasing the R on both sides.
This time, the results were the opposite of the first attempt, with the middle section slightly improved but the R on both sides deviating significantly, failing to meet requirements;
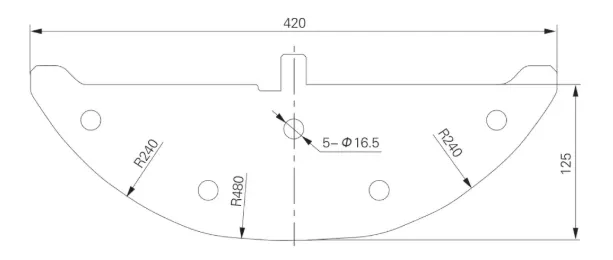
The third attempt learned from the previous two attempts, only increasing the R of the section where the leading phenomenon occurred to R480mm. This time, a satisfactory result was achieved, as shown in Figure 15.
Integrated Upper Die and Tool Holder Design to Overcome Height Limitations
Installing the tool holder is also a challenge, as the opening height of the bending machine imposes restrictions.
If a separate tool holder is continued to be used, the thickness of the upper die must be reduced, which would compromise the strength of the upper die.
To address this issue, an integrated design combining the upper die and tool holder was adopted. Over 70 pieces of 10mm-thick sheet metal were cut using a laser cutting machine, stacked together to form a single 750mm-long integrated upper die.
The five holes in Figure 15 are used for clamping during plate stacking. Due to the thickness limitation of the upper die, the distal end of the upper die almost becomes a sharp corner.
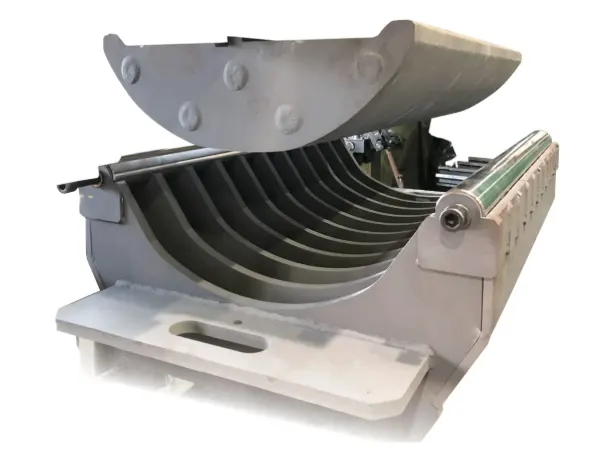
Therefore, the upper part of the distal end was thickened to eliminate the sharp corner. The confirmation drawing of the R290mm bending die set is shown in Figure 16.
R290mm Bending Die Effect Confirmation
The actual production scene is shown in Figure 17. After bending the plate, it is confirmed with a card board.
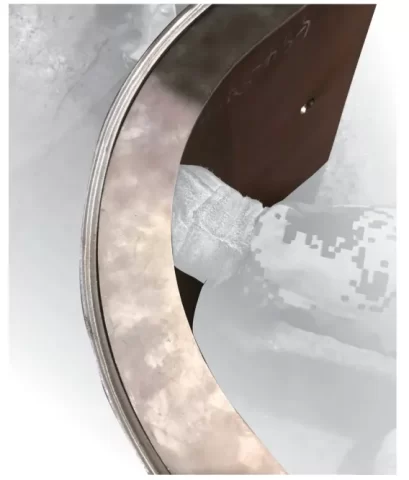
The front part is slightly overcompensated, resulting in a maximum gap of about 1 mm on both sides, as shown in Figure 18.
However, this gap is within the allowable range and is deemed acceptable. The actual product photo is shown in Figure 19.
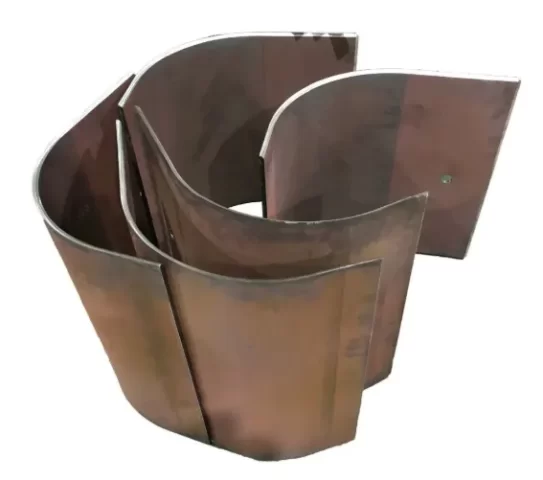
Thus, the development of both large-radius bending dies has been successful, fully leveraging the potential of this bending machine.
Summary
⑴ The bending machine is convenient, flexible, and efficient, and remains the preferred equipment for forming medium-to-thick plates.
⑵ For products with low precision requirements, air bending should be prioritized to reduce demands on equipment and dies.
⑶ When designing lightweight lower dies, consider their deformation trends under working loads to avoid structural instability.
⑷ The leading phenomenon can be mitigated by altering the shape of the upper die.
⑸ Fully leveraging the potential of the bending machine can significantly reduce die costs and subsequent production expenses.
Conclusion
After these two sets of dies were delivered to the workshop, they not only reduced processing time but also proved more convenient and time-saving than forming with a hydraulic press during actual production.
