China CNC Milling » Blog » Gradient Helical End Mills for High-Precision Titanium Alloy Machining
FAQ
What materials can you work with in CNC machining?
We work with a wide range of materials including aluminum, stainless steel, brass, copper, titanium, plastics (e.g., POM, ABS, PTFE), and specialty alloys. If you have specific material requirements, our team can advise the best option for your application.
What industries do you serve with your CNC machining services?
Our CNC machining services cater to a variety of industries including aerospace, automotive, medical, electronics, robotics, and industrial equipment manufacturing. We also support rapid prototyping and custom low-volume production.
What tolerances can you achieve with CNC machining?
We typically achieve tolerances of ±0.005 mm (±0.0002 inches) depending on the part geometry and material. For tighter tolerances, please provide detailed drawings or consult our engineering team.
What is your typical lead time for CNC machining projects?
Standard lead times range from 3 to 10 business days, depending on part complexity, quantity, and material availability. Expedited production is available upon request.
Can you provide custom CNC prototypes and low-volume production?
Can you provide custom CNC prototypes and low-volume production?
Hot Posts
To meet the lightweight requirements of aerospace components, engineers widely use titanium alloys in thin-walled structural parts. However, thin-walled structures have inherently low stiffness.
Their difficult-to-machine characteristics can lead to issues such as deformation and vibration during manufacturing.
This makes it challenging to ensure machining accuracy and surface quality. Under these circumstances, the design and manufacture of gradient spiral end mills hold significant importance.
In recent years, numerous scholars have achieved significant advancements in end mill research.
Lai Xuwei et al. focused on wear identification for end mills, proposing an explainable physics-driven spatial attention enhancement method.
This approach holds great significance for achieving precise monitoring of end mill wear conditions, ensuring cutting quality, and extending tool service life.
Zhang Funneng et al. provided theoretical support for improving the machining accuracy and surface quality of ball-nose end mills.
Their work laid the foundation for optimizing ball-nose milling technology and enhancing tool performance.
Shi Zhuang et al. established a theoretical basis for designing end mills and optimizing process parameters by predicting cutting forces during milling.
This work enhanced tool cutting efficiency and stability.
To address these needs, this paper focuses on gradient spiral end mills, exploring their design and fabrication.
The research aims to establish a foundation for the efficient, high-precision manufacturing of titanium alloy components.
Design of Gradient Helical End Mills
Solid Modeling of Gradient Helical End Mills
Three-dimensional modeling of gradient helical end mills serves as the foundational step in their design, necessitating precise representation of their geometric characteristics and parametric relationships.
Before modeling the end mill, engineers must define its key structural features.
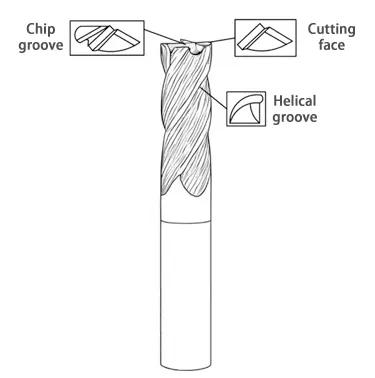
Figure 1 illustrates the structure of a gradient helical end mill.
› Overall Tool Structure and Functional Sections
We can divide the overall structure of a four-flute end mill into two main sections: the face section and the peripheral cutting edge section.
The face section comprises the rear face, front face, and end tooth chip flute; while the peripheral cutting edge comprises elements such as the helical flute, helical cutting edge, and relief groove.
These features directly reflect critical tool parameters, including the rake angle, helix angle, and edge inclination angle.
They play a crucial role in determining the tool’s cutting performance, durability, and the quality of the machined surface.
› Tool Parameter System and Geometric Constraints
During modeling, engineers must define a comprehensive tool parameter system, including the tool radius, core diameter, overall length, peripheral cutting edge rake angle, and clearance angle.
Collective constraints exist between parameters.
For instance, we can express the relationship between the spiral groove depth and the tool core diameter as follows:
.png)
In the formula: rw represents the tool core diameter, r represents the tool radius, and hc represents the helical groove depth.
These parameters directly affect tool rigidity and chip evacuation performance.
Unlike traditional constant helix angle designs, we divide the variable helix angle into two sections from the cutting edge to the tail: the tip helix angle and the tail helix angle.
We design these angles based on the following formula:
.png)
In the formula: β(z) represents the gradual helix angle, β1 represents the tip helix angle, β2 represents the tail helix angle, z represents the axial position coordinate, L1 represents the cutting edge length, and n represents the transition curve index.
This design achieves a smooth transition of the helix angle, effectively dispersing cutting vibrations and enhancing cutting stability.
During three-dimensional modeling, we adopted a parametric design approach.
We developed a tool design platform integrating multiple modeling software using Python, enabling parametric modeling and optimization capabilities.
Optimal Design of Tool Parameters and Milling Parameters
The parameter optimization of tapered spiral end mills requires consideration of multiple interrelated performance metrics, including milling force, milling temperature, and tool life.
Considering the machining characteristics of difficult-to-machine materials like titanium alloys, we established an optimization model with milling force and milling temperature as dual objectives.
We solved the model using NSGA-II algorithm operations.
Milling force influences both machining quality and tool life. Using experimental data fitting, we established the milling force objective function (F):
.png)
In the formula: γ₀ represents the front angle of the peripheral cutting edge.
This model reflects the combined influence of various parameters on milling forces.
Based on the Pareto optimal solution, we perform multi-objective optimization and define the following optimization criteria:
.png)
In the equation: x represents the design variable vector, and gi(x) denotes the constraint conditions.
Through iterative solution using genetic algorithms, the optimal parameter combination was ultimately obtained: helix angles β₁ = 35° and β₂ = 45°.
To determine the number of cutting teeth, we derive it from the relationship between the chip evacuation groove area and the cross-sectional area of the chip:
.png)
In the formula: Ac represents the cross-sectional area of the chip groove, ξ represents the chip deformation coefficient, and ap and aw represent chip parameters.
Research on Manufacturing Methods
Grinding Model and Tool Material Grinding Wheel Selection
To achieve the grinding of tapered spiral end mills on a five-axis tool grinding machine, accurate motion modeling is essential.
Based on this, we simulated the machining process using NumRoto grinding software and programmed it in 15 languages.
Building on this, we proposed a novel grinding method—the grinding approach.
Grinding wheel selection is a critical step in the grinding process. Based on the characteristics of variable-diameter spiral end mills, the following grinding wheels were selected:
The 1V1 disc-shaped grinding wheel is suitable for machining the chip pockets and gash angles of end teeth.
Its inclined angle design facilitates operations in confined spaces.
The 11V9 bowl-shaped grinding wheel enables precise rear face grinding and achieves superior machining results.
This grinding wheel combination optimizes both grinding efficiency and precision.
The tool material is GU25UF cemented carbide (Φ12h6×100 mm), featuring a hardness of HRA92.5 and a bending strength of 3,200 MPa.
Its high-temperature red hardness and wear resistance are crucial for ensuring tool longevity.
We can optimize grinding parameters based on the material removal rate, which we calculate using the following formula:
.png)
In the formula: Q represents material removal rate, vw represents grinding wheel linear speed, ae represents radial depth of cut, and vf represents feed rate.
By controlling these parameters, operators can achieve efficient grinding while minimizing damage.
Manufacturing of Gradient Helical Milling Cutters
On the five-axis UWIF tool grinding machine, a machining stroke of 530 mm × 320 mm × 400 mm and machining accuracy of 0.001 mm were achieved.
The machining process comprises two primary operations: peripheral feature grinding and end feature grinding.
Type 1A1 grinding wheels were used for finishing the outer cylindrical surfaces.
We achieve the gradual helix through the coordinated motion of the B-axis swing angle β and the Z-axis displacement.
This dynamic adjustment enables a smooth transition of the tool’s helix angle from 35 degrees at the root to 45 degrees at the tip.
Subsequently, the peripheral cutting edge’s rake face undergoes precision grinding using a 11V9 grinding wheel, with precise control over the wheel’s offset and tilt angle.
Grinding of end-face characteristics employs a 1V1 cup wheel as the spindle, utilizing a “swing-feed” combination to machine the chip pockets on end teeth.
Employing a “cut-swing” machining method, the relative motion between the grinding wheel and tool generates dual rake angles α’1=6° and α’2=12° during cutting.
This effectively enhances cutting strength and reduces vibration.
We prioritize quality inspection and control throughout production.
ZOLLER tool measuring instruments verify key tool performance metrics: thread angle deviation within 0.5°, rake angle deviation within 0.3°, and tool width deviation within 0.02 mm—all meeting design specifications.
Experimental Analysis
Experimental Preparation
The machining center model used for this experiment is the VDL-1000E.
This machine offers a wide adjustable speed range, with rotational speeds from 40 to 8,000 r/min.
It can accommodate the speed requirements of various machining processes, laying a solid foundation for the smooth progress of the experiment.
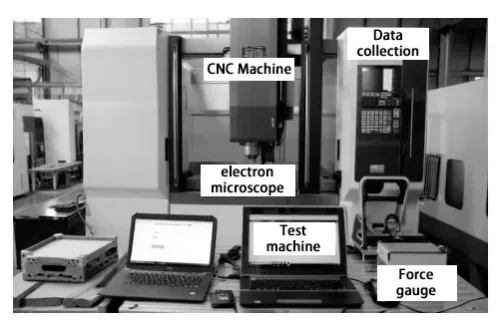
At the test site, equipment was scientifically and rationally configured according to specific requirements to comprehensively and accurately obtain various process parameters.
The test site is shown in Figure 2.

Building on this foundation, we perform instrument calibration and precision adjustment in experiments according to specific operational requirements.
Design outcomes are then validated under conditions that exclude external factors or interference.
Inspection of Helix Angle Accuracy for Gradient Helical End Mills
The magnitude and variation of the helix angle in tapered spiral end mills significantly impact cutting performance, chip evacuation efficiency, and workpiece quality.
During inspection, high-precision measurement equipment such as coordinate measuring machines (CMMs) or specialized helix angle gauges must be employed.
To accurately reflect helix angle variations, multiple measurement points should be selected along different axial directions of the tool.
During testing, environmental factors such as temperature and humidity must be strictly controlled to prevent interference with results.
Based on this, measured data is processed and analyzed according to relevant standards and design specifications to determine compliance with permissible tolerances.
Failure to meet helical angle requirements leads to uneven force distribution, increased tool vibration, and reduced workpiece surface roughness.
Thus, helical angle inspection is critical for ensuring tool performance.
Per technical standards, the helical angle deviation of tapered helical end mills must be controlled within ±1° across their entire length.
Compliance with this range indicates design meets specifications.
Conversely, deviations exceeding ±1° cause operational abnormalities during cutting, compromising workpiece machining and manufacturing quality.
Based on this criterion, inspection results for this metric are shown in Figure 3.
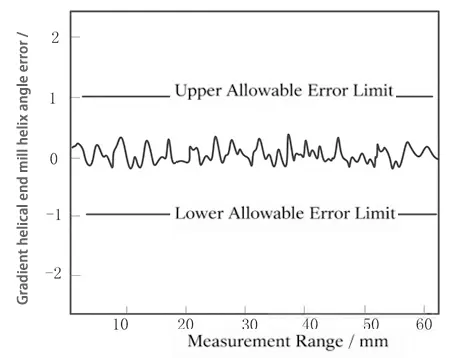
As shown in the results of Figure 3 above, the helical angle error of the tapered helical end mill across its entire length is <±1°, meeting quality acceptance requirements and achieving design specifications.
Surface Roughness Inspection of Cutting Tools
Surface roughness is a critical parameter for evaluating the precision of a cutting tool’s microstructure.
The quality of this metric directly impacts the tool’s cutting performance, wear resistance, and the surface finish of the workpiece.
To accurately measure surface irregularities, surface roughness testers are typically employed.
Surface quality testing is performed using the SRT220 tester.
This instrument is a high-precision inductive sensor with an evaluation length of 1 L to 5 L and a length of 3 L to 7 L (where L represents the sampling length).
The device displays and outputs test results via LCD, capable of showing up to 28 roughness parameters to meet testing requirements.
Excessively high tool surface roughness increases friction between the tool and workpiece, accelerating tool wear while causing defects like scratches and burrs on the workpiece surface.
This significantly impacts part machining accuracy and surface quality.
Based on finishing requirements demanding a Ra value ≤0.2 μm for cutting edges, the experimental results shown in Figure 4 were obtained.
As shown in Figure 4, the proposed method ensures the Ra value at the cutting edge is ≤0.2 μm.
The tester interface displays a value of 0.125 μm, meeting the requirement.

Conclusion
In recent years, the manufacturing industry has demonstrated robust development, achieving significant accomplishments in the production of main combat aircraft.
Among these, manufacturing technologies for aerospace structural components have garnered considerable attention within the industry.
However, ensuring standardized production of these components remains a core technical challenge.
To address this issue, this paper presents a design and manufacturing method for tapered helical end mills.
Practical testing has demonstrated that this approach effectively reduces surface roughness and enhances helix angle precision in real-world applications.
This method provides technical support for producing high-precision workpieces and contributes to advancing tool design.
