


In many cases, milling toolpaths still follow traditional approaches.
Failure to fully leverage the advantages of tool length results in redundant machining, where only the tool’s minimal height is utilized.
This increases the number of toolpaths and reduces machining efficiency.
In practical machining and teaching, the challenge lies in applying advanced machining techniques to produce qualified parts while ensuring students master CNC machining methods regardless of the software used.
This enables them to adapt more quickly to job roles and advance further in their technical careers.
With this question in mind, the author has conducted the following exploration.
Analysis of Dynamic Machining Parameters
How to optimize rough machining settings and enhance processing efficiency? This discussion focuses on dynamic machining.
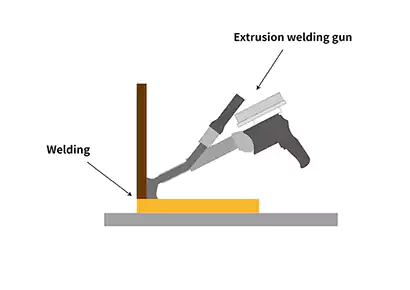
The dynamic milling process fully utilizes the effective length of the tool, typically achieving 1 to 2.8 times the tool diameter.
Taking Siemens tools as an example, the machining process involves near-full-depth cutting, as illustrated in Figure 1.

The final generated graphics are shown above, comprising 7 programs with a total machining time of approximately 15 minutes.
Considering machine tool variations, completion may take around 20 minutes.
This demonstrates a significant advantage over conventional machining methods.
This discussion focuses on dynamic milling and zone milling techniques.
1. The first is a 2D high-speed toolpath, primarily utilizing dynamic milling.
Toolpath type parameters are shown in Figure 2.

2. This operation uses MasterCAM X9 with the blank selected as the machining range and an open machining strategy.
This ensures the tool enters from the blank’s outer edge, with islands designated as collision avoidance zones.
Many modern machining systems offer similar approaches, such as CAXA Manufacturing Engineer and UG.
3. Tool parameters should follow specifications provided by the carbide tool manufacturer.
Using a 10 mm carbide end mill as an example, a linear speed of 160 is selected. Key cutting parameters are detailed in Figure 3.

The key cutting parameters here typically involve selecting climb milling in most cases.
Opting for bidirectional milling reduces tool idle paths and improves machining efficiency, though it also accelerates tool wear.
4. Feed lead-in can extend the tool path.
If machining from a blank, the computer will calculate this automatically;
It can be set to 0 here. You can select the lead-in position and length, and also set the first cut compensation.
5. Step size setting is critical.
For example, with 45 steel, the selected range should be within 25% of the tool diameter.
Optimal parameters should be determined through multiple trial cuts considering comprehensive factors. For aluminum machining, a larger value is permissible.
6. Minimum tool path radius.
This typically refers to the radius during tool entry and exit.
It should not be too small, generally within 20%, as excessive reduction may cause tool damage.
Allowable clearance and micro-lift parameters are set as default above.
For finishing operations, allowances must be configured. Since this is open-ended machining with tool entry on the workpiece’s outer side, the default approach method is used.
Within the common parameters, configure the machining depth for the initial cut.
Crucially, in many cases, “Incremental Coordinates” can select multiple planes at different heights for single-pass programming.
7. Pay attention to the “Arc Transition / Tolerance” settings.
Appropriate parameter values can significantly reduce program length.
For rough machining, larger values can be set. For finishing operations, set the total tolerance to 1/5 to 1/3 of the nominal tolerance to better ensure dimensional accuracy.
After program generation, review the toolpath. If sharp corners appear, increase the minimum arc radius to minimize tool damage caused by pauses and sudden acceleration during machining.
This completes the first finishing operation—dynamic milling.
Area Machining
Dynamic milling serves as roughing, while area machining is employed for finishing to generate conventional finishing toolpaths.
Copy the first dynamic milling program and paste it as the second program.
Then click Parameters, select Area under Toolpath Type, and leave other settings unchanged. As shown in Figure 4.

To reduce tool load, pay attention to the corner parameter settings.
Focus on ensuring the tool follows a rounded corner path at corners, with a tolerance greater than 0.
Since this is a finishing operation, both the wall edge and bottom surface allowances are set to 0, with other settings left at default.
For finishing, neither Z-layering nor cycloidal machining is required. Select the remaining stock, and perform the stock operations as shown in Figure 5.

Specify the operation: Select the first roughing path just completed; leave other settings at default.
Note the feed method. In Common Parameters, choose HST lead-in with the following settings.
The cut-in length need not be excessive—typically 2 mm suffices. For 2D machining, first perform roughing using dynamic milling.
When finishing according to customer requirements, use traditional rest machining for semi-finishing or finishing.
Alternatively, dynamic milling’s rest machining mode can be employed, prioritizing toolpath requirements.
Lessons Learned from Machining Practice
In dynamic machining, maximizing tool life and efficiency involves utilizing the tool’s full cutting depth, optimizing cutting width, and adjusting cutting speed.
This approach enhances both technical capabilities and economic benefits for many small workshops. Specific implementation methods include:
1. Cost-Effective Tool Holder and Cutter Selection for Rough Machining
For rough machining, use BT40-ER32-100 tool holders with ER32 spring collets, which offer greater cost-effectiveness.
Experiments show that standard domestic carbide tools can be used, though at slightly reduced speeds, yet still
remain economical.
2. Tool Selection Strategy for Efficient Roughing and Finishing
When selecting tools in the process, prioritize those slightly smaller than the minimum arc corner radius of the internal slot.
This facilitates completing all operations on a single surface with one tool.
Of course, for faster machining speeds, the approach of roughing with larger tools and finishing with smaller ones remains optimal.
Typically, 12mm or 10mm tools are used for roughing, making smaller tools more economical.
3. For roughing, prioritize dynamic milling.
MasterCAM’s X version offers comprehensive support. UG, CAXA, and similar software now provide comparable functions, though terminology may vary while underlying principles remain consistent.
4. Dynamic Milling Parameter Control for Tool Life Optimization
When employing dynamic milling, carefully manage corner radius and feed rate.
For steel, maintain feed rates below 30%; aluminum allows slightly higher rates, but generally do not exceed45%.
During testing, a 12 mm tungsten carbide tool with a width setting around 15%, depth set at 1.5 times the diameter, and a speed of approximately 1,500 rpm proved reliable, extending tool life.
5. Tolerance Selection and Program Length Optimization
Program length significantly correlates with tolerance ranges.
Therefore, select slightly larger tolerances when possible, provided they meet subsequent finishing requirements.
Generally, dynamic machining time per tool should be kept under 10 minutes.
6. Roughing and Finishing Allowance Selection Guidelines
When selecting roughing allowances, ensure bottom edges also have sufficient allowance for subsequent residual material machining.
To meet customer requirements, traditional residual material finishing methods are often used for finishing.
For flat surface finishing, ensure larger boundary allowances.
For example, if the original allowance was 0.1 mm, then the parameter for area machining should be set to a clearance greater than 0.1 mm.
7. Some standard CNC machines may have longer tool lift times.
In such cases, prioritize minimal or micro tool lifts in the path design, and increase the idle cutting speed during tool lift movement.
For higher-quality machines, appropriate tool lifts can be employed.
Compare results to determine which approach yields superior machining outcomes.
8. Tool Entry and Speed Control for Extended Tool Life
To extend tool life, reduce speed when the tool approaches the workpiece, especially during groove cutting.
Use helical or angled entry, carefully controlling initial height and angle. Simultaneously lower spindle speed and feed rate.
9. Corner Machining Strategy to Prevent Tool Damage
When navigating corners, prioritize circular tool paths over abrupt angular movements to prevent tool damage.
10. Best Practices for CNC Program Verification and Time Control
Develop sound programming habits. After generating the program, always verify for potential collisions and perform simulation machining.
Pay close attention to the machining time, documenting each run to facilitate future adjustments and achieve precise control over processing duration.
Conclusion
Through multiple experiments, the aforementioned machining methods were repeatedly employed in CNC competitions.
Additionally, during boundary contour machining, ensuring the outer shape machining better guarantees dimensional accuracy.
In regular teaching, students utilize CAXA or UG software for corresponding machining operations. Students at Quanzhou Senior Technical School employ solid modeling in CAXA to perform rough machining.
Under rough machining conditions, setting adaptive paths also generates dynamic machining.
Due to the substantial computational load of solid modeling, generation times may be extended.
Similar machining approaches are also available in newer versions of UG.
During 2D machining, dynamic machining is employed for roughing, followed by area-based flat machining, contour machining using the profile, and finally deburring edges with chamfering.
Employing large tools for roughing and small tools for finishing better ensures part dimensional accuracy and facilitates comprehensive learning transfer.