China CNC Milling » Blog » Design Standards for Latching Positions and Stop Grooves
FAQ
What materials can you work with in CNC machining?
We work with a wide range of materials including aluminum, stainless steel, brass, copper, titanium, plastics (e.g., POM, ABS, PTFE), and specialty alloys. If you have specific material requirements, our team can advise the best option for your application.
What industries do you serve with your CNC machining services?
Our CNC machining services cater to a variety of industries including aerospace, automotive, medical, electronics, robotics, and industrial equipment manufacturing. We also support rapid prototyping and custom low-volume production.
What tolerances can you achieve with CNC machining?
We typically achieve tolerances of ±0.005 mm (±0.0002 inches) depending on the part geometry and material. For tighter tolerances, please provide detailed drawings or consult our engineering team.
What is your typical lead time for CNC machining projects?
Standard lead times range from 3 to 10 business days, depending on part complexity, quantity, and material availability. Expedited production is available upon request.
Can you provide custom CNC prototypes and low-volume production?
Can you provide custom CNC prototypes and low-volume production?
Hot Posts
Designing effective latching positions, stop grooves, and snap-fit structures is essential for ensuring the structural integrity, assembly efficiency, and durability of plastic and rubber components.
Stop fits, snap fits, and flanges provide secure connections between parts, allowing components to interlock accurately while accommodating deformation during assembly and disassembly.
Proper dimensioning, material selection, and placement of stops, counter-stops, and snap fits not only enhance strength and functionality but also prevent deformation, interference, or damage during manufacturing and use.
Manufacturers consider these standards critical in consumer electronics, appliances, and other products that require precision assembly and reliable fastening.
Stop and Snap Fit Design Standards
Definition of Stop Fit
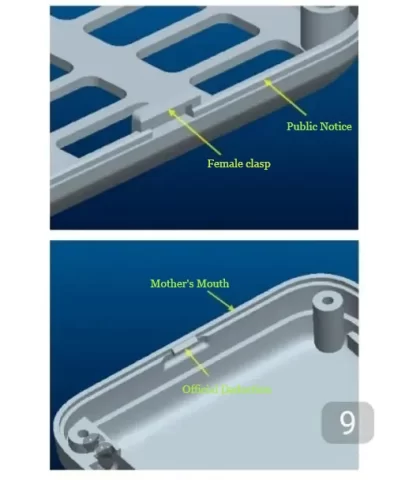
1. A stop fit, which locks the junction of the upper and lower shells, is also called a lip. Designers categorize it into male and female stop fits.
2. Designers typically form male stop fits by adding material along the inner edge of the plastic part.
3. Female stop fits are typically formed by removing material along the inner edge of the plastic part.
4. A snap-fit, also known as a latch, is a structure that enables two or more components to “snap” together through the interlocking of recessed shapes. Snap-fits simplify and expedite assembly.
Company products featuring snap-fit structures: Router series, Air purifier series, Portable charger series, and select power banks.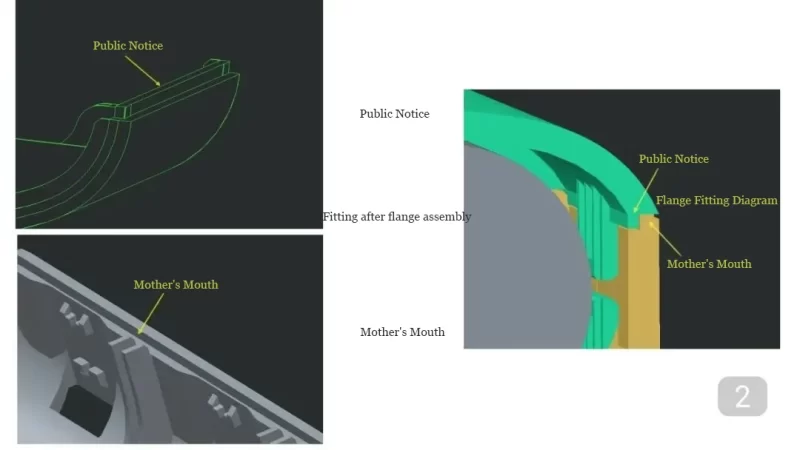
Flange Design Standards
Fundamental Principles of Flange Design:
1. Male flanges are typically formed on relatively thinner rubber components.
2. Designers generally form female flanges on relatively thicker rubber components to reduce or eliminate thick/thin marks.
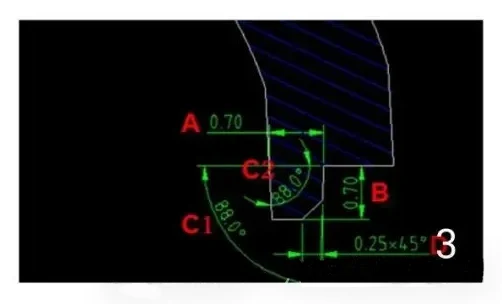
3. Designers specify the dimensions of male flanges as follows:
4. Dimension A represents the root width of the male flange, commonly ranging from 0.60 to 0.80 mm. Designers must ensure the minimum dimension.
5. Dimension B represents the height of the male stop, typically ranging from 0.60 to 0.80 mm.
6. The minimum width at the top after draft removal shall not be less than 0.50 mm.
7. Dimensions C1 and C2 denote the draft angles on both sides of the male stop, with 2-3 degrees being sufficient.
8. Dimension D indicates the chamfer size for ease of assembly, commonly set at 0.25-0.30 mm.
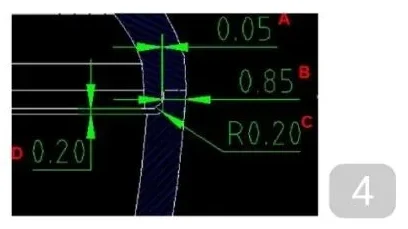
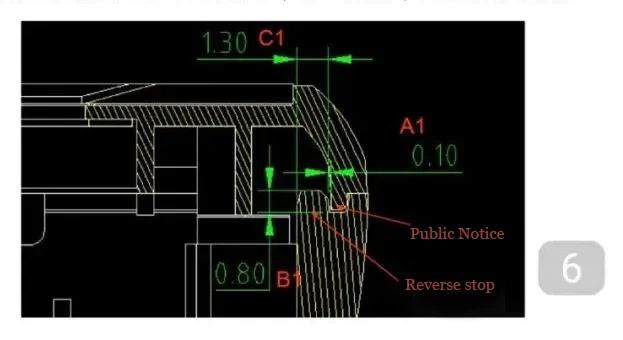
Dimensioning Notes for the Flange:
1. Dimension A represents the clearance between mating surfaces, set at 0.05mm.
2. Dimension B denotes the adhesive thickness on the shell’s outer surface, which must be ≥0.80mm.
3. Dimension C is the transition radius, primarily ensuring a smooth transition at adhesive position changes.
It should not be excessive to prevent assembly interference.
4. Dimension D is the longitudinal clearance dimension for the stop face, typically 0.10-0.20mm.
A value of 0.20mm is recommended to prevent assembly interference caused by dimensional deviations.
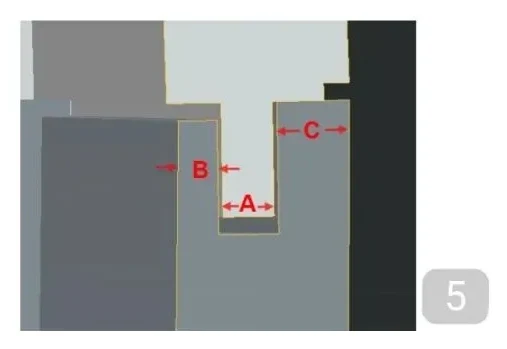
When the rubber thickness exceeds 2.4mm, the stopper type and dimensions are as follows:
1. Dimension A represents the width of the male stopper, typically set at approximately 0.6mm.
2. Dimension B denotes the width of the retaining wall on the female stopper edge; 0.40mm is optimal for molding.
3. Dimension C is the width of the female stopper’s external rib.
It should be set between 0.8-1.2mm based on the rubber part thickness to prevent thickness variation issues.
4. The mating surface should have a draft angle of approximately 1 degree.
5. The stopper height is generally around 2mm.
Stop and Counter-Stop Relationship:
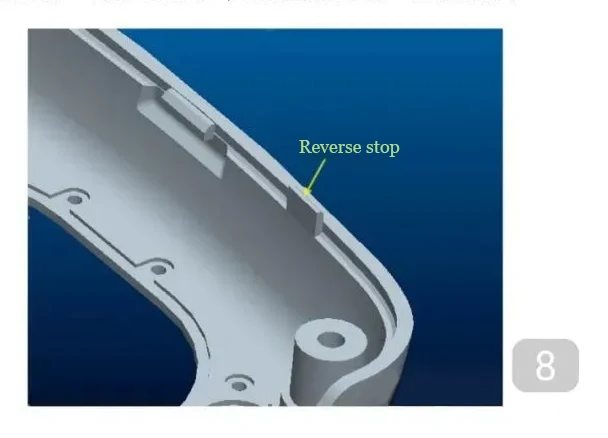
1. Stops and counter-stops are used in combination. The function of a counter-stop is opposite to that of a stop, as shown below: A counter-stop prevents the upper (lower) shell from deforming outward while also preventing the lower (upper) shell from collapsing inward.
2. Operators machine the reverse stop on the shell with the female stop.
3. When designing the reverse stop, ensure it is positioned at least 8.0mm (minimum 6.0mm) from one side of the male snap, as the snap position requires deformation.
Different Structures and Variations of Counter-Stop:
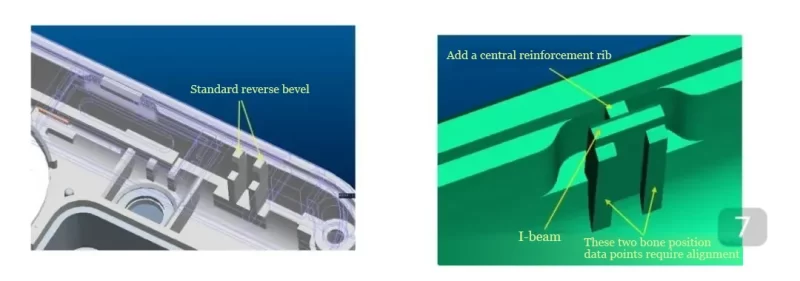
Standard Counter-Stop Form I
This counter-stop is the most commonly used. Designers must install it in pairs to ensure sufficient strength during structural design.
Reverse Stop Form II (I-Beam)
1. The I-beam reverse stop is a common construction method, primarily used when the PCB is too close to the housing to allow space for a standard reverse stop.
2. Key advantages: This reverse stop offers high strength without requiring the cutting of a male stop on the other housing.
Reverse Stop Form Three
1. This bone position evolved from the I-beam bone and is primarily used when the PCB is too close to the shell, leaving insufficient space for a standard reverse stop.
2. Disadvantages: Requires cutting the male stop on the other shell while ensuring adequate adhesive thickness on that shell.
Snap Fit Design Standards
1. Fundamental Principles of Snap Fit Design
2. Snap fits must possess sufficient strength to prevent damage during assembly.
3. Snap clearance (fit tolerance) must be adequate to ensure effective engagement.
4. Snap fits must allow for deformation during disassembly.
5. Designers should evenly distribute snap fits across the entire assembly.
6. Adding snap fits reinforces areas of the plastic housing with weaker structural integrity.
7. Designers categorize interlocking positions as male and female and define their relationship to flanges as follows:
8. Standard placement method: Female interlocks are placed on the housing with male flanges, and similarly, male interlocks are placed on the housing with female flanges.
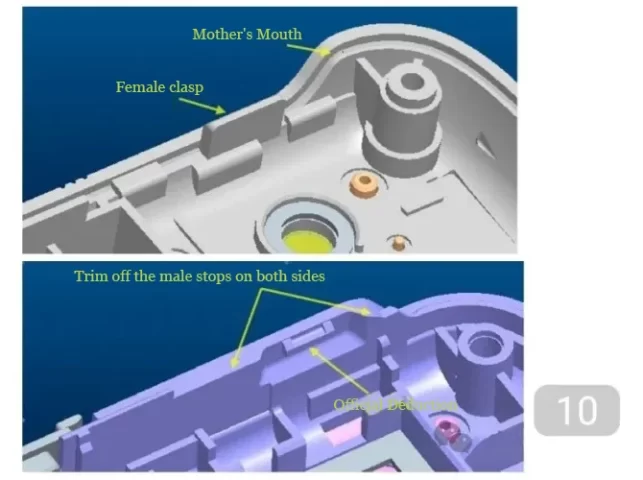
Reverse fastening: When designers position the female fastener fabric on the female stop edge side, they call it reverse fastening.
When performing reverse fastening, operators must trim at least 6 mm from one side of the male stop edge on both sides of the male fastener.
Otherwise, the fastening position cannot deform, rendering it ineffective and creating a dead fastener.
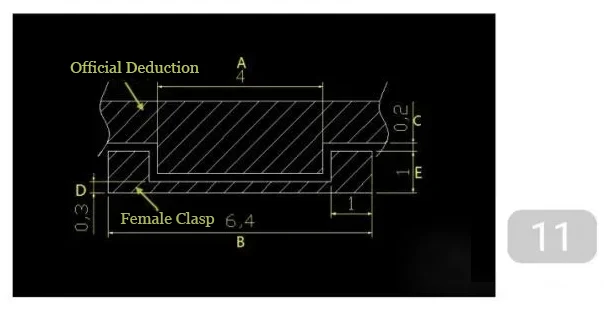
The lateral fit dimensions for the buckle position are as shown below:
1. Dimension A is the male buckle width (buckle position width), typically ranging from 2-6mm, with 4mm being commonly used.
2. Dimension B is the female buckle width, determined by the male buckle width plus clearance.
3. Dimension C is the surface clearance for the buckle position, 0.2mm.
4. Dimension D is the sealing adhesive thickness on the female snap surface: 0.3mm.
5. Dimension E is the female snap side pillar dimension, which must ensure strength and is typically 0.8-1.0mm.
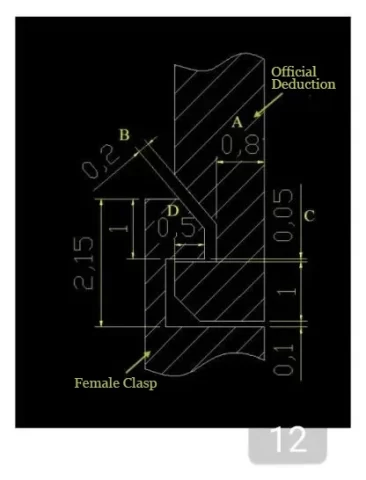
The longitudinal fit dimensions for snap positions are as shown below:
1. Dimension A represents the thinnest point thickness of the male snap.
If this is an exposed surface, maintain a minimum thickness of 0.8mm.
2. Dimension B denotes the clearance gap, typically no less than 0.2mm.
3. Dimension C indicates the snap-fit surface clearance of 0.05mm. Avoid excessive clearance to ensure proper snap function.
4. Dimension D represents the engagement amount (latch fit allowance).
Excessive dimensions make disassembly difficult, while insufficient dimensions render the latch ineffective.
It is recommended to maintain this dimension within the range of 0.35-0.6mm, with 0.5mm being the commonly used engagement dimension.
5. The thickness at the top of both male and female latches is generally set at 1.0mm, with a minimum requirement of 0.8mm.
Segmented Design for Buckle Components
1. The female buckle incorporates a central partition to create segments, enhancing its structural integrity and reducing damage during assembly/disassembly.
2. To complement the segmented female buckle, the male buckle also requires a central partition.
However, this compromises its strength, making it prone to damage during assembly/disassembly.
Mold Cavity Flash Removal Design
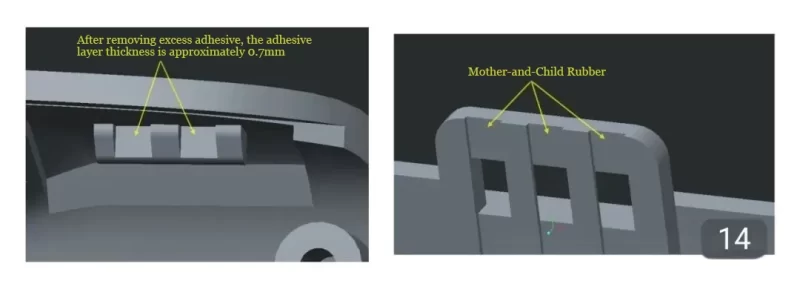
1. The primary purpose of flash removal is to prevent excessive thickness at the flash location, which could cause shrinkage and affect appearance.
2. For male cavities, operators may remove flash as needed to avoid affecting appearance; however, they must ensure that the thinnest section after removal is not less than 0.7 mm.
3. For the rear section of female cavities, operators may adopt either a sealed configuration or partially remove flash.
Designers do not recommend completely penetrating the female cavity due to potential strength implications.
Distribution Requirements for Fastening Points
1. Designers must distribute fastening points symmetrically and evenly to ensure balanced force across all areas.
2. The distance between two fastening points should be set at approximately 30mm.
Operators must make adjustments if the distance is too large or too small.
Adhering to standardized design principles for stops, counter-stops, snap fits, and flanges ensures reliable assembly, optimal part performance, and longevity of products.
Correct dimensioning, appropriate material thickness, and strategic placement of fastening points reduce stress concentrations, prevent structural failure, and facilitate easy assembly and disassembly.
By following these design standards, engineers can achieve functional, aesthetically consistent, and durable components while minimizing production errors, improving manufacturability, and enhancing overall product quality.

