China CNC Milling » Blog » Compensation for Machining Errors in CNC Gear Hobbing Machines
FAQ
What materials can you work with in CNC machining?
We work with a wide range of materials including aluminum, stainless steel, brass, copper, titanium, plastics (e.g., POM, ABS, PTFE), and specialty alloys. If you have specific material requirements, our team can advise the best option for your application.
What industries do you serve with your CNC machining services?
Our CNC machining services cater to a variety of industries including aerospace, automotive, medical, electronics, robotics, and industrial equipment manufacturing. We also support rapid prototyping and custom low-volume production.
What tolerances can you achieve with CNC machining?
We typically achieve tolerances of ±0.005 mm (±0.0002 inches) depending on the part geometry and material. For tighter tolerances, please provide detailed drawings or consult our engineering team.
What is your typical lead time for CNC machining projects?
Standard lead times range from 3 to 10 business days, depending on part complexity, quantity, and material availability. Expedited production is available upon request.
Can you provide custom CNC prototypes and low-volume production?
Can you provide custom CNC prototypes and low-volume production?
Hot Posts
Error compensation is essential in CNC machine tools, where errors can be categorized by origin into internal and external types, and by characteristics into random, time-varying, and deterministic types.
Engineers must apply proper compensation methods to minimize these errors, especially accounting for the influence of reference errors on mechanical manufacturing.
Current error compensation methods encompass six categories: software, hardware, real-time, non-real-time, dynamic, and static.
Focusing on the currently predominant software error compensation approach, one must first identify error sources in gear hobbing machines.
Researchers should construct a spatial error mathematical model to analyze the error data.
The system generates motion correction commands to enhance machining accuracy.
Therefore, this paper investigates error control in gear hobbing machine processing using software compensation techniques, with CNC machining as the case study.
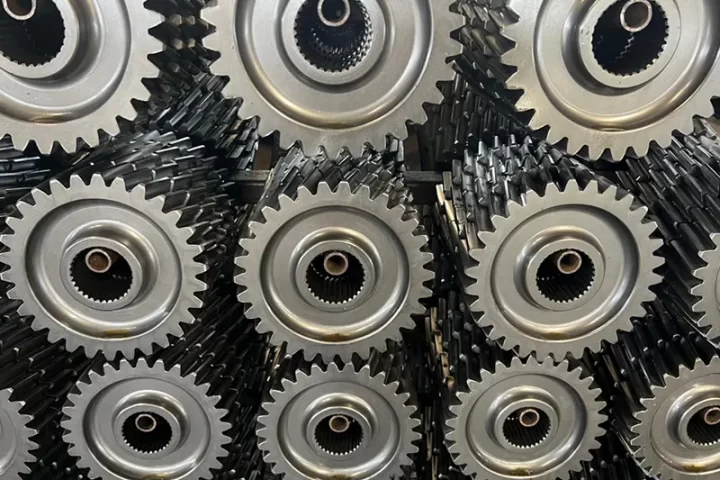
Measurement of Geometric Error Parameters
Engineers can employ the X-80 laser interferometer system to measure machining errors on CNC gear hobbing machines.
This system generates a stable laser beam and performs error measurements within an ambient temperature range of 0°C to 40°C.
The primary components consist of the independent XC-80 compensation unit system and the X-80 lightweight laser head.
The X-80 laser interferometer system has a laser frequency stability accuracy of ±0.06×10⁻⁶ over one year and ±0.02×10⁻⁶ within one hour.
This accuracy allows it to meet the requirements for error measurement.
Researchers conducted error data statistics for the X-axis, Y-axis, and Z-axis movements of the machine tool spindle.
Table 1 summarizes the measured X-axis errors, and researchers effectively collected triaxial errors at various positions.

Identification of Geometric Error Parameters
After completing geometric error parameter measurements, it is necessary to select an appropriate parameter identification method.
Four common geometric error identification methods based on laser interferometers exist for gear hobbing machines.
These are the nine-line, twelve-line, fourteen-line, and twenty-two-line geometric error parameter identification methods.
After comparing these methods, this paper applies the nine-line geometric error parameter identification method.
Second, when applying the nine-line method, comprehensive error calculations are required.
Researchers base these calculations on the three single-motion displacement line measurement data sets of each motion axis.
We should note that abandoning simultaneous measurements results in simpler and more efficient overall measurement lines.
Additionally, this method avoids introducing error values, ensuring that the identification model remains standardized.
Finally, by integrating the nine-line method identification model, one can identify the motion errors in the X, Y, and Z directions of the machine tool spindle.
This process yields 18 geometric error parameters, with six for each of the X, Y, and Z directions.
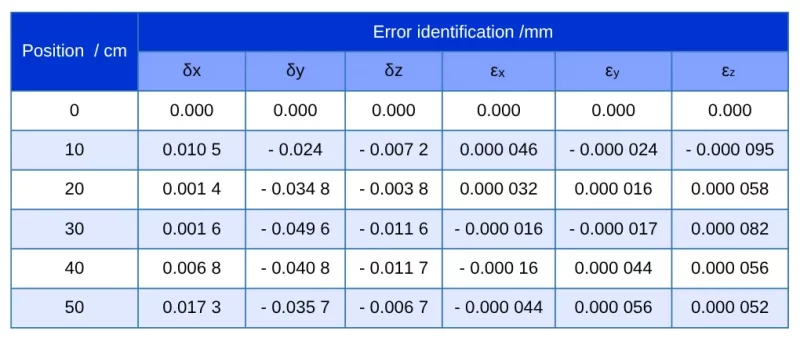
Researchers examined the error parameters for the X-axis and referenced the partial identification results in Table 2, where:
δxrepresents the X-axis position error;
δydenotes the X-axis straightness error in the Y-axis direction;
δz represents the straightness error of the X-axis in the Y-axis direction;
εxdenotes the roll angle error of the X-axis;
εyindicates the yaw angle error of the X-axis;
εzsignifies the pitch angle error of the X-axis.
This enables the identification of triaxial errors at various positions, providing a foundation for analyzing the CNC system and implementing error compensation.
Geometric Error Parameter Compensation
Hardware System of the CNC Gear Hobbing Machine
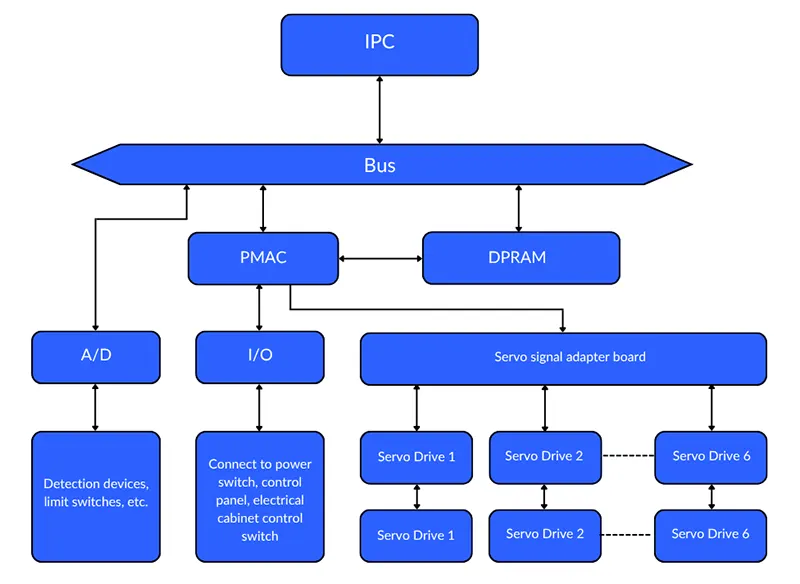
Engineers can enhance the hardware of the CNC system by adding a geometric error compensation module, given the functional expansion and system upgrade capabilities of CNC gear hobbing machines.
The improved CNC system hardware framework is illustrated in Figure 1.
Figure 1 shows that the PAMC motion control card primarily supports the geometric error compensation calculations.
Below is an overview of the control card’s functions:
First, as a multi-axis motion controller, its core functions include discrete control, motion control, and host interaction.
Second, the motion control card possesses robust capabilities for detecting and collecting speed, position, and other information from each axis of the equipment.
It achieves high actual calculation speed and precision, and with superior performance metrics in bandwidth and resolution, its overall capabilities surpass those of conventional controllers.
Third, as an independent processor chip, the card features an open architecture.
Based on its characteristics, it also provides significant flexibility for system integration and end users, offering the hardware foundation for geometric error parameter compensation.
Software System of the Gear Hobbing Machine CNC System
In this paper, we conduct software analysis of the CNC system for the PMAC card, combined with the studied error compensation process.
Its software fundamentally consists of commands, variables, and programs. Specifically:
First, the program allows the PMAC to store multiple programs that execute across multiple standards and single coordinates.
These programs possess functions such as data transmission, parameter optimization, and input/output.
Second, regarding variables, four types—I, P, Q, and M—are defined.
Each variable consists of its own letter combined with a number ranging from 0 to 8191.
Taking the I variable as an example, it primarily handles the initialization and configuration of the entire board, including each axis and coordinate.
Third, the system mainly divides commands into buffer commands and online commands.
Online commands are more commonly used in the system, enabling improvements to corresponding CNC actions after command execution.
Generally, engineers categorize online commands into definition commands, global commands, motor definition commands, and coordinate system commands.
Practical Error Compensation Using PMAC Position Compensation Functionality
For PMAC motion control cards, gap compensation and pitch compensation functions are available, with compensation executed within the servo loop, resulting in high compensation accuracy.
Specifically:
First, position compensation. As a motor position compensation function, PMAC can store 32 compensation tables, with each motor having its corresponding table.
In application, engineers can add the correction table to the motor after analyzing the source data to complete motor control.
Second, command correction.
When PMAC obtains the source motor’s position, it performs position matching within the corresponding table.
Typically, this position falls between two entries in the table, facilitating linear interpolation operations to correct the current servo loop.
Third, practical verification.
Based on machining data from CNC gear hobbing machines, applying PMAC’s position compensation enables error compensation for complex motor backlash.
Error compensation effectively enhances product precision compared to previous workpiece machining accuracy.
Conclusion
In the manufacturing of gear-cutting workpieces, actively reducing CNC production errors can effectively ensure workpiece quality.
Specifically, researchers successively applied laser interferometers and the nine-line identification method to acquire and identify error parameters for gear hobbing machines.
Based on the position compensation upgrade requirements of CNC gear hobbing machines, researchers proposed a system using the PMAC multi-axis motion control card:
The hardware framework was designed, while the software system of the gear hobbing machine’s CNC system was analyzed from the perspectives of commands, variables, and programs.
Engineers implemented error compensation practices based on the PMAC position compensation function.
Following position compensation and command correction, the CNC gear hobbing machine can enhance machining efficiency and precision, thereby promoting the development of manufacturing enterprises.
