China CNC Milling » Blog » CNC Milling Technology for Multi-Protrusion Ring Grooves on Split Receiver
FAQ
What materials can you work with in CNC machining?
We work with a wide range of materials including aluminum, stainless steel, brass, copper, titanium, plastics (e.g., POM, ABS, PTFE), and specialty alloys. If you have specific material requirements, our team can advise the best option for your application.
What industries do you serve with your CNC machining services?
Our CNC machining services cater to a variety of industries including aerospace, automotive, medical, electronics, robotics, and industrial equipment manufacturing. We also support rapid prototyping and custom low-volume production.
What tolerances can you achieve with CNC machining?
We typically achieve tolerances of ±0.005 mm (±0.0002 inches) depending on the part geometry and material. For tighter tolerances, please provide detailed drawings or consult our engineering team.
What is your typical lead time for CNC machining projects?
Standard lead times range from 3 to 10 business days, depending on part complexity, quantity, and material availability. Expedited production is available upon request.
Can you provide custom CNC prototypes and low-volume production?
Can you provide custom CNC prototypes and low-volume production?
Hot Posts
The split receiver is a critical load-bearing component of large aircraft engines, subjected to aerodynamic loads, inertial forces, and thermal loads caused by temperature differences during engine operation.
The materials used for the split receiver are primarily difficult-to-machine materials such as titanium alloys, stainless steel, and high-temperature alloys. Its structure consists of two half-rings, which are connected into a complete ring during use via bolts and locating pins along the longitudinal installation edges.
After being assembled into a complete ring, the front and rear mounting edges of the engine casing have stringent requirements for roundness, positional accuracy of the hole system, and positional accuracy of the mounting surface.
Due to the complex shape and structure, difficult-to-machine materials, thin-walled weak rigidity, and high material removal rate inherent in aviation engine casings, their production processes face challenges such as lengthy process flows, low machining efficiency, and significant deformation errors.
Additionally, the casing requires extensive process transfers and repeated clamping during machining. Low adaptability of process parameters reduces production efficiency, while machining deformation caused by residual stress and cutting forces also adversely affects the quality of the casing.
Analysis of Machining Challenges
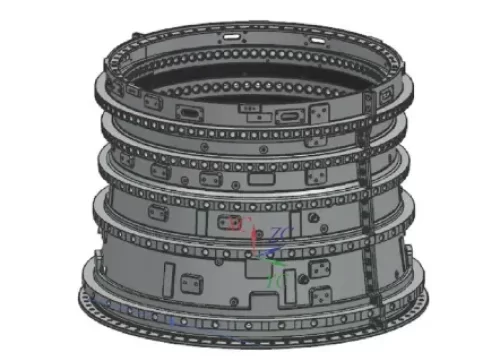
The split receiver model of a certain engine type is shown in Figure 1.

After analysis, the processing challenges of the split crankcase primarily manifest in the following aspects.
1) The design tolerance of the engine casing is small, and there are many requirements for mutual position.
After the split engine receiver is assembled into a complete ring, the roundness and coaxiality tolerances of the front and rear installation edges are small. Due to the use of a split structure, repeated disassembly and reassembly during processing make it difficult to ensure consistency between the two halves of the engine casing, leading to stress release deformation and causing deviations in roundness and position.
2) The outer surface features are numerous and the shape is complex.
The outer surface of the split receiver has ring-shaped reinforcing ribs and longitudinal mounting edges, dividing the outer surface into multiple ring-shaped grooves. Within these grooves are various protrusions such as interlocking ring limit protrusions and probe protrusions. These protrusions are numerous, have small spacing, and are irregularly distributed.
3) Large material removal volume and difficult-to-machine material.
The raw material for the split receiver is typically a solid ring forged part. Due to the influence of the longitudinal mounting edges, all material within the ring grooves on the outer surface must be removed via CNC milling, resulting in a very large material removal volume.
Due to these challenges, the manufacturing process for the split receiver is highly complex.
The outer surface of the split receiver features ring-shaped grooves and numerous protruding structures. Its outer surface features can only be processed via CNC milling. However, the ring-shaped grooves on the outer surface of the casing require a large amount of material removal, the material is difficult to machine, and CNC milling efficiency is relatively low.
In the machining of split receivers, CNC milling accounts for over 50% of the total machining cycle.
The existing processing methods for split receivers have overly dispersed processes, unreasonable allocation of allowances between processes, excessive reliance on specialized fixtures and measuring tools, resulting in long processing cycles and low efficiency.
This paper proposes an efficient CNC milling processing method for split receivers, ensuring processing accuracy and improving efficiency from two aspects: the overall CNC milling process plan and efficient CNC milling toolpath planning.
This method has been successfully applied in the processing of a certain type of split engine receiver, reducing the processing cycle to two months and significantly improving processing efficiency.
Overall CNC Milling Process Plan
The split engine receiver adopts a split structure. To ensure good fit between the two halves of the casing and maintain design accuracy, the process is divided into three parts: rough machining, semi-finishing, and finishing.
Between the two processing stages, processes for stress relief heat treatment, correcting the end face reference, and correcting the longitudinal joint surface reference are arranged. CNC milling is divided into three steps: rough milling of the outer shape, finish milling of the outer shape, and finish milling of the protrusion plane.
(1) Rough milling of the outer shape
After the rough turning process, the outer shape surface of the housing is rough-milled to remove the large allowance from the annular groove on the outer surface of the housing, ensuring that internal stresses in the material are sufficiently released and significantly reducing deformation of the part after finishing.
During rough milling, a 1mm allowance is left on the end face of the boss, and a 0.5mm allowance is left on the sides of the boss, the bottom surface of the annular groove, and its sides.
After rough milling, the housing is split into two halves, and the mating surfaces are re-machined.
During rough milling of the outer shape, considering the machining allowance for the mating surfaces, the two halves of the housing are offset to ensure that after machining the mating surfaces, the housing can be reassembled into a complete ring with uniform and reasonable allowances.
(2) Finish milling the protrusion outer shape:
Fully machine the sides of the protrusion, the bottom and sides of the annular groove, and leave allowances for surfaces with high dimensional and positional accuracy requirements, such as the support platform plane of the linkage device and the end face of the protrusion.
(3) Precision milling of the end face of the boss and the support platform of the linkage device
Precision milling is the final machining process for forming the outer surface. The dimensions, positions, and surface roughness of all grooves, seats, and bosses on the outer surface are ensured by the precision milling process.
Efficient CNC Milling Method for Multi-Ribbed Annular Grooves
Due to the influence of the longitudinal installation edge height of the housing, the annular groove depth is large, and the housing diameter is also large, resulting in a significant amount of material removal during annular groove milling.
Since there are numerous ribs in the annular groove, the distances between the ribs and between the ribs and the annular groove sides are small, limiting the CNC tool diameter and feed path.
When selecting tools and milling paths, it is necessary to quickly remove material while effectively avoiding various protrusions, making CNC programming highly complex and labor-intensive.
This paper implements process improvement measures in aspects such as CNC tool and cutting parameter selection, optimized tool engagement methods, and cutting path planning to enhance rough milling efficiency.
CNC Tool Selection and Cutting Parameters
When rough milling, select tools with the largest possible diameter and process in the following order: large tools first, small tools later; wide areas first, narrow areas later.
When removing large allowances during roughing, select a 20mm diameter machine-mounted tool. This tool is a square shoulder milling cutter, suitable for deep cutting depths and high feed rate side-cutting milling.
When machining stainless steel materials, this tool can achieve a cutting depth of up to 8mm per layer and a feed rate of up to 500mm/min, resulting in high material removal efficiency.
The transition radius (R) at the base of the machine housing flange is 1.5mm. If a 3mm ball end mill is used directly for root clearance, the feed rate will be slow, and the tool will need to be passed 3–4 times, resulting in low processing efficiency. Therefore, first use a bar milling cutter with an R of 1.5mm to remove most of the remaining material at the base, then use a 3mm ball milling cutter for a single pass to clear the root, thereby improving machining efficiency.
Cutting Path Optimization
(1) Efficient rough machining of ring-shaped groove surfaces
In the depth direction of the ring-shaped groove, the tool path is reasonably divided into layers according to the height of the boss, and large-diameter tools are used as much as possible to remove the upper layer of material on the boss first.
By reasonably dividing the toolpath into layers, the machining area is reduced from large to small, prioritizing the machining of larger cutting areas. This facilitates the continuous and stable removal of large material volumes, reduces the number of programs, minimizes non-cutting movements, and decreases the number of tool entry/exit operations, thereby improving machining efficiency.
Along the circumferential direction of the annular groove, the groove should be divided into multiple machining zones based on the distance between the protrusion side and adjacent surfaces, as well as the tool diameter.
For protrusions with sufficient tool clearance, programming methods can be used to automatically avoid the protrusion during toolpath planning.
Zone-based milling and contour milling, as shown in Figure 2, allow flexible toolpath planning, simplifying programming while reducing program count and improving machining efficiency.

(2) High-efficiency precision machining of ring groove surfaces
To improve machining efficiency and surface quality, machining is performed in the order of “ring groove side surface → boss side surface → ring groove bottom surface.”
When machining the ring groove side surfaces of the engine casing, the surrounding side surfaces are treated as a single unit, using five-axis side-cutting milling with a spiral milling approach.
Compared to individually milling each surface in a back-and-forth motion, this method uses entirely down-cut tool paths, improving tool cutting conditions, reducing cutting forces, and minimizing tool vibration.
This toolpath requires only one feed-in/feed-out operation, saving feed-in/feed-out time; it also avoids tool changes between regions during regional milling, improving surface finish quality.
During the finishing of the ring groove bottom surface of the engine casing, due to the influence of the protrusions, the ring groove bottom surface must be divided into many regions, with programming required for each region. The method of milling by region involves cumbersome programming, frequent tool changes between regions, prolonged non-cutting machine tool movement time, and low tool path efficiency;
The machined surface has numerous tool changes, resulting in poor surface quality.
> Optimized Strategy for Bottom Surface with Protrusions
Optimizing the machining sequence, first perform precision milling of the protrusion’s outer shape, with the milling toolpath as shown in Figure 3;
Then, use an end mill to machine a certain range of the ring groove bottom surface at the base of the protrusion, performing precision machining on the protrusion’s outer contour and the adjacent ring groove bottom surface;
Finally, machine the remaining portions of the ring groove bottom surface of the housing. When the tool encounters the protrusion, lift the tool, pass over the protrusion from the top, and then re-engage the tool to continue milling.
Since the material around the protrusion has already been removed, the tool can be directly inserted.
By avoiding the protrusion in this manner, the cutting efficiency of the tool path is high, reducing the number of programs, minimizing non-cutting movements of the machine tool, and reducing indirect tool changes between milling areas.

Processing Case
This processing method was applied to verify the machining of a certain type of engine split housing. The engine casing has a maximum outer diameter of 600 mm and features 78 protrusions of various types.
The finished split engine receiver part is shown in Figure 4. The surface quality of the outer shape is excellent, and the dimensions and positional accuracy of all components meet the drawing specifications. Both machining efficiency and quality have been significantly improved.
Figure 4: Finished split engine receiver part
Conclusion
By planning the CNC milling process scheme for the split engine receiver, the processing sequence and allowances between processes were reasonably arranged, effectively ensuring processing accuracy.
The proposed methods for efficient rough milling of multi-boss ring grooves and efficient finishing of ring groove surfaces have improved CNC milling processing efficiency, reduced tool wear, and enhanced processing quality and stability.


