China CNC Milling » Blog » Bending Design for Precision Stamping Dies
FAQ
What materials can you work with in CNC machining?
We work with a wide range of materials including aluminum, stainless steel, brass, copper, titanium, plastics (e.g., POM, ABS, PTFE), and specialty alloys. If you have specific material requirements, our team can advise the best option for your application.
What industries do you serve with your CNC machining services?
Our CNC machining services cater to a variety of industries including aerospace, automotive, medical, electronics, robotics, and industrial equipment manufacturing. We also support rapid prototyping and custom low-volume production.
What tolerances can you achieve with CNC machining?
We typically achieve tolerances of ±0.005 mm (±0.0002 inches) depending on the part geometry and material. For tighter tolerances, please provide detailed drawings or consult our engineering team.
What is your typical lead time for CNC machining projects?
Standard lead times range from 3 to 10 business days, depending on part complexity, quantity, and material availability. Expedited production is available upon request.
Can you provide custom CNC prototypes and low-volume production?
Can you provide custom CNC prototypes and low-volume production?
Hot Posts
This paper focuses on the bending design of precision stamping dies.
It discusses bending design concepts, including process analysis and sequence arrangement.
It introduces bending process requirements, such as bending radius, straight edge length, and bending direction.
The paper also presents the standard structure of precision bending dies and various bending techniques.
It emphasizes the importance of reasonable design in ensuring part quality and reducing costs.
Preface
Engineers often call molds the “mother of machinery” and rely on them to ensure manufacturing precision.
Germany and Japan place a very high value on the role and significance of molds in industry and the economy.
With the increasing globalization of the world economy, production has become increasingly concentrated, making mass production capabilities increasingly important.
Molds are indispensable equipment for large-scale production.
Manufacturers increasingly apply precision stamping in modern parts production, giving it a prominent position.
Non-flat parts account for nearly 90% of metal products produced through stamping.
Manufacturers widely use bent metal components in mechanical manufacturing, vehicle production, aerospace, and electronics, underscoring their significant importance.
Curved design concept
Pre-design process analysis
Before design, it is necessary to understand and confirm the dimensional accuracy, geometric tolerances, surface quality requirements, structural shape, and material selection of the bent parts.
Communicate any requirements that exceed the process and actual needs to the customer promptly to reduce production risks and costs.
The bending sequence must be arranged reasonably
When bending, the principle of “outer before inner” should be followed.
Generally, we call the position closer to the unchanged section the inner side (see Figure 1).
The position farther from it is called the outer side.
In the figure, smaller numbers indicate the outer side, while larger numbers indicate the inner side.
Arranging the bending sequence as “outer before inner” lets you easily determine the starting position for each bend at the original position.
The bending design for the rear section of the workpiece should avoid overlapping with previously bent shapes.
This ensures that each process does not interfere with the others.
This also facilitates improvements to bending processes that do not meet requirements and facilitates subsequent maintenance.
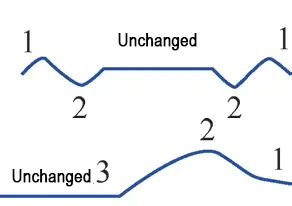
If the inner side is bent first and then the outer side, the bending position becomes uncertain due to many influencing factors.
Additionally, the processes interfere with each other, making subsequent judgment and repair difficult.
The shape and dimensions of bent parts must be completed on the mold
They cannot rely on subsequent mechanical or manual adjustments, otherwise it will be time-consuming and labor-intensive, and quality cannot be guaranteed.
Few other processes match the interchangeability of mold-made parts, especially for small precision parts.
Therefore, molds are the most reliable way to ensure stable and reliable manufacturing.
Bending process requirements
Bending radius
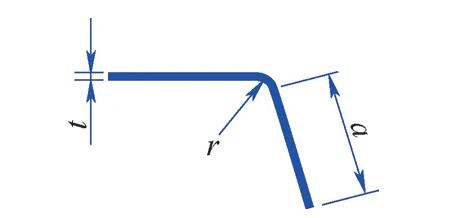
As shown in Figure 2, the bending radius refers to the inner diameter r of the bend.
Bending processes commonly use the relative bending radius r/t (the ratio of inner diameter to material thickness) as a metric.
For harder materials, manufacturers generally require r/t ≥ 1. A larger bending radius causes greater springback, making it difficult to control the actual angle.
Conversely, a smaller bending radius increases difficulty because the outer layer undergoes severe stretching and may crack.
The selection of the bending radius is the result of a comprehensive consideration of various factors and customer requirements.
Bending straight edge length
The minimum straight edge length for metal bending (see a in Figure 2) should be at least 2.5 times the material thickness, i.e., a ≥ 2.5t.
If the straight edge length is insufficient, significant springback causes distortion and deformation.
This makes it difficult to achieve the desired shape and dimensions.
If the straight edge length exceeds 2.5t, it has almost no effect on springback.
Bending direction
When bending metal, it is important to bend as perpendicular to the grain direction of the material as possible.
When the bending direction is parallel to the metal’s grain direction, cracks or fractures are likely to occur on the outer surface of the bent area.
This results in low strength and insufficient holding power.
Standard structure of precision bending dies
Metal bending has two designs: upward and downward.
Upward bending takes longer, has less springback, and is easier to maintain the angle.
The mold float value is not large, production is stable, and it is easy to improve production efficiency.
However, it requires a pre-set pressure mechanism, which has a complex structure.
Downward bending directly utilizes the unloading plate pressure, has a simple structure, and is easy to maintain.
The following mainly introduces downward bending.
Figure 3a shows the standard structure of the mold bending downward, and Figure 3b shows an enlarged view of its working position, with many design details.
When springback is significant in this corner bending structure, operators can reduce it by lowering the stamping machine’s lower dead point or raising the punch.
This reduces the vertical clearance between punch and die, or even applies slight overpressure to minimize springback.
Modifying the die to shift the punch to the left reduces the lateral clearance between punch and die.
This minimizes springback and helps meet the part’s forming angle requirements.
In Figure 3, a = 2.5t and R = t, where t is the material thickness (mm).
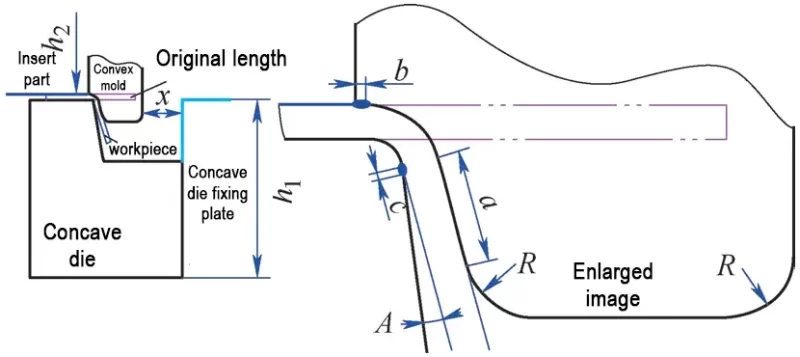
Before bending the material, the unloading insert pre-clamps the material, and then the punch begins to contact the material.
The insert clamps the material to prevent force displacement during bending, ensuring accurate and precise bending positions.
The die cavity width is slightly greater than the punch width, and the punch width is slightly greater than the workpiece width.
Designers position the die cavity along the inner surface of the workpiece, reserving a compensation angle A of 3° to 8°.
Except for the length of the protrusion section, the groove section of the die should leave a downward space x to accommodate the punch and the original length of the material.
The height h1 is flush with the die mounting plate.
The key is the compensation design of the arc edge C=0.1mm straight edge, which is crucial for the stability of the bending angle.
Designers position the punch along the outer surface of the workpiece with a wrap angle, where the wrap angle length b ranges from 0.1 to 0.2 mm.
The remaining length direction must ensure sufficient strength of the punch.
The effective height h2 = punch fixed plate height + unloading pad height + unloading plate height – material thickness + 0.05 mm.
Polish the curved corners of the punch and die, as well as the R- areas of the punch, to prevent damage to the workpiece surface during bending.
This helps maintain surface quality and preserves the mechanical properties of the bent areas.
Introduction to bending techniques
Two-step bending
To ensure the bending angle fully meets requirements during mold production, a common technique completes the process with two bends using a single bending angle.
During design, engineers first bend the material to about half the required angle, then bend it again to reach the final angle.
Taking a 90° angle as an example (see Figure 4), first bend 45°, then bend 90°.
At this point, the total bending angle is 45° + 90°. The two bends overlap significantly.
Engineers use the exposed portion D from the first bend to offset the springback angle.
By adjusting the mold, engineers modify the center distance d between the two bends to change D and meet different springback requirements.
When d increases, D increases, and the angle tilts inward; when d decreases, D decreases, and the angle tilts outward.
Since the second bend remains fixed at the blueprint position, engineers can only adjust the mold to change the position of the first bend.
This method addresses two issues.
First, when the bending angle exceeds 90°, a single bend is difficult to achieve.
Second, when the workpiece material has poor plasticity, a single bend may cause cracking.
This method ensures stable production but is more cumbersome to maintain.
It requires removing the die from the machine tool, disassembling it, and extracting the die core for maintenance.
One bend, one adjustment
First, bend the material to a slightly greater angle than the blueprint requires (including the springback angle).
Then, adjust the blueprint’s angle specifications in the opposite direction.
This method is called “positive bend, reverse adjustment.”
Because bending and adjustment both create internal stress that causes springback, the “positive-negative” approach offsets some springback during bending with springback during adjustment.
This reduces the overall springback risk.
In unavoidable situations, “positive bend and positive adjustment” (for structures exceeding 90°) must be used.
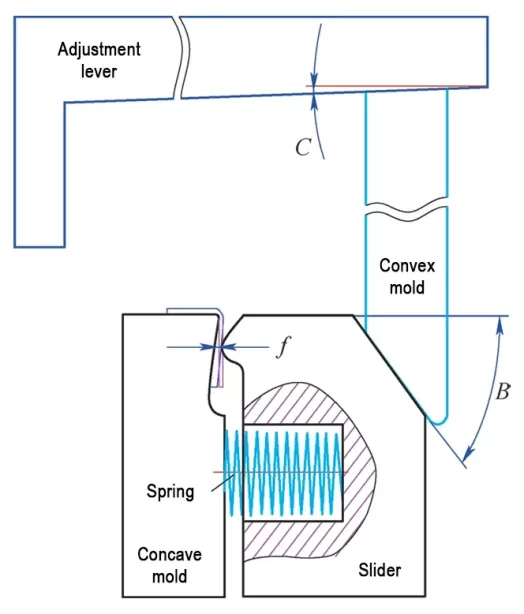
Figure 5 shows the structural design adjustment.
The concave die working area is designed similarly to the front concave die, with a compensation angle reserved, but it does not require a large groove area.
The slide block height is slightly lower than the concave die fixed plate to facilitate normal operation of the slide block.
During mold opening, the slide block is reset by a spring.
The design of the slide block impact position on the workpiece is critical.
If set too high, it becomes overly sensitive and may damage the workpiece.
If too low, the workpiece may curve, causing significant springback and requiring large adjustments.
Designers generally set the adjustable distance f to about 0.3 mm and the contact angle B between the slide block and punch to 45° to simplify calculating the travel distance.
The contact angle C between the adjustment rod and the punch is set at approximately 2° to 5° to meet bending precision requirements.
The adjustment rod features a bracket on its outer side, connected by bolts that control whether the rod moves in or out and lock it in place.
During closing, the slide block remains open under spring force, allowing the workpiece to enter.
As the upper die descends, the ejector insert clamps the workpiece’s die surface, and the punch presses the slide block against the workpiece.
During opening, the spring releases the slide block, and the workpiece moves with the material conveyor.
Improving the structure of bent components
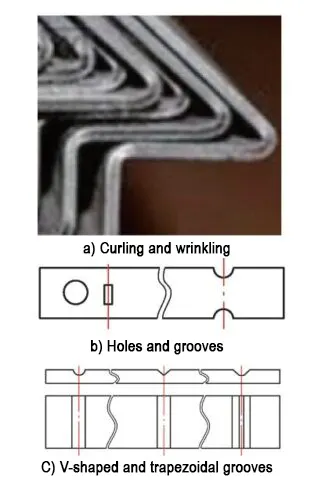
During bending, tensile forces stretch the outer layer material, causing it to crack lengthwise and contract inward widthwise.
Meanwhile, compressive forces squeeze the inner layer, leading to lengthwise wrinkling and outward expansion across the width (see Figure 6a).
When the bent component has high strength and large width and thickness, it is necessary to drill holes along the bending line or create inner grooves along its edges (see Figure 6b).
This design effectively reduces the material’s width, giving the inner layer compressed widthwise space to yield during bending and preventing cracking of the outer layer.
Alternatively, engineers can machine circular, V-shaped, or trapezoidal grooves on the inner layer along the bending line (see Figure 6c), with groove depths about one-third of the material thickness.
This design effectively reduces the material thickness, thereby lowering the risk of cracking during bending.
Both of these designs will reduce the mechanical properties of the bent section of the workpiece.
Before designing, engineers must carefully analyze the workpiece’s performance requirements.
They should communicate thoroughly with the customer and ensure functionality remains uncompromised before choosing either approach.
Conclusion
Because of its high production efficiency, low cost, dimensional stability, and good interchangeability, manufacturers have widely adopted precision stamping bending in industrial production.
Mold design, material properties, and operational techniques all influence the quality of precision stamping bending.
This requires in-depth research into its process characteristics and optimization methods.
An excellent mold engineer must abandon traditional workshop-based thinking before design.
They should develop proper stamping mold design concepts, thoroughly understand bending mold structures, master various bending techniques, conduct comprehensive process analysis, and avoid unstable mechanisms during bending.
These steps ensure part dimensional accuracy, surface quality, and ease of production assembly and maintenance.
Based on actual conditions, engineers should perform accurate, reasonable, and flexible bending design to ensure smooth production and timely improvements.
