China CNC Milling » Blog » Application of Coordinate Measuring Machines in Improving the Accuracy of Geometric Measurement of Mechanical Parts
FAQ
What materials can you work with in CNC machining?
We work with a wide range of materials including aluminum, stainless steel, brass, copper, titanium, plastics (e.g., POM, ABS, PTFE), and specialty alloys. If you have specific material requirements, our team can advise the best option for your application.
What industries do you serve with your CNC machining services?
Our CNC machining services cater to a variety of industries including aerospace, automotive, medical, electronics, robotics, and industrial equipment manufacturing. We also support rapid prototyping and custom low-volume production.
What tolerances can you achieve with CNC machining?
We typically achieve tolerances of ±0.005 mm (±0.0002 inches) depending on the part geometry and material. For tighter tolerances, please provide detailed drawings or consult our engineering team.
What is your typical lead time for CNC machining projects?
Standard lead times range from 3 to 10 business days, depending on part complexity, quantity, and material availability. Expedited production is available upon request.
Can you provide custom CNC prototypes and low-volume production?
Can you provide custom CNC prototypes and low-volume production?
Hot Posts
The geometric measurement accuracy of mechanical parts is a key factor in assessing product quality.
Among these devices, the coordinate measuring machine (CMM) stands out as a high-precision and high-efficiency inspection tool.
The mechanical manufacturing industry is increasingly adopting it.
A coordinate measuring machine (CMM) is an instrument that combines precision mechanical structures, optical systems, and advanced computer technology.
It is used to measure spatial coordinates accurately.
Its main features include high precision, high stability, high automation, and a wide measurement range.
Traditional methods measure the geometric dimensions of mechanical parts primarily using tools such as calipers and micrometers.
These tools, however, have certain limitations.
Compared to traditional inspection methods, CMMs do not require direct contact with the parts, thereby avoiding measurement errors caused by contact force.
They can more accurately obtain the geometric dimensions, shape, and position information of the parts.
Set the Parameters of the Coordinate Measuring Machine
In research focused on improving the measurement accuracy of mechanical parts, ensuring high precision for complex parts using a CMM is crucial.
To achieve this, it is necessary to select an appropriate coordinate measuring machine (CMM) and pre-set its key parameters according to its structural configuration.
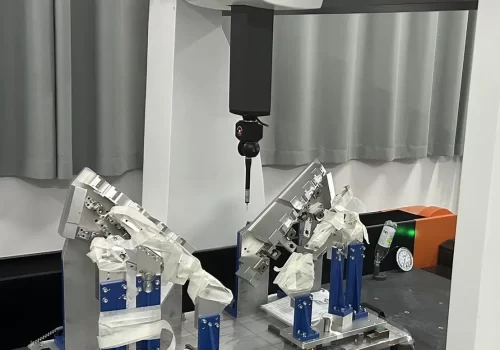
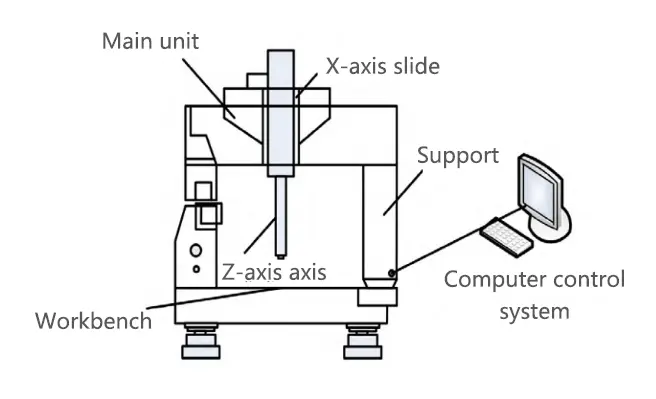
The basic components of a CMM are shown in Figure 1.
In Figure 1, the core components of the CMM include mechanical structures (such as the workbench, columns, and axes) and a computer control system.
The measurement principle uses the probe to move along three axes.
It measures the coordinate positions of the object in three-dimensional space.
This process determines the object’s shape and dimensions.
During operation, the control system directs the probe to scan the surface of the object.
It then transmits the scan results to the computer for processing.
Operators use CAD models to automatically plan measurement paths when setting CMM parameters, thereby reducing non-measurement time.
For complex surfaces, operators employ high-density scanning paths and set the scanning resolution to 0.001 mm to capture minute geometric features.
Operators select appropriate probes for different measured features of mechanical parts.
For example, when measuring precision grooves, use micro probes with a contact force set within the range of 0.5 to 2 N to balance probe stability.
Additionally, maintain the measurement room temperature at (20 ± 1)°C and control relative humidity between 45% and 65%.
During machine calibration, a laser interferometer is used to ensure the measuring machine’s geometric accuracy meets the ±(0.5+L/250) μm standard.
Probes are also calibrated, with their shape and dimensional accuracy verified using standard spheres.
During software parameter configuration and data analysis, operators set tolerances according to part drawing requirements.
They process the measurement data using algorithms, such as Gaussian filtering, to remove noise and enhance data reliability.
Establish the Coordinate System of the Part Under Test
Before measurement, operators establish a coordinate system corresponding to the workpiece.
This system serves as a reference for accurately describing and quantifying the specific positions of each point on the workpiece.
Operators first select three known, non-collinear points on the workpiece as reference points.
These points should have clear geometric features, such as the center of a hole or the corner of an edge. See Figure 2 for details.
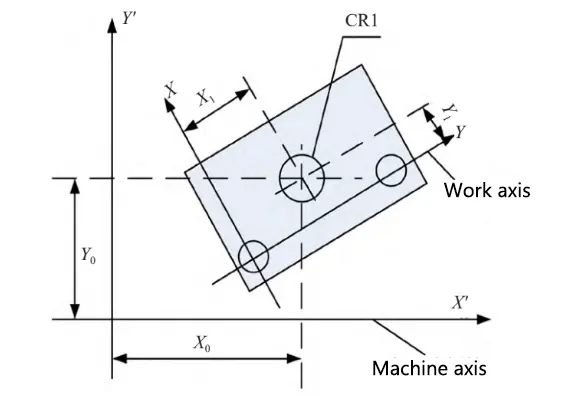
In Figure 2, select the center point of the center hole and the two corner points of the adjacent rectangle as reference points.
Use the probe head of the coordinate measuring machine to accurately detect these points and record their coordinate positions.
Next, operators use the least squares method in the measurement software to fit the reference plane based on the detected reference point coordinates.
They ensure that the fitting error remains within the specified range.
The specific sum of squared residuals is:
.jpg)
In the equation: S is the sum of squared residuals; a, b, and c are the parameters of the fitted plane; Xi, Yi, and Zi are the coordinates of the measurement points.
During the fitting process, operators calculate the distance from each reference point to the fitted plane.
They ensure that the root mean square (RMS) error of these distances stays within the specified tolerance range, with the RMS error ≤ 0.001 mm.
Operators must recheck the detection data or adjust the reference point selection if the error exceeds the specified range, repeating the process until they meet the accuracy requirements.
Select feature lines or points on the reference plane that are parallel or perpendicular to the expected axis to establish the X-axis and Y-axis.
To establish the X-axis, select a feature line parallel to the expected X-axis and located on the reference plane, or two points parallel to this axis.
Measure the coordinates of these two points, use linear interpolation to calculate the equation of the line, and determine the direction of the X-axis.
The specific equation is:
-1.jpg)
In the equation, (X1, Y1) and (X2, Y2) are the coordinates of the two points.
Similarly, establish another feature line or point on the Y-axis that is parallel to the expected Y-axis, and repeat the above steps.
After determining the X-axis and Y-axis, operators establish the origin’s position.
They do this by detecting specific points on the reference plane or by calculating the intersection points between reference points.
If the design specifies the origin’s position, operators directly detect that point.
When the design does not specify the origin, operators calculate its coordinates by solving the following system of equations:
-1.jpg)
In the formula: (X3, Y3) and (X4, Y4) are the coordinates of the two reference points established in the Y-axis direction.
Operators ensure that the Z-axis is perpendicular to the reference plane when establishing it.
If the part has a surface or line perpendicular to the reference plane, operators determine the Z-axis direction by measuring at least two points on that feature.
Operators measure multiple points on the reference plane and calculate the distances from these points to the fitted reference plane to ensure the Z-axis perpendicularity.
The specific calculation is as follows:
.jpg)
In the formula: Cw is the verticality error; Zi is the Z-coordinate of the measurement point; n is the number of measurement points; Zj is the Z-coordinate of the reference plane.
The verticality error must not exceed the specified tolerance value.
This ensures the Z-axis accuracy and maintains the overall precision of the coordinate system.
Verify the established coordinate system by inspecting known coordinate test points.
The actual measured coordinates of the test points should match the theoretical coordinates, with errors within the tolerance range.
Input or adjust the origin coordinates, X-axis, Y-axis, and Z-axis directions in the measurement software to ensure the parameters are correct.
Finally, save the established coordinate system in the measurement software for subsequent measurements.
Planning and Collection of Measurement Points
When using a coordinate measuring machine (CMM) to measure the geometric dimensions of mechanical parts, operators must first analyze the part’s geometric features.
These features include planes, cylinders, holes, and slots.
Inspectors determine the inspection elements based on the dimensional tolerances (ISO 1101-2017 standard) and the form and position tolerances specified in the drawings.
For continuous surfaces, scanning measurement is used; for discrete points, touch measurement is used.
Inspectors determine the measurement points based on the part’s complexity and the specified tolerance requirements.
Inspectors should uniformly distribute the measurement points to cover all important geometric features.
The steps for collecting measurement points are as follows:
(1) Calibrate the CMM using a standard sphere to control the system error to within ±2μm;
(2) Operators should use the CMM’s automatic positioning function to precisely position the measuring head at the pre-planned measurement points.
The head then contacts or scans these points while the system records the coordinate data.
(3) Perform multiple measurements on critical points and calculate the average value;
(4) Operators apply filtering to the collected data to remove outliers.
They then analyze measurement errors using the least squares method and evaluate part conformity based on the measurement data and specified tolerance requirements.
When testing the flatness of a part, select at least nine points distributed in a rectangular pattern for measurement.
Along the long side, operators determine two measurement points positioned at the 1/4 and 3/4 lengths.
Along the short side, they set two measurement points at the 1/4 and 3/4 positions of the short side.
Set one measurement point at each of the four corners, near the intersections of the rectangular diagonals.
Place the midpoint at the center of the rectangle to facilitate capturing deformation in the central planar region.
The spacing between points should not exceed 1/10 of the planar dimension to ensure sufficient measurement density.
Next, use a probe to perform point-by-point contact measurements.
Record the Z-coordinate value at each point and repeat the measurements multiple times to calculate the average value.
When testing the height of a cylindrical part, measure multiple points along both the circumferential and axial directions.
Divide the surface into 12 points, equally spaced at 30° intervals.
Measure one point each at the 1/3, 2/3, and midpoint positions along the cylinder height, totaling 3 points, to uniformly cover the axial direction.
In the circumferential direction, the probe should be perpendicular to the cylinder’s axis for measurement, recording the radial distance at each point.
Operators guide the probe along the cylinder’s axis in the axial direction, recording measurements at each predetermined height.
Compare the radial distance at each point on the circumference with the theoretical cylinder radius, and calculate the cylindricity error.
When measuring features such as holes and slots, choose three equally spaced points along the radial direction of the hole and four points along the circumferential direction.
This forms a 12-point measurement matrix.
Additionally, perform measurements at the center of the hole.
Measure once at each end and the midpoint of the slot length, and measure the slot depth at multiple points on the slot bottom.
Use a probe for point-by-point contact measurement and record the coordinate values of each point.
By comparing the measured values with the design dimensions, evaluate the dimensional and positional errors of the holes and slots.
Evaluate the Accuracy of Automatic Parts Inspection
Verticality
To assess part perpendicularity, use a coordinate measuring machine (CMM) to measure the angle between the part’s measured surface and the reference surface.
Then, calculate the angular deviation and determine whether the perpendicularity meets the required specifications.
The specific angle deviation is:
.jpg)
In the formula: Δθ is the perpendicularity deviation (°); A, B, and C are the three components of the normal vector of the reference plane (plane A); A’, B’, and C’ are the three components of the normal vector of the measured plane (plane B).
Compare the calculated perpendicularity deviation with the tolerance specified in the part drawing.
This determines whether the part meets the perpendicularity requirements.
Refer to Table 1 for detailed results.

Table 1 shows that the actual angles at all three measurement points are very close to the ideal 90° vertical state.
This indicates that the measured part maintains high-precision verticality, remaining well within the allowable angle deviation range of ±0.05°.
The measurement results at each point meet the part’s verticality requirements.
This not only demonstrates the high precision and reliability of the coordinate measuring machine (CMM) but also reflects the superior quality of the part’s manufacturing process.
Additionally, the results from the three measurement points show high consistency.
This indicates that the coordinate measuring machine maintains excellent repeatability and stability across multiple measurements.
Potential sources of error in actual measurement processes include system errors of the measuring instrument.
They also include wear of the probe head, changes in environmental temperature, and variations in the surface roughness of the part.
To minimize these errors, operators should calibrate the instrument before measurement.
Measurements should also be conducted in a temperature-controlled environment.
In summary, the data in Table 1 demonstrate the high precision and efficiency of the coordinate measuring machine in inspecting geometric dimensions.
They also show its effectiveness in controlling quality and maintaining precision during part processing.
Coaxiality
Coaxiality refers to the positional error between two axis lines, requiring that the two axis lines must either coincide or fall within a specified tolerance range.
In mechanical part inspection, the assessment of coaxiality typically involves measurements of holes, shafts, or similar features.
Specific assessment results are shown in Table 2.
As shown in Table 2, the coaxiality of mechanical parts was precisely measured using a coordinate measuring machine at three different measurement points.
The actual coaxiality errors ranged from 0.022 to 0.028 mm, all of which were less than the maximum allowable coaxiality deviation of ±0.06 mm.
This indicates that the parts maintain excellent coaxiality.
It meets the requirements for high-precision machining and confirms both the consistency and accuracy of the machining process.
Additionally, the high resolution demonstrated by the coordinate measuring machine provides a robust quantitative foundation for quality control processes.
The compact distribution of measurement data demonstrates the machining system’s stability and repeatability.
This stability is critical for maintaining strict consistency of coaxiality parameters during production.
In summary, applying coordinate measuring technology to coaxiality assessment ensures the machining quality of mechanical parts.
It enhances the precision of production processes and guarantees that products meet industry-specific precision standards and engineering specifications.

Flatness
Flatness is one of the key factors affecting the assembly accuracy of parts.
If a part’s flatness fails to meet the requirements, it can create excessive or insufficient gaps between assembled components.
This, in turn, negatively impacts the overall performance and stability of the equipment.
Additionally, flatness errors can cause uneven wear or stress concentration during part operation, thereby impacting the service life of the part.
Multiple measurement points must be selected on the part surface.
A coordinate measuring machine is used to measure the height at each selected point.
The flatness errors of each measurement point are compared with the specified tolerance range to assess whether the part’s flatness meets the requirements.
The specific assessment results are shown in Table 3.

As shown in Table 3, the flatness of the part is generally good, with all test point flatness errors falling within the allowable flatness deviation range (±3.0 μm).
Along the X-axis, from point 1 to point 3, as the X-coordinate increases, the Z-coordinate value also gradually increases, indicating a slight tilt in this direction.
However, the flatness errors are all within the tolerance range, indicating that the flatness control in this direction is appropriate.
Along the Y-axis direction, a comparison between point 1 and point 4 shows that as the Y-coordinate increases, the Z-coordinate value also rises.
However, the flatness error remains at 2.1 μm, indicating that the flatness along the Y-axis direction meets the required specifications.
Additionally, the Z-coordinate value at point 4 is the largest, reaching 0.016 mm, but its flatness error is the smallest at 1.9 μm.
This is either due to the actual surface quality of this point being better or random errors during the measurement process.
In summary, the flatness control of the measured part is relatively uniform, with no obvious local high or low points.
In subsequent production processes, manufacturers should maintain the current machining processes and inspection methods.
This ensures that the part’s flatness consistently remains within the allowable tolerance range.
Conclusion
This paper systematically investigates the application of coordinate measuring machines (CMMs) in the geometric measurement of mechanical parts.
Through an analysis of the inspection process, the study accurately evaluates the precision of automated part inspection.
The results indicate that CMMs significantly reduce systematic errors.
They also enhance the comprehensiveness of inspection data, which in turn improves the precision and reliability of measurements.
Future researchers can further refine the algorithms used in three-coordinate measurement technology.
They can also explore its potential applications for measuring complex surfaces and micro-features.
Additionally, integrating this technology with smart manufacturing systems can drive continuous progress and innovation in inspection technology within the mechanical manufacturing industry.
